> ## Documentation Index
> Fetch the complete documentation index at: https://spreecommerce.org/docs/llms.txt
> Use this file to discover all available pages before exploring further.
# Import & Export
> Learn how to bring products into your store from a spreadsheet, and take them out again, in Spree Commerce.
An import reads a CSV file into your store, creating the products that are new and updating the ones that already exist. An export writes your products out to a CSV file.
Together they are how you work on many products at once. Preparing a catalog in a spreadsheet is faster than filling in the product form a hundred times over, and exporting, editing and importing back is the quickest way to change a whole season's prices.
Two different CSV files are involved. An export lists your products as they are today, and can be edited and imported again to update them. The import template is an empty file carrying the column headings your store expects, for products you are adding for the first time. See [Import Template](/docs/user/products/import-template).
To import or export products, navigate to **Products** in the admin dashboard and use the **Import** and **Export** buttons above the list.
## How to Export Products
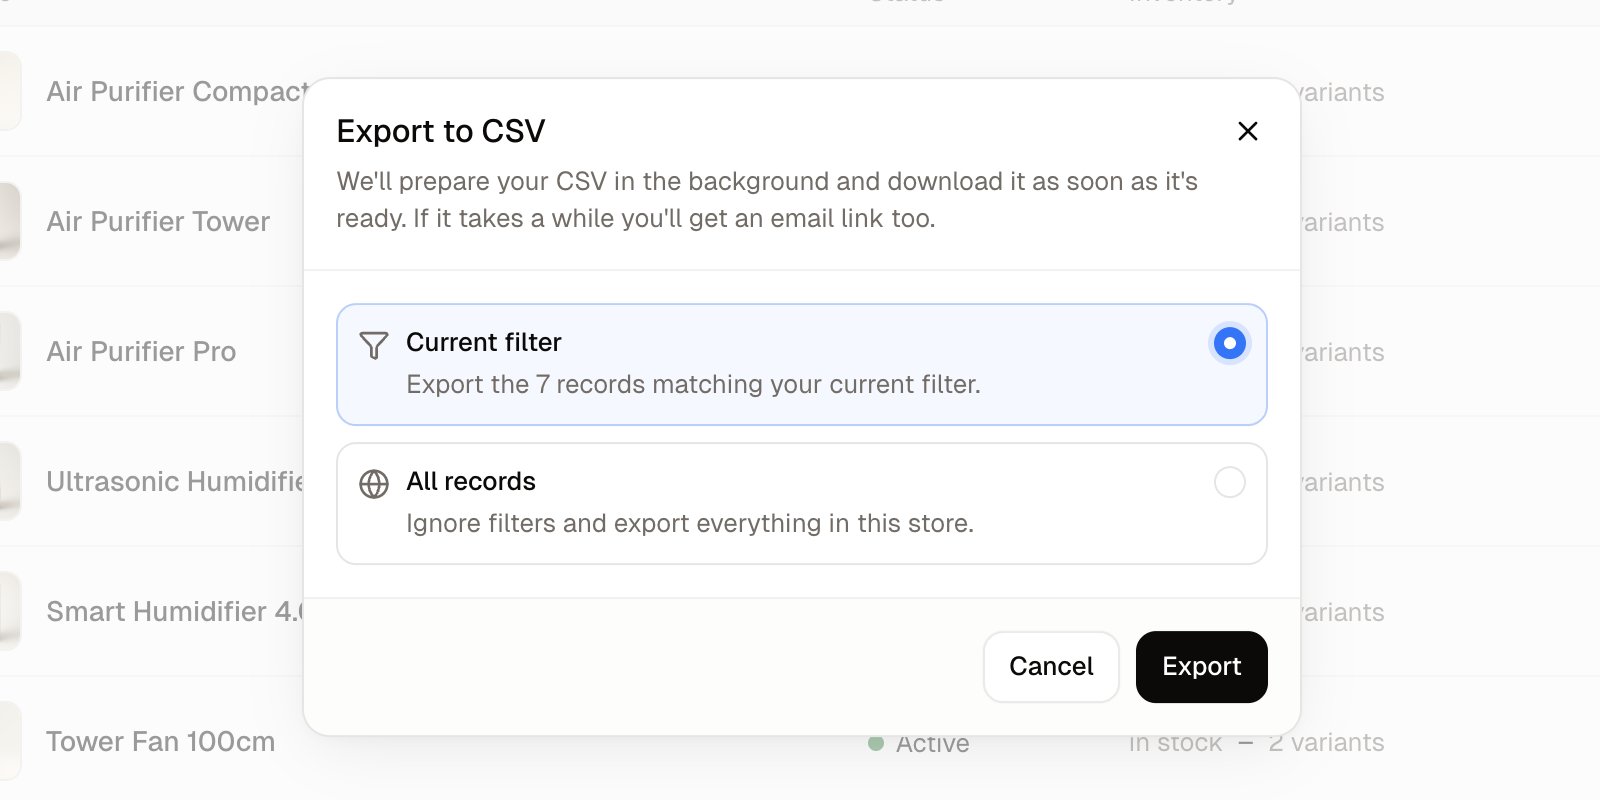
The export gives you two choices. **Current filter** exports only the products the list is showing right now, and tells you how many that is. **All records** ignores any search or filter and exports every product in your store.
Ticking products in the list does not narrow the export. To export a few products, search for them or use **Add filter** first, then export the **Current filter**.
1. Narrow the list with the search box or **Add filter** if you want only part of your catalog.
2. Click **Export**.
3. Choose **Current filter** or **All records**. With a filter set, **Current filter** names how many products it will export.
4. Click **Export**. The file downloads, named after your store and the time it was made, such as `products-shop-20261004091759.csv`.
 Archived products are left out of an export, even when you choose **All records**. To export them, set the **Status** filter to **Archived** first, then export the **Current filter**.
### What is in the file
Each size or color of a product gets its own line, carrying its SKU, its price in your main currency, its stock count, its option and the product's details such as name, description, tags and categories. If you sell in more than one currency, each extra currency price is a short line of its own holding only the SKU, the product's slug, the price and the currency, so a product in three colors and five currencies takes fifteen lines. The file ends with one column for each custom field your store has defined for products.
The export does not carry the customs and carton columns that the import template has, so use the template when you want to bring those details in.
## How to Import Products
Importing has three stages: you upload the file, match its columns to product fields, and then the rows are processed while you wait or carry on working.
Set up your options and their values under **Products → Options** before you import products that come in several sizes or colors. A value in your file is matched to an existing value - `red` in the file matches your existing **Red**. Write each value exactly as it appears on the Options screen, because a value the store does not have yet is added as a new one. See [Options](/docs/user/products/options).
### Preparing your file
Click **Import**, then **Download CSV template** to get a file with the exact column headings your store expects and no rows. Fill it in a spreadsheet and save it as CSV. Four columns have to be mapped before an import can start: **Slug**, **SKU**, **Name** and **Price**. See [Import Template](/docs/user/products/import-template) for what each column holds.
For a product with more than one variant, every line in the file is a variant, carrying its own SKU, price, stock count and option values. The product's own details, such as its name, description, status and categories, only need to appear on one of those lines. An export also writes the file this way, putting the product's details on its first variant's line.
Write each price as a plain number with a full stop before the decimals, such as `12.50`.
### Uploading and matching columns
1. Click **Import**, then drop your file on the panel or click **Browse files**. The file's name and size appear once it is chosen.
2. If your spreadsheet saved the file with something other than commas between the values, choose it under **Column separator**: semicolon, pipe or tab.
3. Click **Continue**, which stays disabled until a file is chosen. The import gets its own number, such as IM1005, and opens on the **Map columns** step.
4. Check the matching. Each product field sits on its own line with a dropdown of your file's columns and an example taken from your first row. Columns named the way the template names them are matched for you, and anything without a match shows **Not mapped**. Pick the right column for any field you want filled.
5. Click **Start import**. There is no separate preview, so the rows start processing straight away.
Archived products are left out of an export, even when you choose **All records**. To export them, set the **Status** filter to **Archived** first, then export the **Current filter**.
### What is in the file
Each size or color of a product gets its own line, carrying its SKU, its price in your main currency, its stock count, its option and the product's details such as name, description, tags and categories. If you sell in more than one currency, each extra currency price is a short line of its own holding only the SKU, the product's slug, the price and the currency, so a product in three colors and five currencies takes fifteen lines. The file ends with one column for each custom field your store has defined for products.
The export does not carry the customs and carton columns that the import template has, so use the template when you want to bring those details in.
## How to Import Products
Importing has three stages: you upload the file, match its columns to product fields, and then the rows are processed while you wait or carry on working.
Set up your options and their values under **Products → Options** before you import products that come in several sizes or colors. A value in your file is matched to an existing value - `red` in the file matches your existing **Red**. Write each value exactly as it appears on the Options screen, because a value the store does not have yet is added as a new one. See [Options](/docs/user/products/options).
### Preparing your file
Click **Import**, then **Download CSV template** to get a file with the exact column headings your store expects and no rows. Fill it in a spreadsheet and save it as CSV. Four columns have to be mapped before an import can start: **Slug**, **SKU**, **Name** and **Price**. See [Import Template](/docs/user/products/import-template) for what each column holds.
For a product with more than one variant, every line in the file is a variant, carrying its own SKU, price, stock count and option values. The product's own details, such as its name, description, status and categories, only need to appear on one of those lines. An export also writes the file this way, putting the product's details on its first variant's line.
Write each price as a plain number with a full stop before the decimals, such as `12.50`.
### Uploading and matching columns
1. Click **Import**, then drop your file on the panel or click **Browse files**. The file's name and size appear once it is chosen.
2. If your spreadsheet saved the file with something other than commas between the values, choose it under **Column separator**: semicolon, pipe or tab.
3. Click **Continue**, which stays disabled until a file is chosen. The import gets its own number, such as IM1005, and opens on the **Map columns** step.
4. Check the matching. Each product field sits on its own line with a dropdown of your file's columns and an example taken from your first row. Columns named the way the template names them are matched for you, and anything without a match shows **Not mapped**. Pick the right column for any field you want filled.
5. Click **Start import**. There is no separate preview, so the rows start processing straight away.
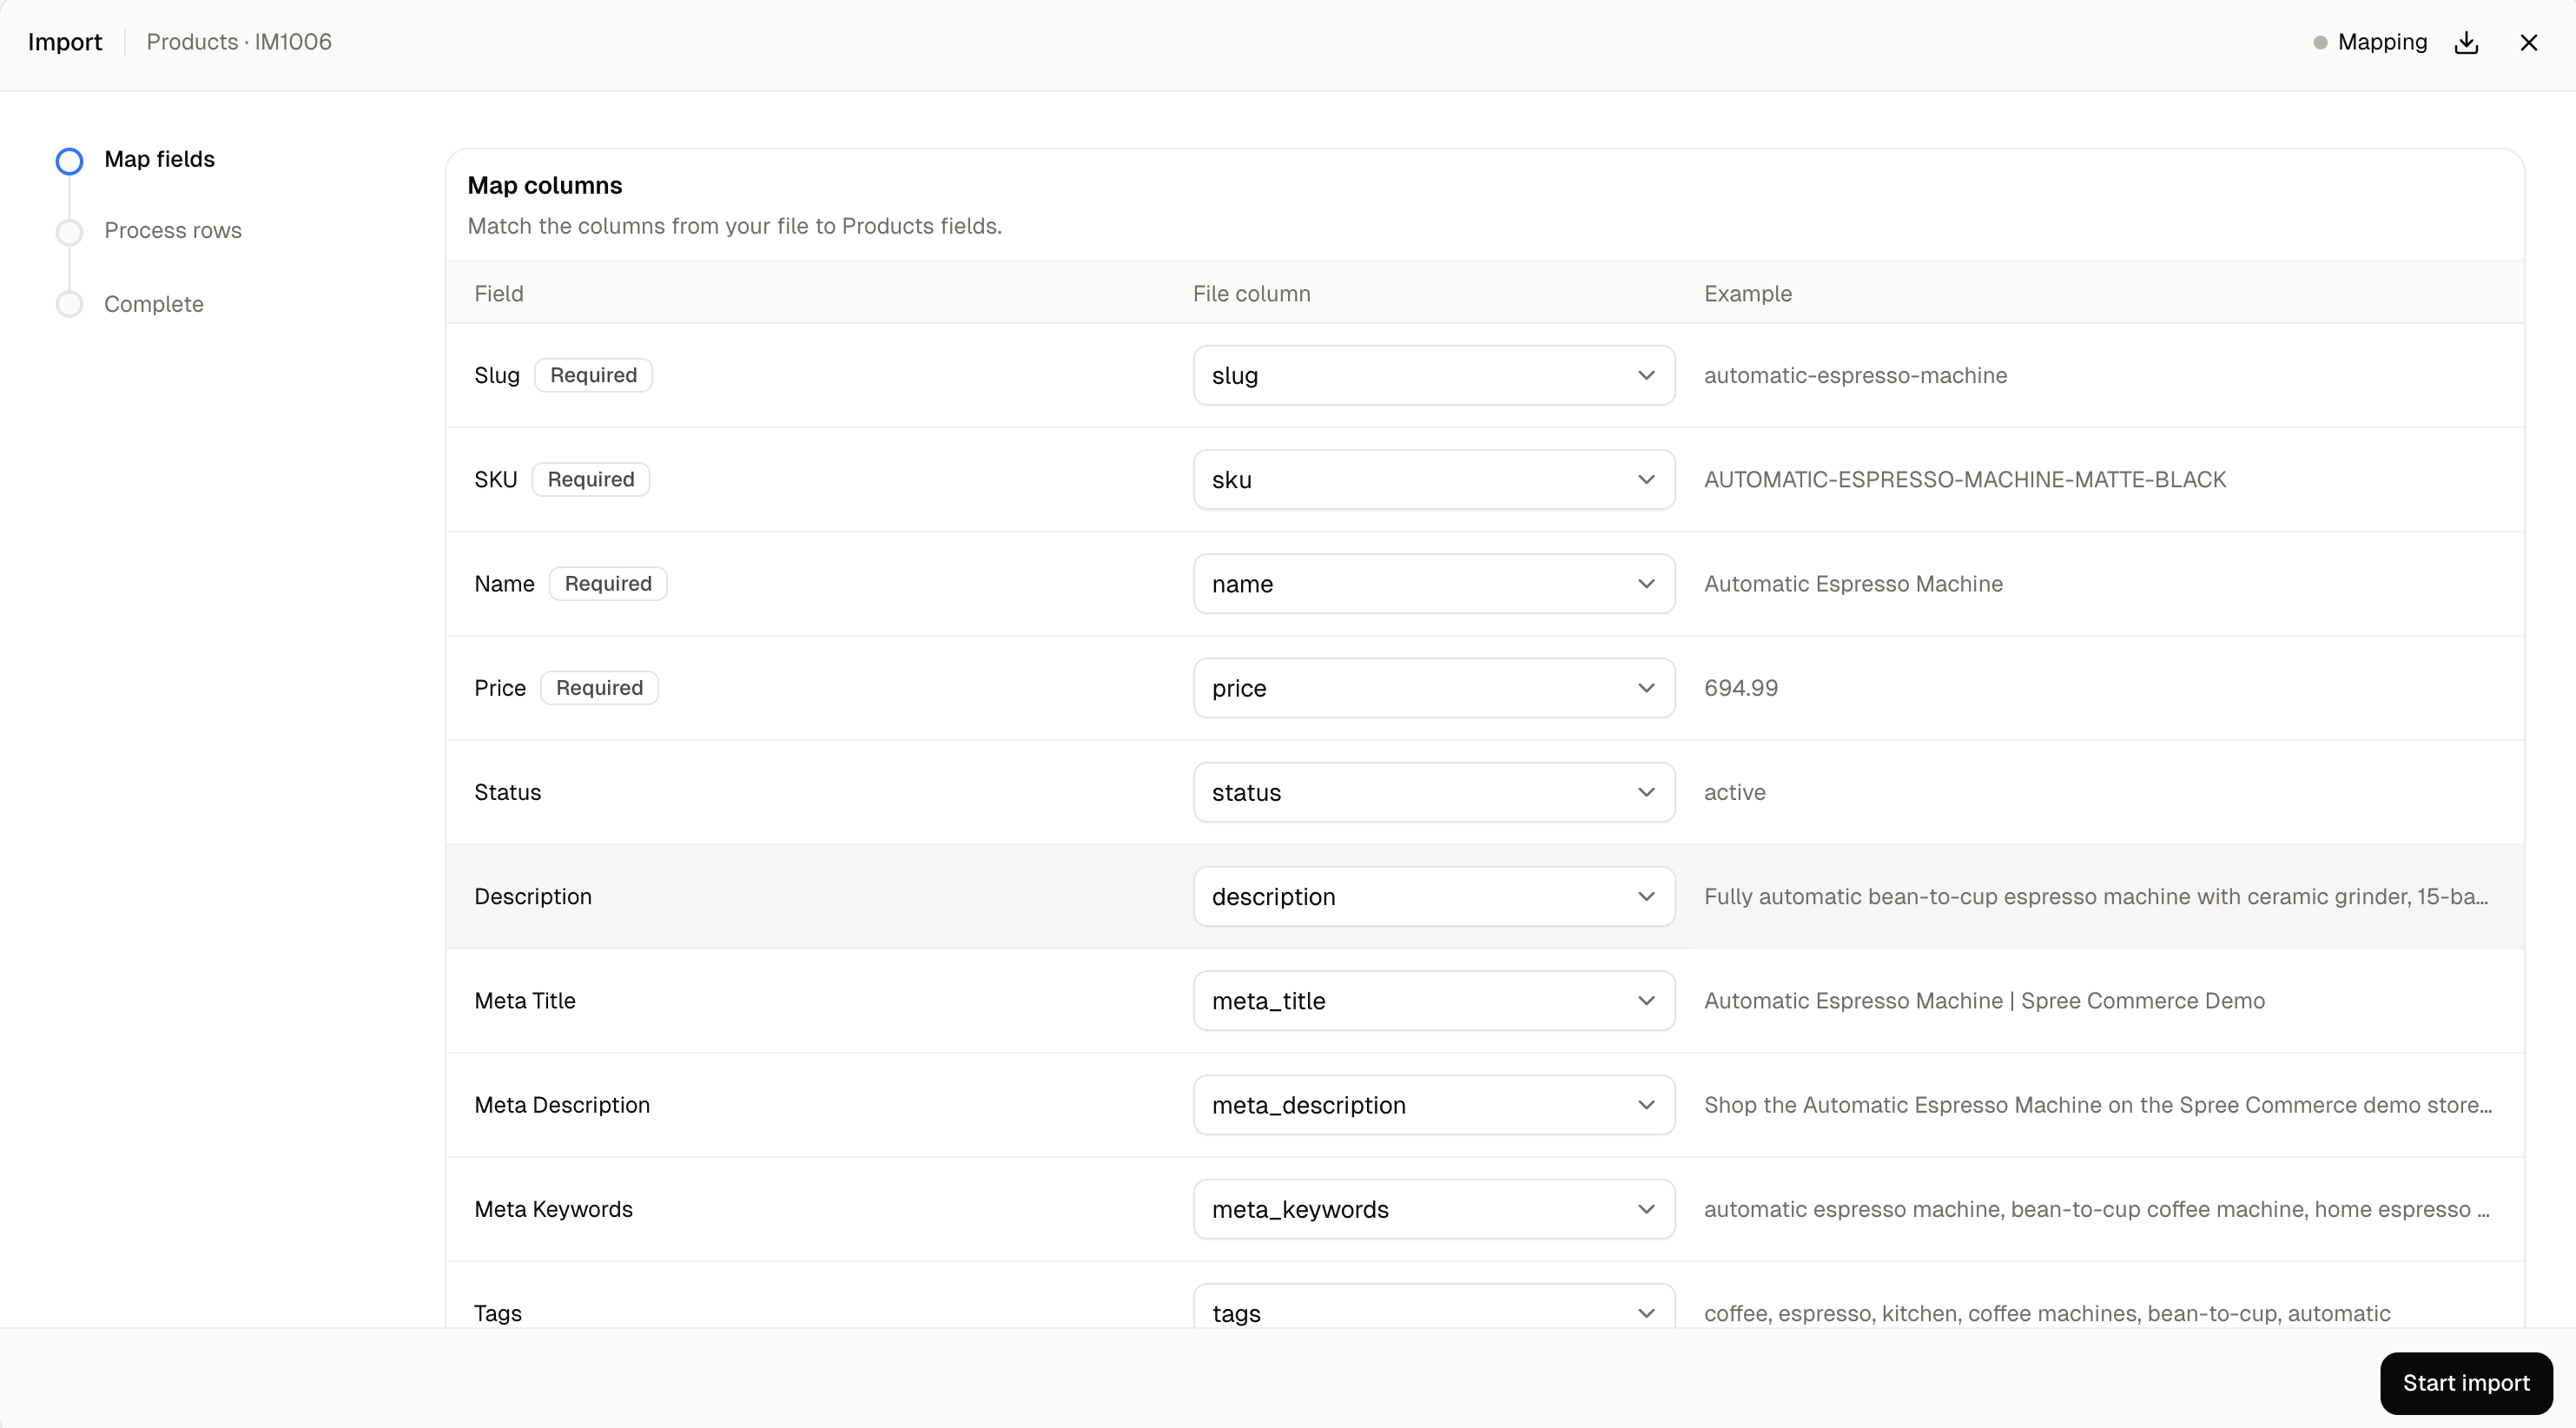 If one of the four required fields has no column, **Start import** stays disabled and a line above it names which field is missing. Choose a column for it, or close the import and fix your file. Nothing is written to your catalog while an import waits at this step.
### Processing and the result
While the rows are processed, the screen counts them off, and you can leave the page because the import carries on in the background. When it finishes, the result gives the number of rows imported and the number that failed, and **View Products** takes you back to your list.
The count is in lines of your file, not in products, so every extra currency line counts as a row. "Imported" covers both new products and products that were updated.
Each import shows a status beside its number while it runs:
| Status | What it means |
| - | - |
| **Mapping** | Waiting for you to match the columns and start it. Nothing has been written yet. |
| **Queued** | Started and waiting its turn to be processed. |
| **Processing** | Rows are being written to your catalog now. |
| **Completed** | Every row has been tried. Check the failed count, because an import with failed rows also ends here. |
## How to Update Products by Importing an Export
The export is the easiest way to change many products at once. Export the products you want to change, edit the file, and import it again.
Lines are matched to your existing products by their slug and to each size or color by its SKU, so the same products are updated and no copies are made. A changed price replaces the old one. A line with a new SKU adds a new size or color to the product, with the price and stock count from that line, and a new option value in the file is added to your options at the same time.
A few columns in the export, such as the product's ID, its seller and its labels, have no field on the matching step and are left as they are.
The good habit is to export only what you mean to change, by searching or filtering first. A smaller file is easier to check line by line before you import it.
## How to Deal with Failed Rows
When some rows fail, the result adds a **Failed rows** table showing each failed row's number in your file and the reason. Click **View row data** beside a row to see the values it was imported with, and **Hide row data** to close them again.
**Retry failed rows** tries the same rows again with the values they were first imported with. It does not read your file again, so when the problem is in the file, correct the file and import it again.
## How to Review Past Imports
Every import is kept in a list under **Settings → Imports**, in the Developer group of the settings menu, so you can check later how each one went. It covers products and also other kinds of import, such as customers and price list prices.
* **Number** - The import's own reference, such as IM1013.
* **Type** - What was imported, such as Products or Customers.
* **Status** - How far the import got, using the statuses above.
* **Rows** - How many rows succeeded compared to how many were attempted, with the number that failed beside it.
Use the search box to find an import by its number, and **Add filter** to narrow the list by status, seller or date. Click an import to reopen its result, including any failed rows.
The row menu offers **View**, **Download original file** and **Delete**. An import you left at the matching step stays on the list as **Mapping** until you delete it. Deleting asks you to confirm, and the confirmation explains that it removes the import, its rows and the uploaded file.
## Further Reading
* [Import Template](/docs/user/products/import-template) - What each column of the import file holds
* [Options](/docs/user/products/options) - Setting up the sizes and colors your file refers to
* [Products](/docs/user/products/products) - Narrowing the list before you export
* [Variants](/docs/user/products/variants) - How the option columns become variants
* [Purchase Orders](/docs/user/inventory/purchase-orders) - Importing and exporting purchase orders
This documentation is built and hosted on [Mintlify](https://mintlify.com), a developer documentation platform.
If one of the four required fields has no column, **Start import** stays disabled and a line above it names which field is missing. Choose a column for it, or close the import and fix your file. Nothing is written to your catalog while an import waits at this step.
### Processing and the result
While the rows are processed, the screen counts them off, and you can leave the page because the import carries on in the background. When it finishes, the result gives the number of rows imported and the number that failed, and **View Products** takes you back to your list.
The count is in lines of your file, not in products, so every extra currency line counts as a row. "Imported" covers both new products and products that were updated.
Each import shows a status beside its number while it runs:
| Status | What it means |
| - | - |
| **Mapping** | Waiting for you to match the columns and start it. Nothing has been written yet. |
| **Queued** | Started and waiting its turn to be processed. |
| **Processing** | Rows are being written to your catalog now. |
| **Completed** | Every row has been tried. Check the failed count, because an import with failed rows also ends here. |
## How to Update Products by Importing an Export
The export is the easiest way to change many products at once. Export the products you want to change, edit the file, and import it again.
Lines are matched to your existing products by their slug and to each size or color by its SKU, so the same products are updated and no copies are made. A changed price replaces the old one. A line with a new SKU adds a new size or color to the product, with the price and stock count from that line, and a new option value in the file is added to your options at the same time.
A few columns in the export, such as the product's ID, its seller and its labels, have no field on the matching step and are left as they are.
The good habit is to export only what you mean to change, by searching or filtering first. A smaller file is easier to check line by line before you import it.
## How to Deal with Failed Rows
When some rows fail, the result adds a **Failed rows** table showing each failed row's number in your file and the reason. Click **View row data** beside a row to see the values it was imported with, and **Hide row data** to close them again.
**Retry failed rows** tries the same rows again with the values they were first imported with. It does not read your file again, so when the problem is in the file, correct the file and import it again.
## How to Review Past Imports
Every import is kept in a list under **Settings → Imports**, in the Developer group of the settings menu, so you can check later how each one went. It covers products and also other kinds of import, such as customers and price list prices.
* **Number** - The import's own reference, such as IM1013.
* **Type** - What was imported, such as Products or Customers.
* **Status** - How far the import got, using the statuses above.
* **Rows** - How many rows succeeded compared to how many were attempted, with the number that failed beside it.
Use the search box to find an import by its number, and **Add filter** to narrow the list by status, seller or date. Click an import to reopen its result, including any failed rows.
The row menu offers **View**, **Download original file** and **Delete**. An import you left at the matching step stays on the list as **Mapping** until you delete it. Deleting asks you to confirm, and the confirmation explains that it removes the import, its rows and the uploaded file.
## Further Reading
* [Import Template](/docs/user/products/import-template) - What each column of the import file holds
* [Options](/docs/user/products/options) - Setting up the sizes and colors your file refers to
* [Products](/docs/user/products/products) - Narrowing the list before you export
* [Variants](/docs/user/products/variants) - How the option columns become variants
* [Purchase Orders](/docs/user/inventory/purchase-orders) - Importing and exporting purchase orders
This documentation is built and hosted on [Mintlify](https://mintlify.com), a developer documentation platform.