> ## Documentation Index
> Fetch the complete documentation index at: https://spreecommerce.org/docs/llms.txt
> Use this file to discover all available pages before exploring further.
# Adding Products
> Learn how to add a product to your store, with its variants, prices, stock and media, in Spree Commerce.
A product is anything that you sell, whether it be a physical item or a digital file. Adding one typically involves giving it a name and a description, saying which versions of it exist, what each version costs, how many you hold in each warehouse, and what it looks like.
Everything sits on one form, so a product can be set up from start to finish in a single sitting and saved once. A new product starts as **Draft** and stays hidden from customers until you set it to **Active**, so you can also build it up over several sessions and show it only when it is ready.
Prices, product codes and stock always belong to a version of a product, never to the product as a whole. A product with no options still has one version, called the **Default variant**, and that is where its price and product code live. See [Variants](/docs/user/products/variants) to learn more about multi-variant products and variant-specific settings.
To add a product, navigate to **Products** in the admin dashboard and click **Add product**.
## How to Create a Product
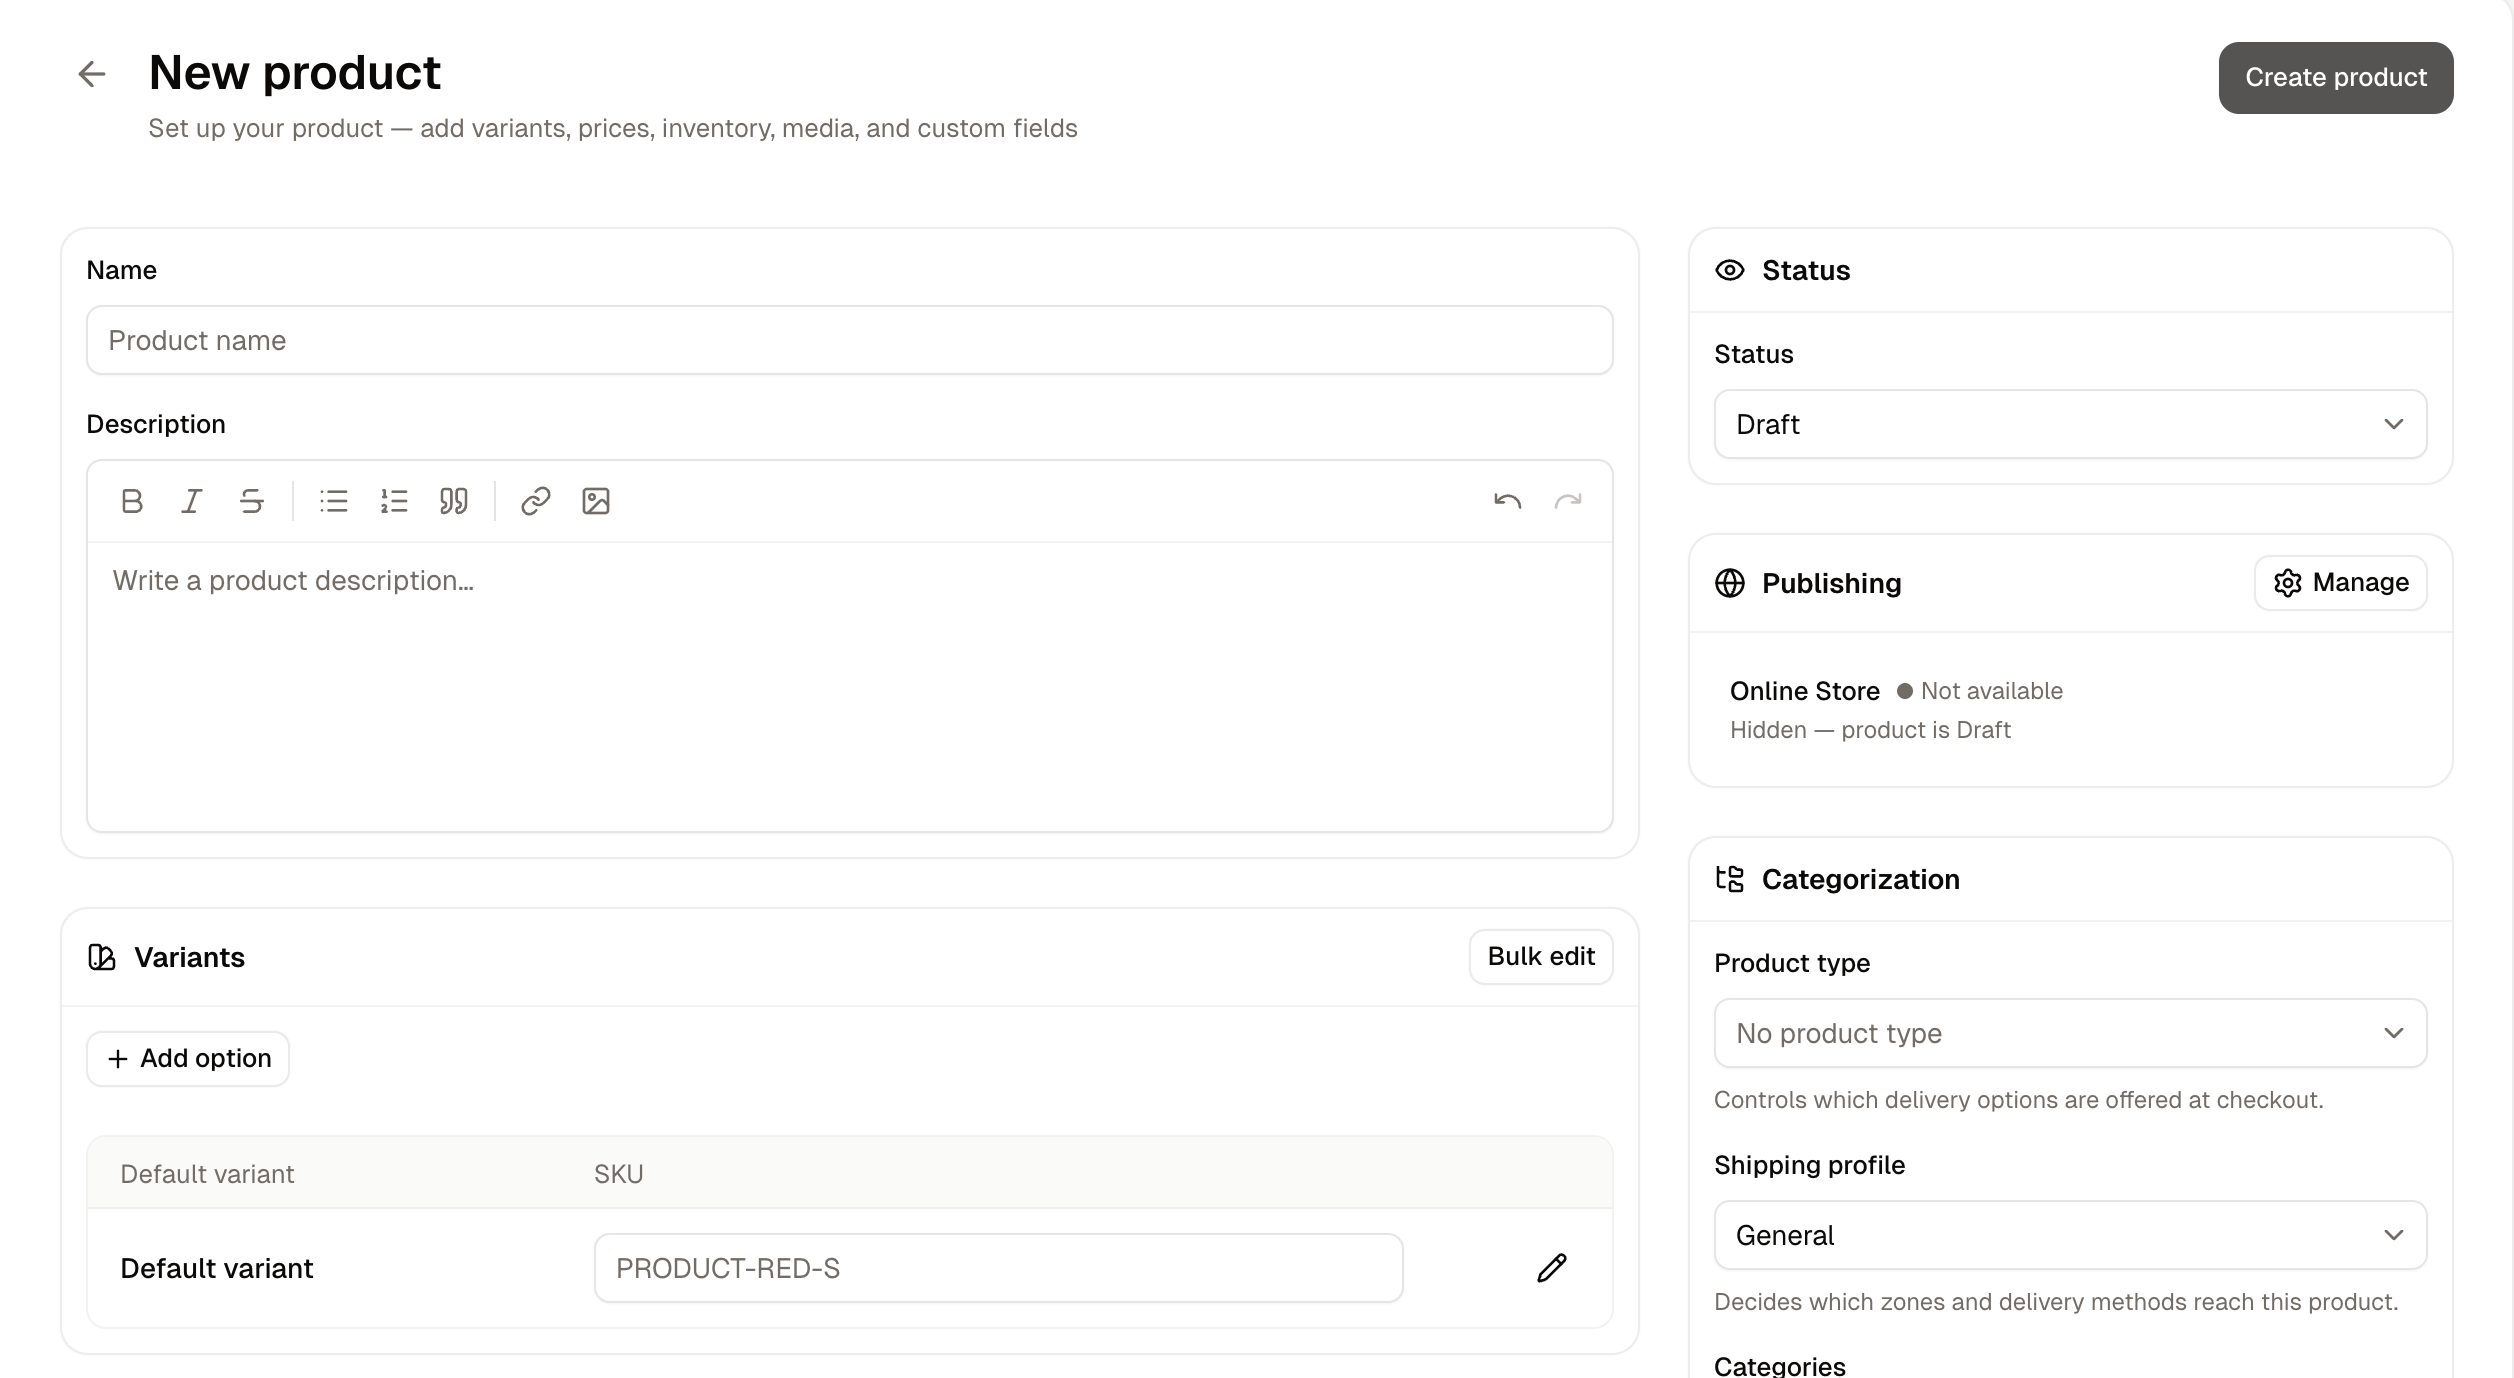 1. Enter a **Name**. **Create product** is disabled until you do, and a **Discard** button appears beside it as soon as you start typing.
2. If your store uses product types, set **Product type** in the [Categorization](#categorization) card now. A product type fills in the option types, categories, delivery profile and custom fields that kind of product needs, so choosing it first saves setting them by hand.
3. Fill in whichever of the remaining cards the product needs. The name is the only field always required, though your store may have custom fields that are required too.
4. Click **Create product**.
The product is saved as a **Draft**, and three further cards appear on the form. See [Cards That Appear After Saving](#cards-that-appear-after-saving) below.
Nothing you enter is final. A saved product can be reopened and changed at any time, so you can create it with little more than a name and fill in the rest later.
A product can be saved with no price at all, because price is never a required field. Set a price for every variant before you set the product to **Active**.
## The Product Form
The form has a number of cards, each one configuring a different part of the product. Every card described below appears on the form from the start, except the last group, which appears only once the product has been saved.
### Name and Description
1. Enter a **Name**. **Create product** is disabled until you do, and a **Discard** button appears beside it as soon as you start typing.
2. If your store uses product types, set **Product type** in the [Categorization](#categorization) card now. A product type fills in the option types, categories, delivery profile and custom fields that kind of product needs, so choosing it first saves setting them by hand.
3. Fill in whichever of the remaining cards the product needs. The name is the only field always required, though your store may have custom fields that are required too.
4. Click **Create product**.
The product is saved as a **Draft**, and three further cards appear on the form. See [Cards That Appear After Saving](#cards-that-appear-after-saving) below.
Nothing you enter is final. A saved product can be reopened and changed at any time, so you can create it with little more than a name and fill in the rest later.
A product can be saved with no price at all, because price is never a required field. Set a price for every variant before you set the product to **Active**.
## The Product Form
The form has a number of cards, each one configuring a different part of the product. Every card described below appears on the form from the start, except the last group, which appears only once the product has been saved.
### Name and Description
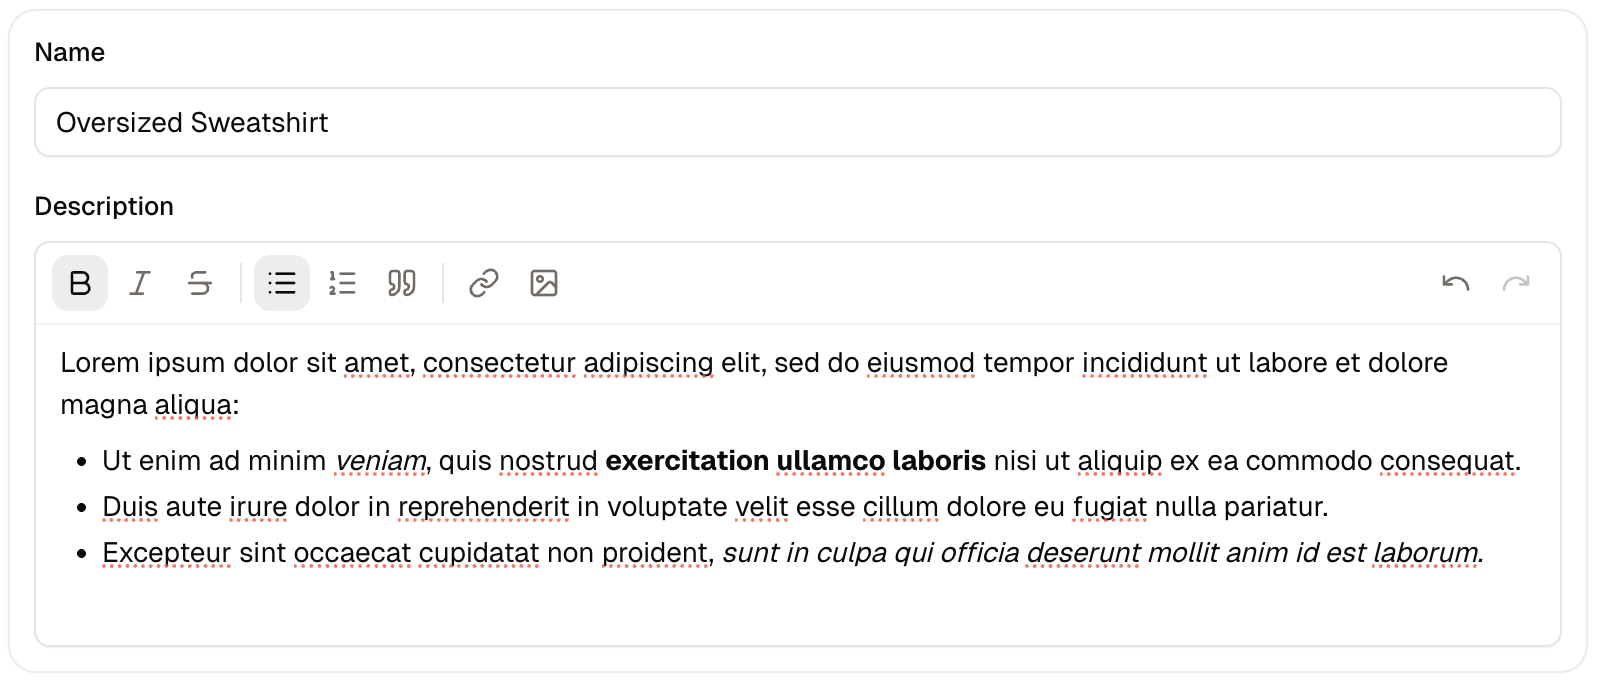 **Name** is what customers see as the product's title, and the form will not save without it. It is the only field required on every store, though your own store may also have required custom fields.
**Description** is the text on the product page. Its toolbar holds bold, italic, strikethrough, bullet and numbered lists, quotes, links, undo and redo. The **Image** button opens your media library so you can place a picture inside the text. Formatting you apply here appears on the product page as you set it.
### Variants
**Name** is what customers see as the product's title, and the form will not save without it. It is the only field required on every store, though your own store may also have required custom fields.
**Description** is the text on the product page. Its toolbar holds bold, italic, strikethrough, bullet and numbered lists, quotes, links, undo and redo. The **Image** button opens your media library so you can place a picture inside the text. Formatting you apply here appears on the product page as you set it.
### Variants
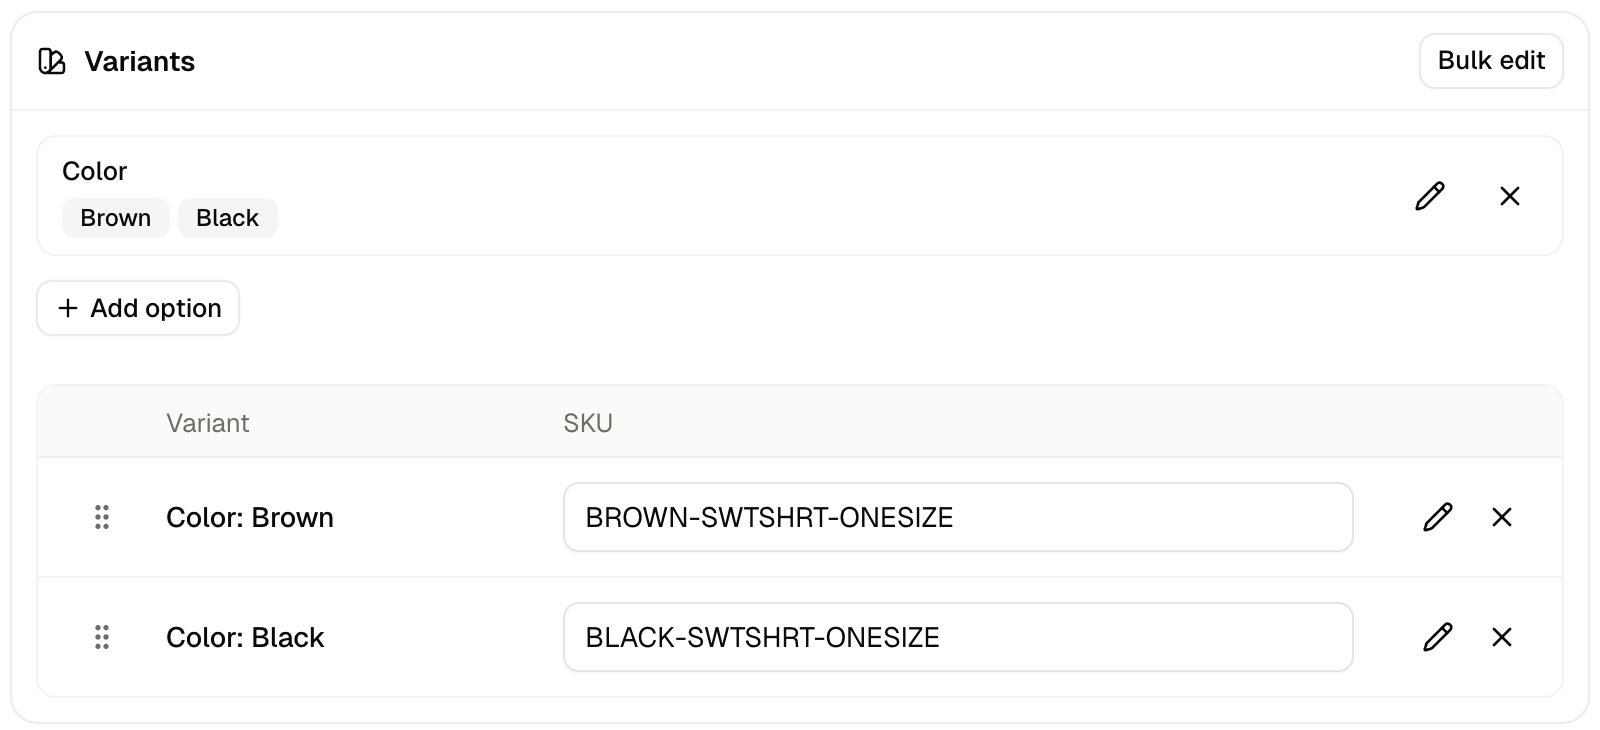 A variant is one version of a product, such as one size or one color. Adding an option to a product creates a variant for each value you pick.
1. Click **Add option**.
2. Choose an option type from **Pick an option type**, for example Size. Its values appear as buttons.
3. Click each value you sell, then click **Done**.
The **Default variant** row is replaced by one row per value, each with its own **SKU** box, an edit button and a drag handle. The **Prices** card gains a line for each variant, and the **Inventory** card gains a block for each.
**Bulk edit** opens every variant as a spreadsheet, and the edit button on a row opens that variant's own panel, where its barcode, weight, dimensions, packing, customs, pre-order and tax settings live.
Variants are covered in full in [Variants](/docs/user/products/variants), including the option types that drive them and how to edit many at once.
### Media
A variant is one version of a product, such as one size or one color. Adding an option to a product creates a variant for each value you pick.
1. Click **Add option**.
2. Choose an option type from **Pick an option type**, for example Size. Its values appear as buttons.
3. Click each value you sell, then click **Done**.
The **Default variant** row is replaced by one row per value, each with its own **SKU** box, an edit button and a drag handle. The **Prices** card gains a line for each variant, and the **Inventory** card gains a block for each.
**Bulk edit** opens every variant as a spreadsheet, and the edit button on a row opens that variant's own panel, where its barcode, weight, dimensions, packing, customs, pre-order and tax settings live.
Variants are covered in full in [Variants](/docs/user/products/variants), including the option types that drive them and how to edit many at once.
### Media
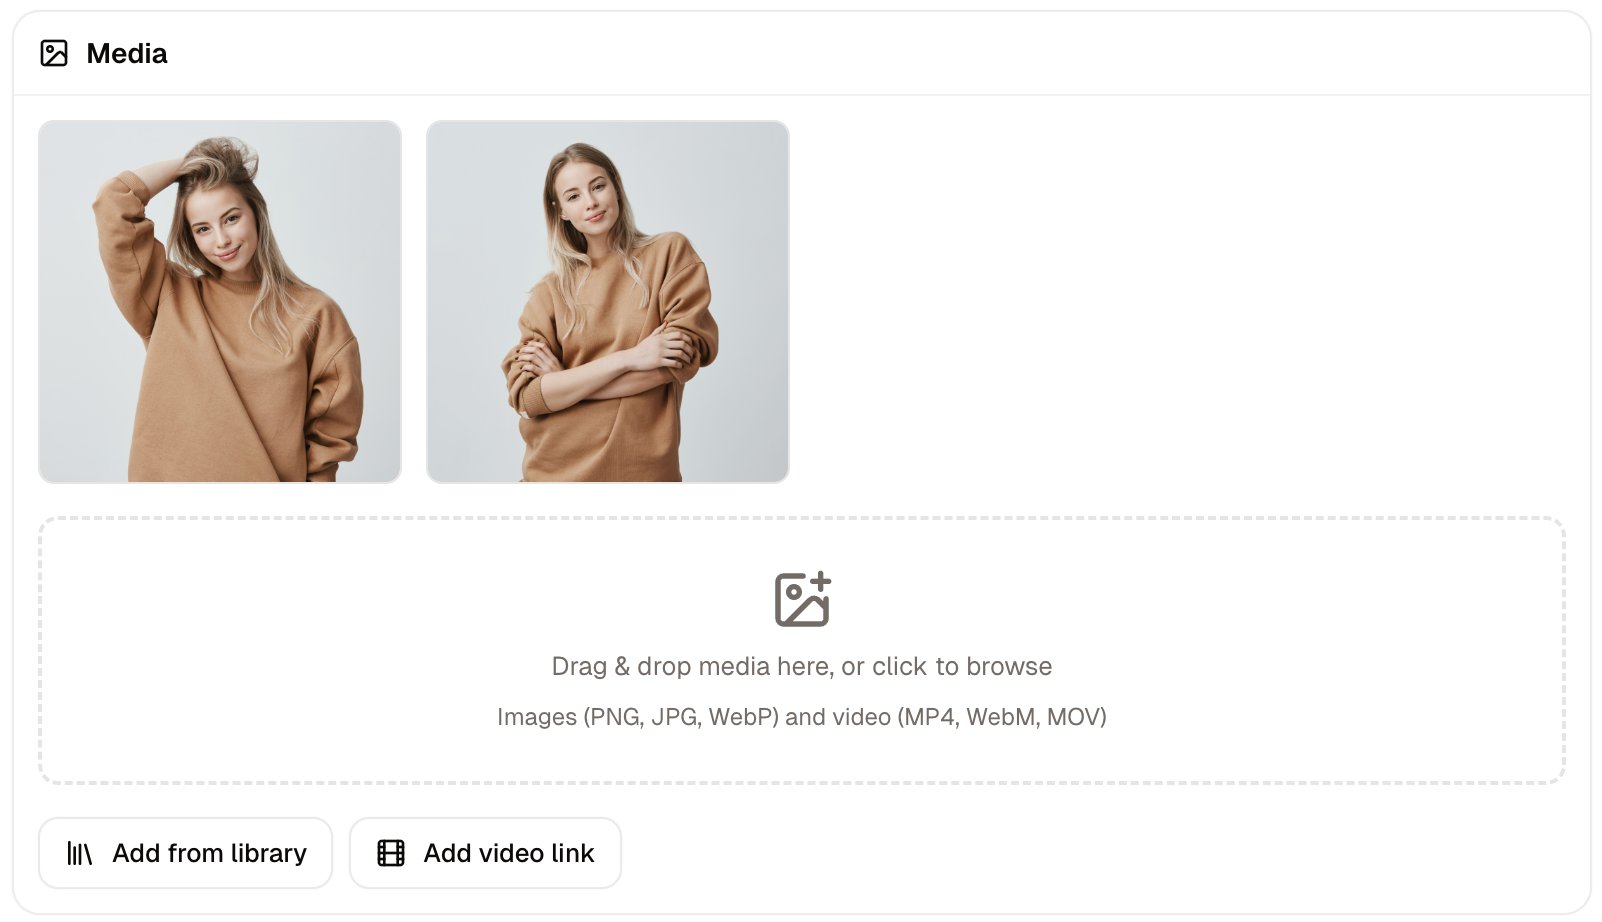 **Media** holds the product's images and videos. Click the drop area to upload files from your computer, **Add from library** to pick files you have already uploaded, or **Add video link** for a YouTube or Vimeo link.
Click a tile to open **Edit media**, which has two fields. **Alt text** describes the image for customers using a screen reader and for search engines, and starts out holding the file name, so select that text and type over it. **Assigned variants** says which variants the image represents, and leaving it blank applies the image to all of them.
The first tile from the left is the product's primary image. Drag the tiles to reorder them.
Media is attached to the product when you click **Save product**, along with everything else on the form, and the files appear in your [media library](/docs/user/products/media) at the same time. Removing a file from the store is done from the library, not from this card.
### Prices
**Media** holds the product's images and videos. Click the drop area to upload files from your computer, **Add from library** to pick files you have already uploaded, or **Add video link** for a YouTube or Vimeo link.
Click a tile to open **Edit media**, which has two fields. **Alt text** describes the image for customers using a screen reader and for search engines, and starts out holding the file name, so select that text and type over it. **Assigned variants** says which variants the image represents, and leaving it blank applies the image to all of them.
The first tile from the left is the product's primary image. Drag the tiles to reorder them.
Media is attached to the product when you click **Save product**, along with everything else on the form, and the files appear in your [media library](/docs/user/products/media) at the same time. Removing a file from the store is done from the library, not from this card.
### Prices
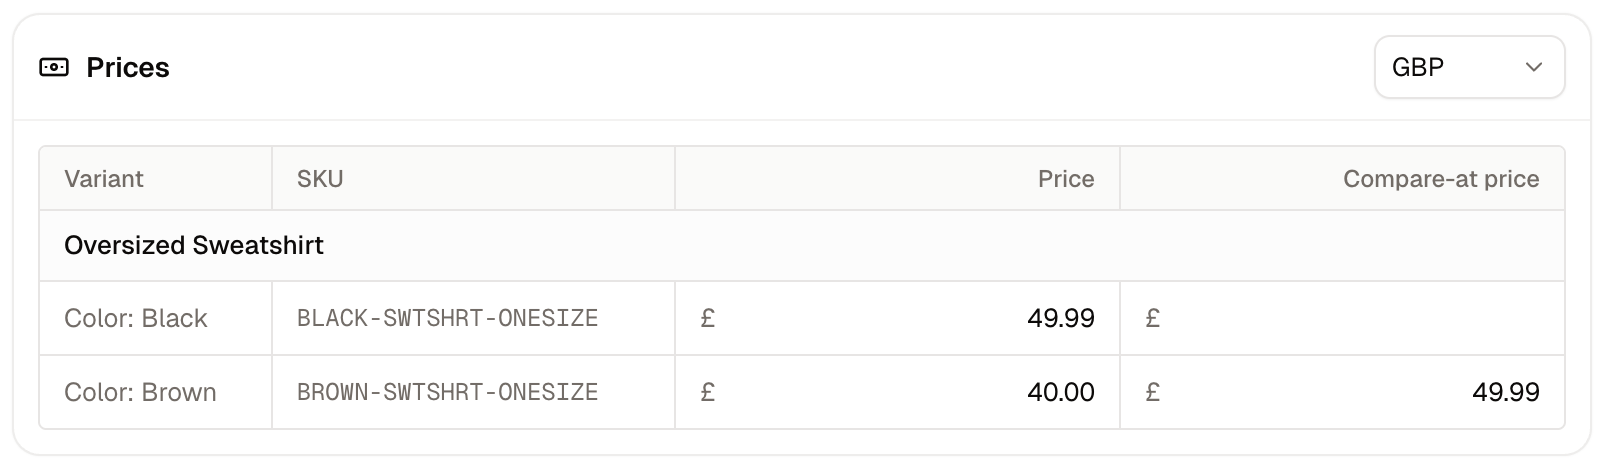 **Prices** has one row per variant, with two amounts.
| Field | What it means |
| - | - |
| **Price** | What the customer pays for this variant, before any discount is applied. Tax may be added on top of this figure depending on your tax setup. |
| **Compare-at price** | The higher "was" price. Filling it in shows the product marked down from this figure, with a **Sale** badge. |
To type in a cell, double-click it or select it and press Enter, then press Tab to move to the next. A single click only selects the cell, and anything typed before the cell is open is not entered.
If you sell in more than one currency, the currency selector at the top of the card switches between them, and each currency holds its own prices. When variants are priced differently, the product page changes its price as the customer picks one.
### Inventory
**Prices** has one row per variant, with two amounts.
| Field | What it means |
| - | - |
| **Price** | What the customer pays for this variant, before any discount is applied. Tax may be added on top of this figure depending on your tax setup. |
| **Compare-at price** | The higher "was" price. Filling it in shows the product marked down from this figure, with a **Sale** badge. |
To type in a cell, double-click it or select it and press Enter, then press Tab to move to the next. A single click only selects the cell, and anything typed before the cell is open is not entered.
If you sell in more than one currency, the currency selector at the top of the card switches between them, and each currency holds its own prices. When variants are priced differently, the product page changes its price as the customer picks one.
### Inventory
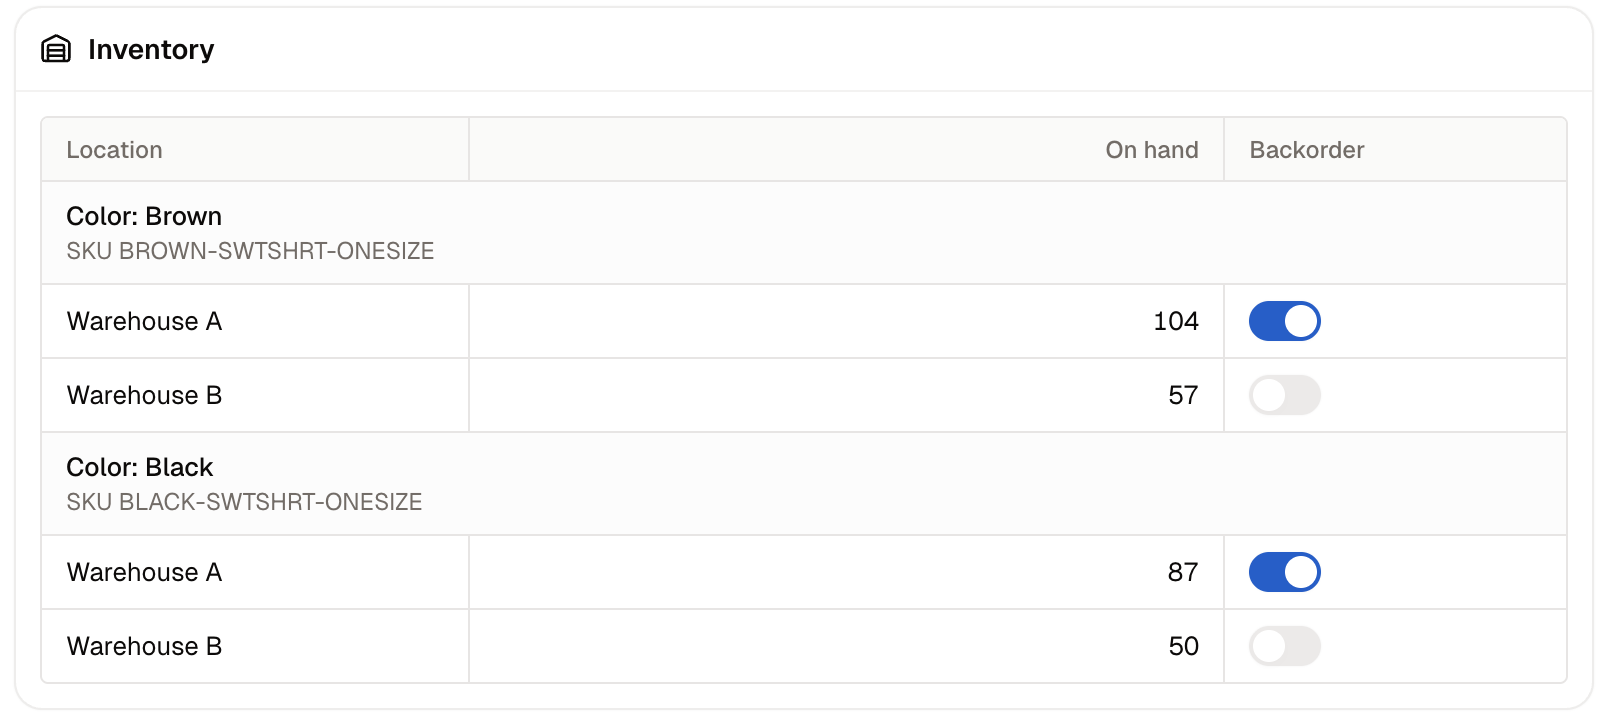 **Inventory** lists every one of your [stock locations](/docs/user/settings/locations), once for each variant. Enter how many units you hold in the **On hand** cell for each warehouse that stocks the product, and leave the rest empty. A stock record is created only where you enter a number.
Switching on **Backorder** beside each location lets customers keep buying that variant at that location once it reaches zero.
### Digital Files
**Inventory** lists every one of your [stock locations](/docs/user/settings/locations), once for each variant. Enter how many units you hold in the **On hand** cell for each warehouse that stocks the product, and leave the rest empty. A stock record is created only where you enter a number.
Switching on **Backorder** beside each location lets customers keep buying that variant at that location once it reaches zero.
### Digital Files
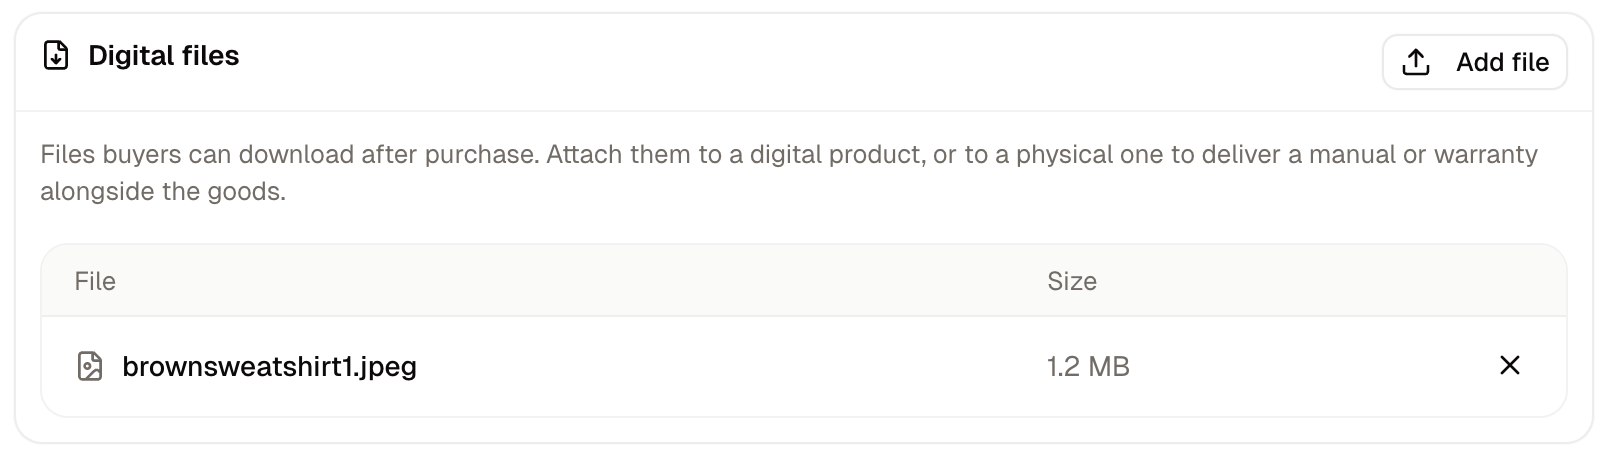 **Digital files** holds files buyers download after purchase. Attach them to a digital product, or to a physical one to deliver a manual or warranty alongside the goods. Click the drop area to upload.
### Custom Fields
**Digital files** holds files buyers download after purchase. Attach them to a digital product, or to a physical one to deliver a manual or warranty alongside the goods. Click the drop area to upload.
### Custom Fields
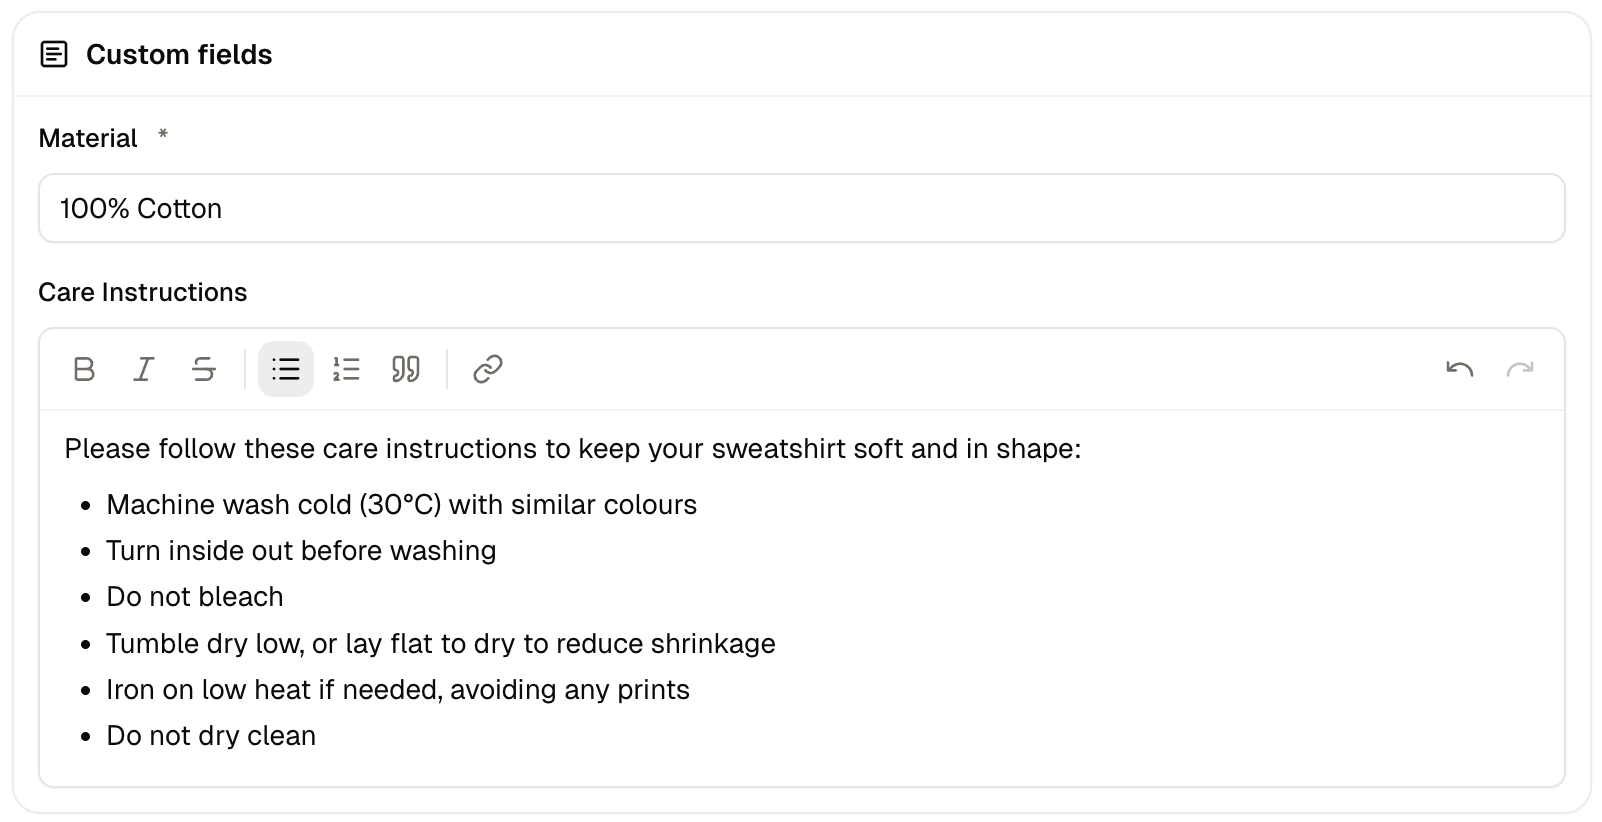 **Custom fields** holds the extra fields your store has defined for products, such as Warranty, Capacity or Voltage. Fill in the ones that apply.
A field marked with an asterisk is required, and the product cannot be saved without it. Which fields appear, and which are required, is set under [Custom Fields](/docs/user/settings/custom-fields).
### Status and Publishing
**Custom fields** holds the extra fields your store has defined for products, such as Warranty, Capacity or Voltage. Fill in the ones that apply.
A field marked with an asterisk is required, and the product cannot be saved without it. Which fields appear, and which are required, is set under [Custom Fields](/docs/user/settings/custom-fields).
### Status and Publishing
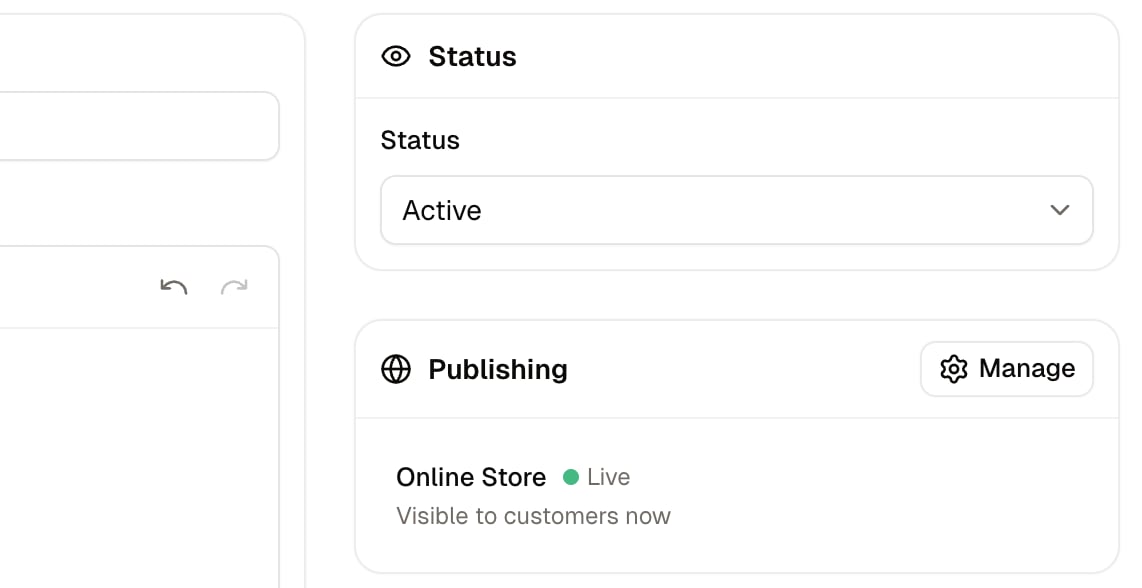 **Status** is **Draft**, **Active** or **Archived**, and decides whether customers can find and buy the product. The three statuses are explained in [Product Statuses](/docs/user/products/products#product-statuses).
**Publishing** lists each sales channel the product is available on. A new product is listed on your default channel.
There are two things to do on this card:
* **Manage** picks which sales channels list the product. The channels you choose are added to the list on the card.
* Clicking a sales channel on that list reveals its **Publish on** and **Unpublish on** dates. Use these to schedule a date range in which the product should be available on that channel.
**Status** is **Draft**, **Active** or **Archived**, and decides whether customers can find and buy the product. The three statuses are explained in [Product Statuses](/docs/user/products/products#product-statuses).
**Publishing** lists each sales channel the product is available on. A new product is listed on your default channel.
There are two things to do on this card:
* **Manage** picks which sales channels list the product. The channels you choose are added to the list on the card.
* Clicking a sales channel on that list reveals its **Publish on** and **Unpublish on** dates. Use these to schedule a date range in which the product should be available on that channel.
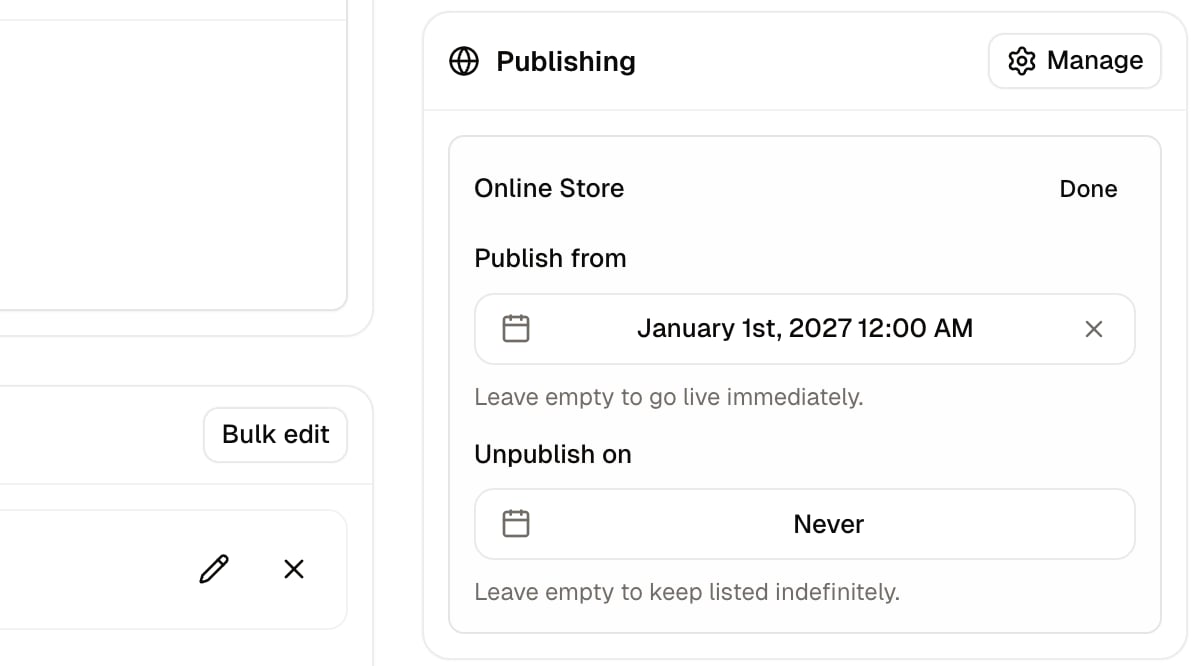 Because the dates belong to the channel rather than the product, a product can go live on one channel before another.
The Publishing card updates the moment you change the status, before you save. Click **Save product** to keep the change.
### Categorization
Because the dates belong to the channel rather than the product, a product can go live on one channel before another.
The Publishing card updates the moment you change the status, before you save. Click **Save product** to keep the change.
### Categorization
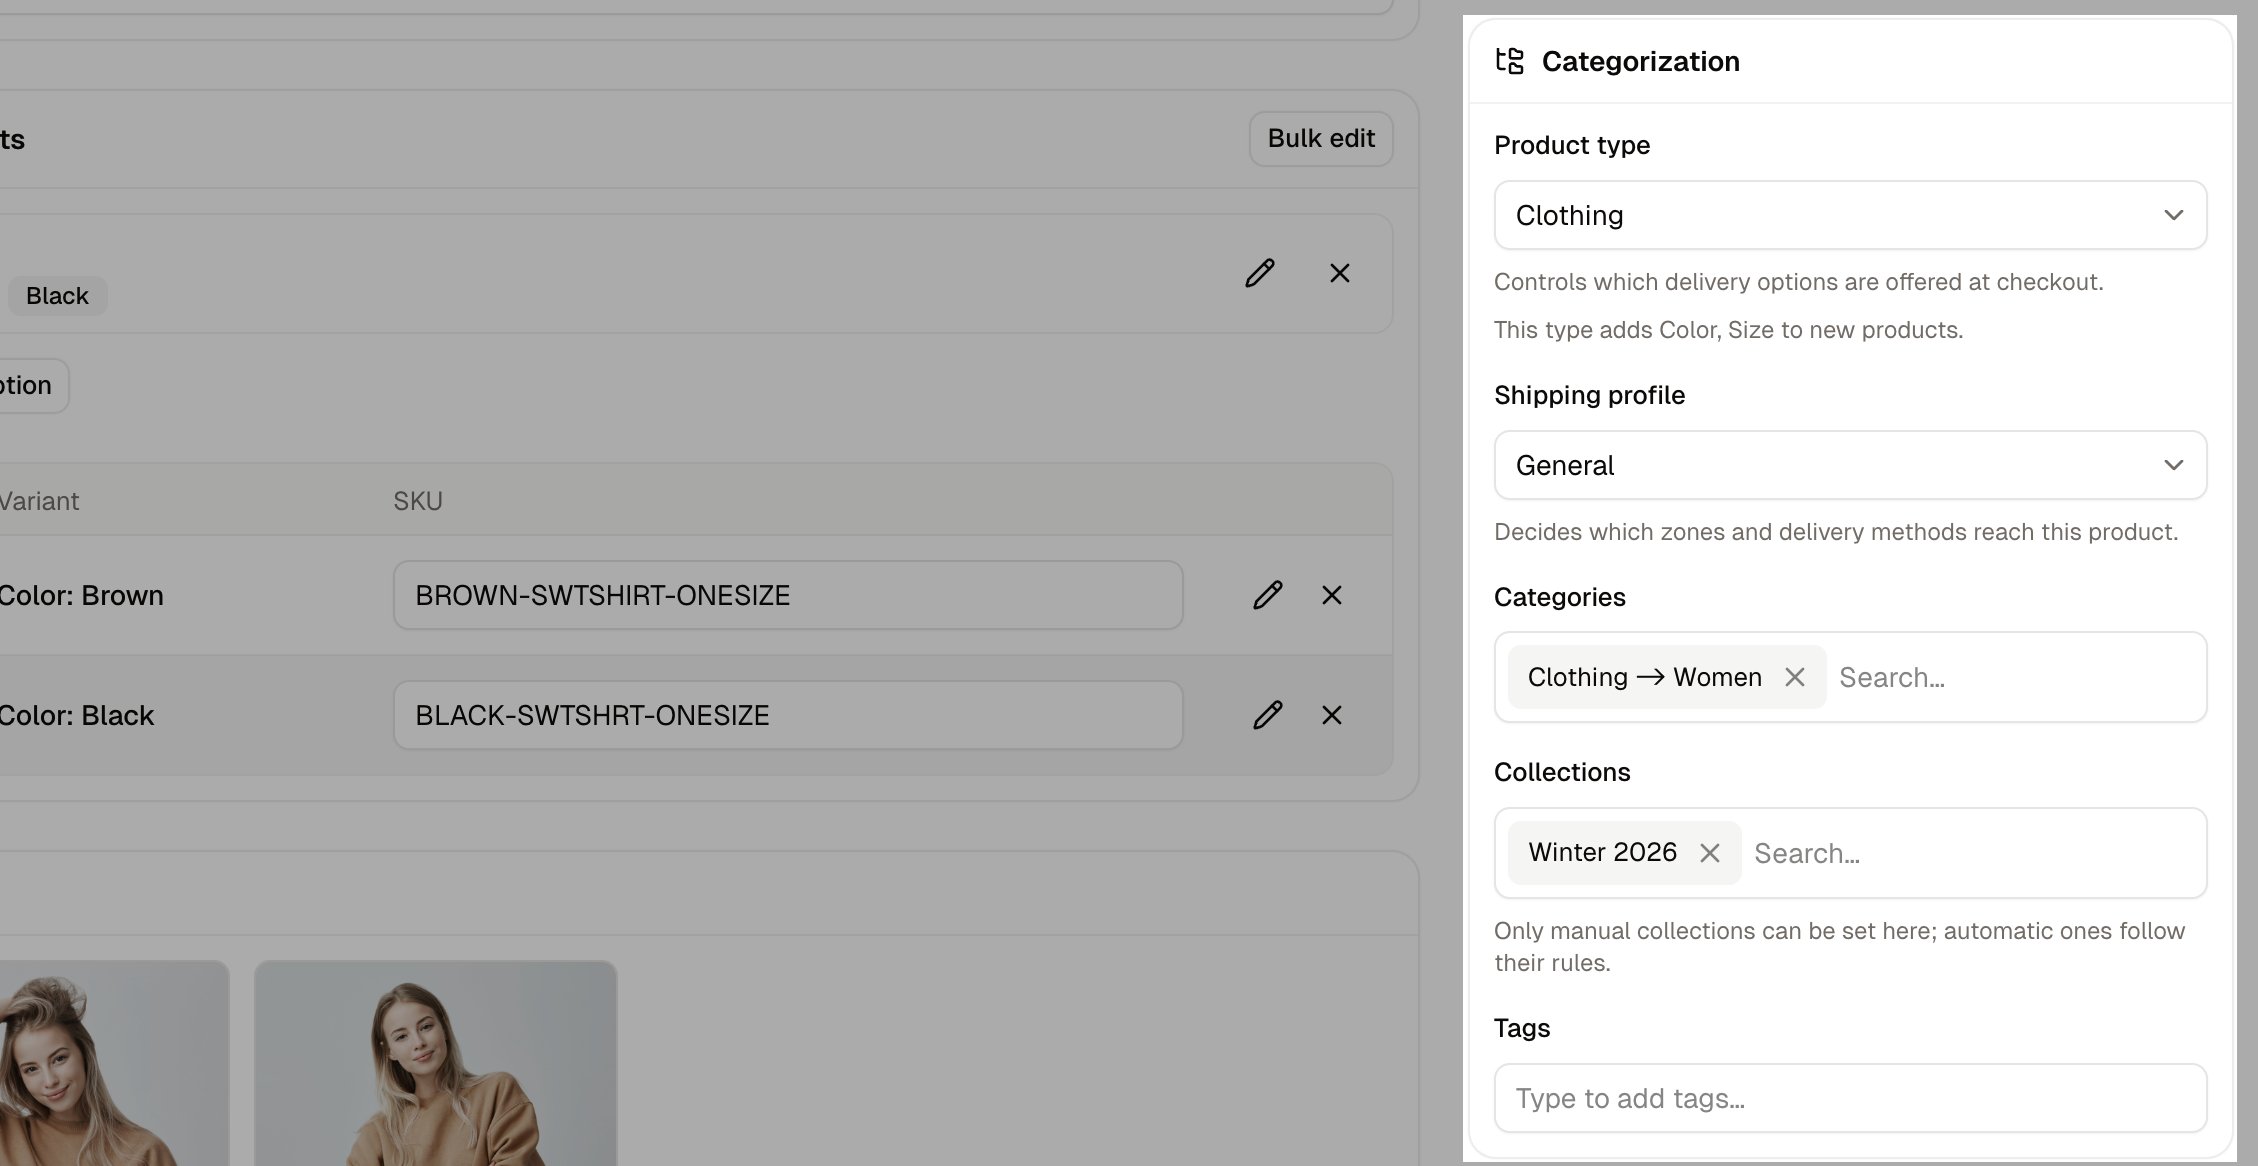 **Categorization** decides where customers find the product as they browse, and which delivery options reach it.
| Field | What it means |
| - | - |
| **Product type** | The template the product follows. See [Product Types](/docs/user/settings/product-types). |
| **Delivery profile** | Which zones and delivery methods reach this product. See [Delivery Profiles](/docs/user/settings/delivery-profiles). |
| **Categories** | Where the product sits in your shop's menu. Start typing to search, and pick from the full paths, such as Kitchen -> Kettles. The product page's breadcrumb follows the category you choose. See [Categories](/docs/user/products/categories). |
| **Collections** | Groups such as Best Sellers. Only manual collections can be set here, because an automatic collection fills itself from its rules and can pick the product up once it is saved. See [Collections](/docs/user/products/collections). |
| **Tags** | Your own labels, added one word or phrase at a time. |
### Tax
**Tax** holds the product's **Tax category**, which decides the rate applied to it. See [Tax Categories](/docs/user/settings/tax-categories).
A variant can override this from its own panel, where **Tax category** reads **Inherit from product** unless you change it.
### SEO
**SEO** controls the product's web address and how it appears in search results.
| Field | What it means |
| - | - |
| **Slug** | The last part of the product's web address. Leave it empty and it is built from the product name when you create the product. |
| **Meta title** | The title shown in the browser tab and as the headline in search results. |
| **Meta description** | A sentence or two summarizing the product, written for someone choosing it from a list of search results. |
The preview at the top of the card shows the address as you type.
### Cards That Appear After Saving
**Categorization** decides where customers find the product as they browse, and which delivery options reach it.
| Field | What it means |
| - | - |
| **Product type** | The template the product follows. See [Product Types](/docs/user/settings/product-types). |
| **Delivery profile** | Which zones and delivery methods reach this product. See [Delivery Profiles](/docs/user/settings/delivery-profiles). |
| **Categories** | Where the product sits in your shop's menu. Start typing to search, and pick from the full paths, such as Kitchen -> Kettles. The product page's breadcrumb follows the category you choose. See [Categories](/docs/user/products/categories). |
| **Collections** | Groups such as Best Sellers. Only manual collections can be set here, because an automatic collection fills itself from its rules and can pick the product up once it is saved. See [Collections](/docs/user/products/collections). |
| **Tags** | Your own labels, added one word or phrase at a time. |
### Tax
**Tax** holds the product's **Tax category**, which decides the rate applied to it. See [Tax Categories](/docs/user/settings/tax-categories).
A variant can override this from its own panel, where **Tax category** reads **Inherit from product** unless you change it.
### SEO
**SEO** controls the product's web address and how it appears in search results.
| Field | What it means |
| - | - |
| **Slug** | The last part of the product's web address. Leave it empty and it is built from the product name when you create the product. |
| **Meta title** | The title shown in the browser tab and as the headline in search results. |
| **Meta description** | A sentence or two summarizing the product, written for someone choosing it from a list of search results. |
The preview at the top of the card shows the address as you type.
### Cards That Appear After Saving
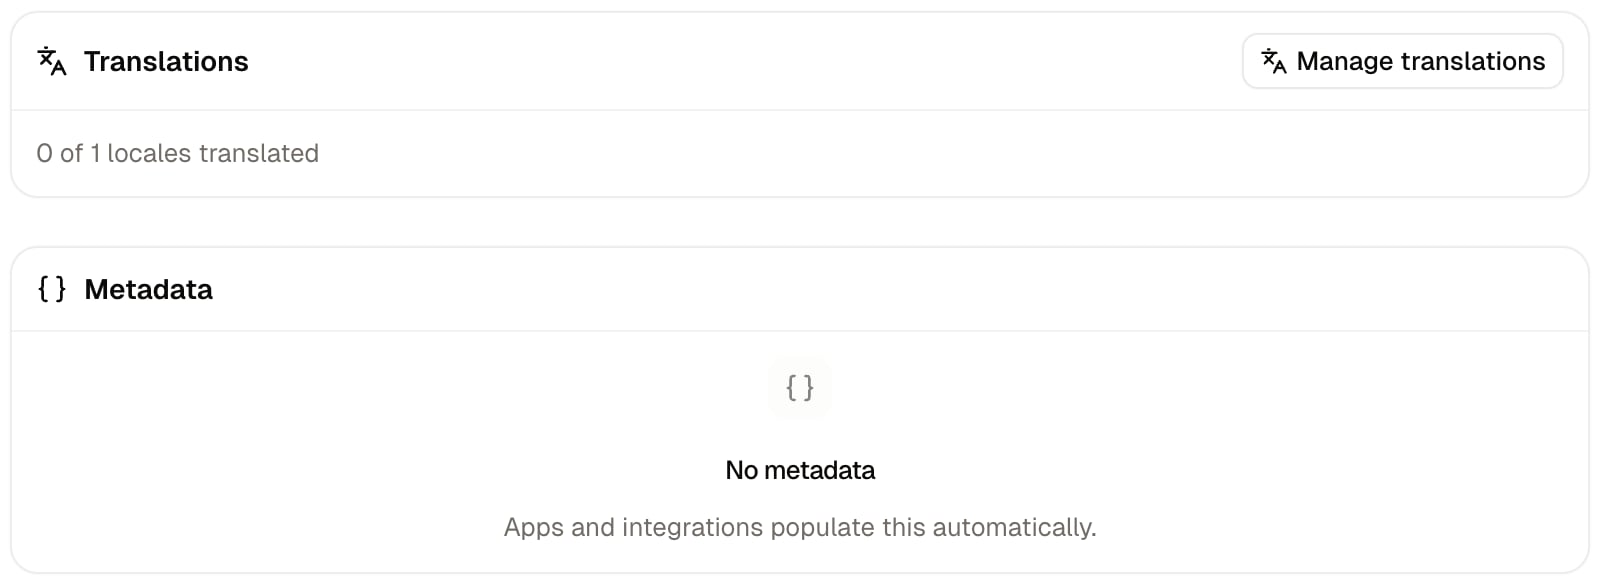 Three more cards appear once the product exists, because each needs a saved product to attach to.
| Card | What it holds |
| - | - |
| **Stock history** | A button inside the **Inventory** card, showing how a warehouse count reached its current figure. See [Inventory](/docs/user/inventory/stock-levels). |
| **Translations** | The product's name and description in your other languages, and how many locales are translated so far. See [Translations](/docs/user/translations/translations). |
| **Metadata** | Structured data that apps and integrations write to the product. You do not fill this in yourself. |
## How to Edit a Product
Open a product from the products list, either by clicking its row or by choosing **Edit** from the menu at the end of the row. The page is the same form described above, with the product's values filled in.
Change whatever you need across any of the cards, then click **Save product**. Nothing on the form takes effect until you do.
**Discard** beside it abandons the changes you have made since you last saved.
## How to Duplicate a Product
To start a new product from an existing one, open the menu at the end of the product's row in the product list view and choose **Duplicate**. The copy opens for you to edit, so you can change its name, its prices and its product codes before saving.
Duplicating is convenient when a product differs only slightly from an existing one, where filling in the form from scratch would mean repeating most of it.
## How to Delete a Product
Open the menu at the end of the product's row in the list and choose **Delete**, then confirm.
To delete several products at once, tick them in the list and use **Delete** under **More actions**. See [How to Perform Bulk Actions on Products](/docs/user/products/products#how-to-perform-bulk-actions-on-products).
Deleting a product cannot be undone. If you only want to stop selling it, set its status to **Archived** instead, which keeps the product in your list so you can bring it back later.
## Further Reading
* [Products](/docs/user/products/products) - The products list, statuses and bulk actions
* [Variants](/docs/user/products/variants) - Versions of a product, and editing many at once
* [Options](/docs/user/products/options) - Setting up the sizes, colors and other choices a product can come in
* [Media](/docs/user/products/media) - Every image and video in your store
* [Import & Export](/docs/user/products/import-and-export) - Loading many products at once from a file
* [Custom Product Fields](/docs/user/products/custom-product-fields) - The extra fields a product can carry
* [Inventory](/docs/user/inventory/stock-levels) - Working with your stock counts
This documentation is built and hosted on [Mintlify](https://mintlify.com), a developer documentation platform.
Three more cards appear once the product exists, because each needs a saved product to attach to.
| Card | What it holds |
| - | - |
| **Stock history** | A button inside the **Inventory** card, showing how a warehouse count reached its current figure. See [Inventory](/docs/user/inventory/stock-levels). |
| **Translations** | The product's name and description in your other languages, and how many locales are translated so far. See [Translations](/docs/user/translations/translations). |
| **Metadata** | Structured data that apps and integrations write to the product. You do not fill this in yourself. |
## How to Edit a Product
Open a product from the products list, either by clicking its row or by choosing **Edit** from the menu at the end of the row. The page is the same form described above, with the product's values filled in.
Change whatever you need across any of the cards, then click **Save product**. Nothing on the form takes effect until you do.
**Discard** beside it abandons the changes you have made since you last saved.
## How to Duplicate a Product
To start a new product from an existing one, open the menu at the end of the product's row in the product list view and choose **Duplicate**. The copy opens for you to edit, so you can change its name, its prices and its product codes before saving.
Duplicating is convenient when a product differs only slightly from an existing one, where filling in the form from scratch would mean repeating most of it.
## How to Delete a Product
Open the menu at the end of the product's row in the list and choose **Delete**, then confirm.
To delete several products at once, tick them in the list and use **Delete** under **More actions**. See [How to Perform Bulk Actions on Products](/docs/user/products/products#how-to-perform-bulk-actions-on-products).
Deleting a product cannot be undone. If you only want to stop selling it, set its status to **Archived** instead, which keeps the product in your list so you can bring it back later.
## Further Reading
* [Products](/docs/user/products/products) - The products list, statuses and bulk actions
* [Variants](/docs/user/products/variants) - Versions of a product, and editing many at once
* [Options](/docs/user/products/options) - Setting up the sizes, colors and other choices a product can come in
* [Media](/docs/user/products/media) - Every image and video in your store
* [Import & Export](/docs/user/products/import-and-export) - Loading many products at once from a file
* [Custom Product Fields](/docs/user/products/custom-product-fields) - The extra fields a product can carry
* [Inventory](/docs/user/inventory/stock-levels) - Working with your stock counts
This documentation is built and hosted on [Mintlify](https://mintlify.com), a developer documentation platform.