> ## Documentation Index
> Fetch the complete documentation index at: https://spreecommerce.org/docs/llms.txt
> Use this file to discover all available pages before exploring further.
# Set Up Multiple Languages
> Learn how to sell in multiple languages by configuring locales, translating products, categories, and policies in Spree Commerce.
Spree lets you present your store in multiple languages — so customers in France see content in French, customers in Germany see content in German, and so on. Languages are tied to your Markets configuration, which means you set up a locale per market and then translate your content to match.
In this guide, we'll walk through enabling additional languages, translating your product catalog in bulk using the translations importer, and making manual adjustments to individual products, categories, and store policies.
## 1. Set Up Markets with Additional Locales
Languages in Spree are configured through Markets. Each market has a **Default Locale** — the language customers see when they browse that market. Before any translation work can begin, you need at least one market set up with a non-default locale.
Navigate to **Settings → Markets** and click **New Market** for each region you want to add.
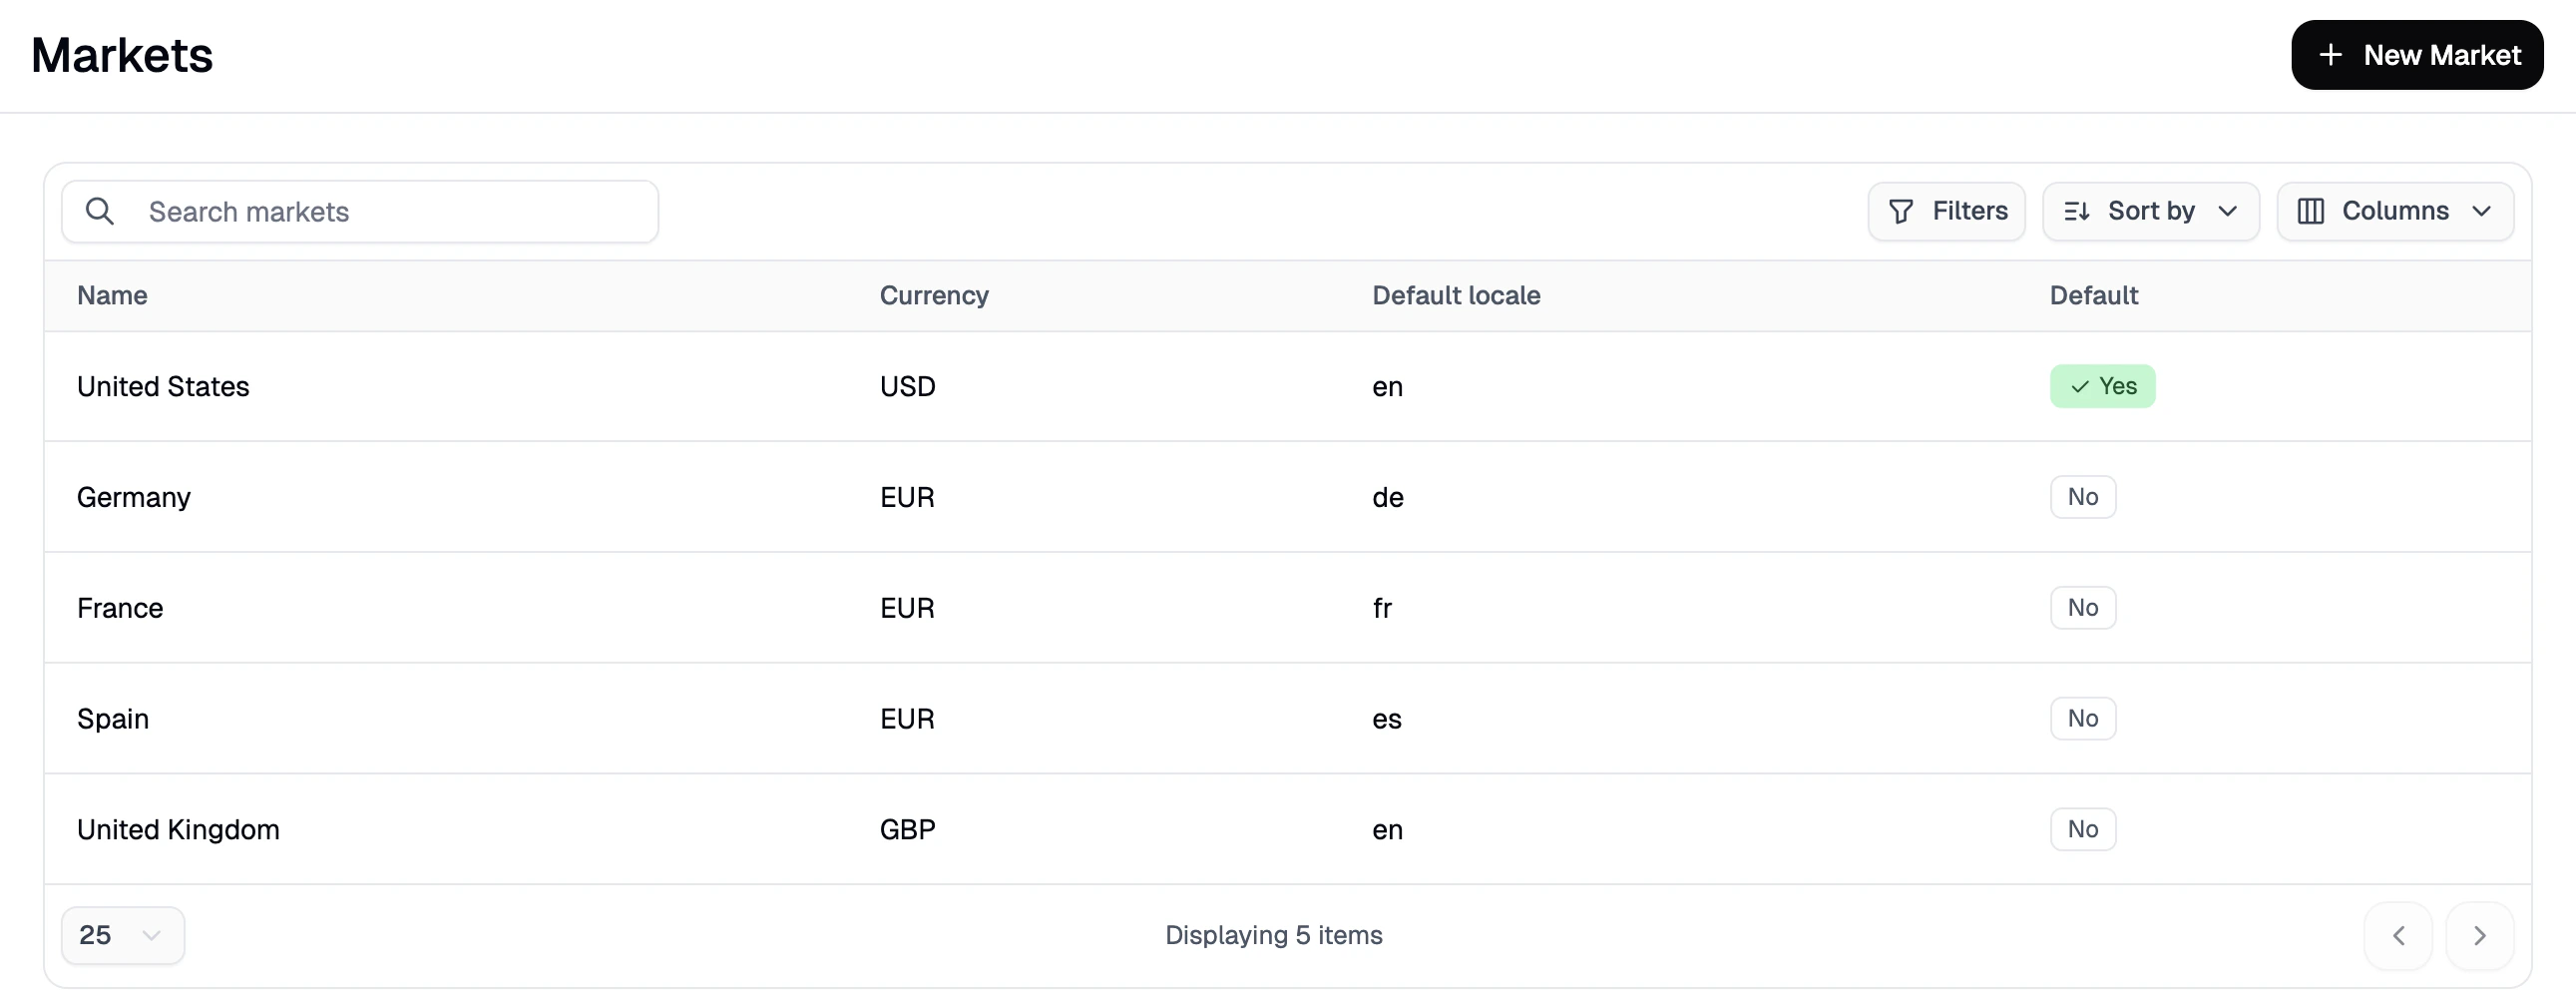 When creating or editing a market, set the following:
* **Default Locale** — the primary language for this market (e.g., `FR` for French, `DE` for German)
* **Supported Locales** — any additional languages customers can switch to within that market
Before you can set up a Market for a country, make sure that country is included in a configured Zone. See [Settings → Zones](https://spreecommerce.org/docs/user/settings/zones) for setup instructions.
Click **Create** once you've configured the new market. Once your markets are saved, the locales you've configured will appear in the **Products → Translations** page, ready for you to start filling in translated content.
## 2. Translate Products in Bulk Using the Translations Importer
The fastest way to translate a large product catalog is to export your existing content, fill in the translations, and import it back. Navigate to **Products → Translations**.
When creating or editing a market, set the following:
* **Default Locale** — the primary language for this market (e.g., `FR` for French, `DE` for German)
* **Supported Locales** — any additional languages customers can switch to within that market
Before you can set up a Market for a country, make sure that country is included in a configured Zone. See [Settings → Zones](https://spreecommerce.org/docs/user/settings/zones) for setup instructions.
Click **Create** once you've configured the new market. Once your markets are saved, the locales you've configured will appear in the **Products → Translations** page, ready for you to start filling in translated content.
## 2. Translate Products in Bulk Using the Translations Importer
The fastest way to translate a large product catalog is to export your existing content, fill in the translations, and import it back. Navigate to **Products → Translations**.
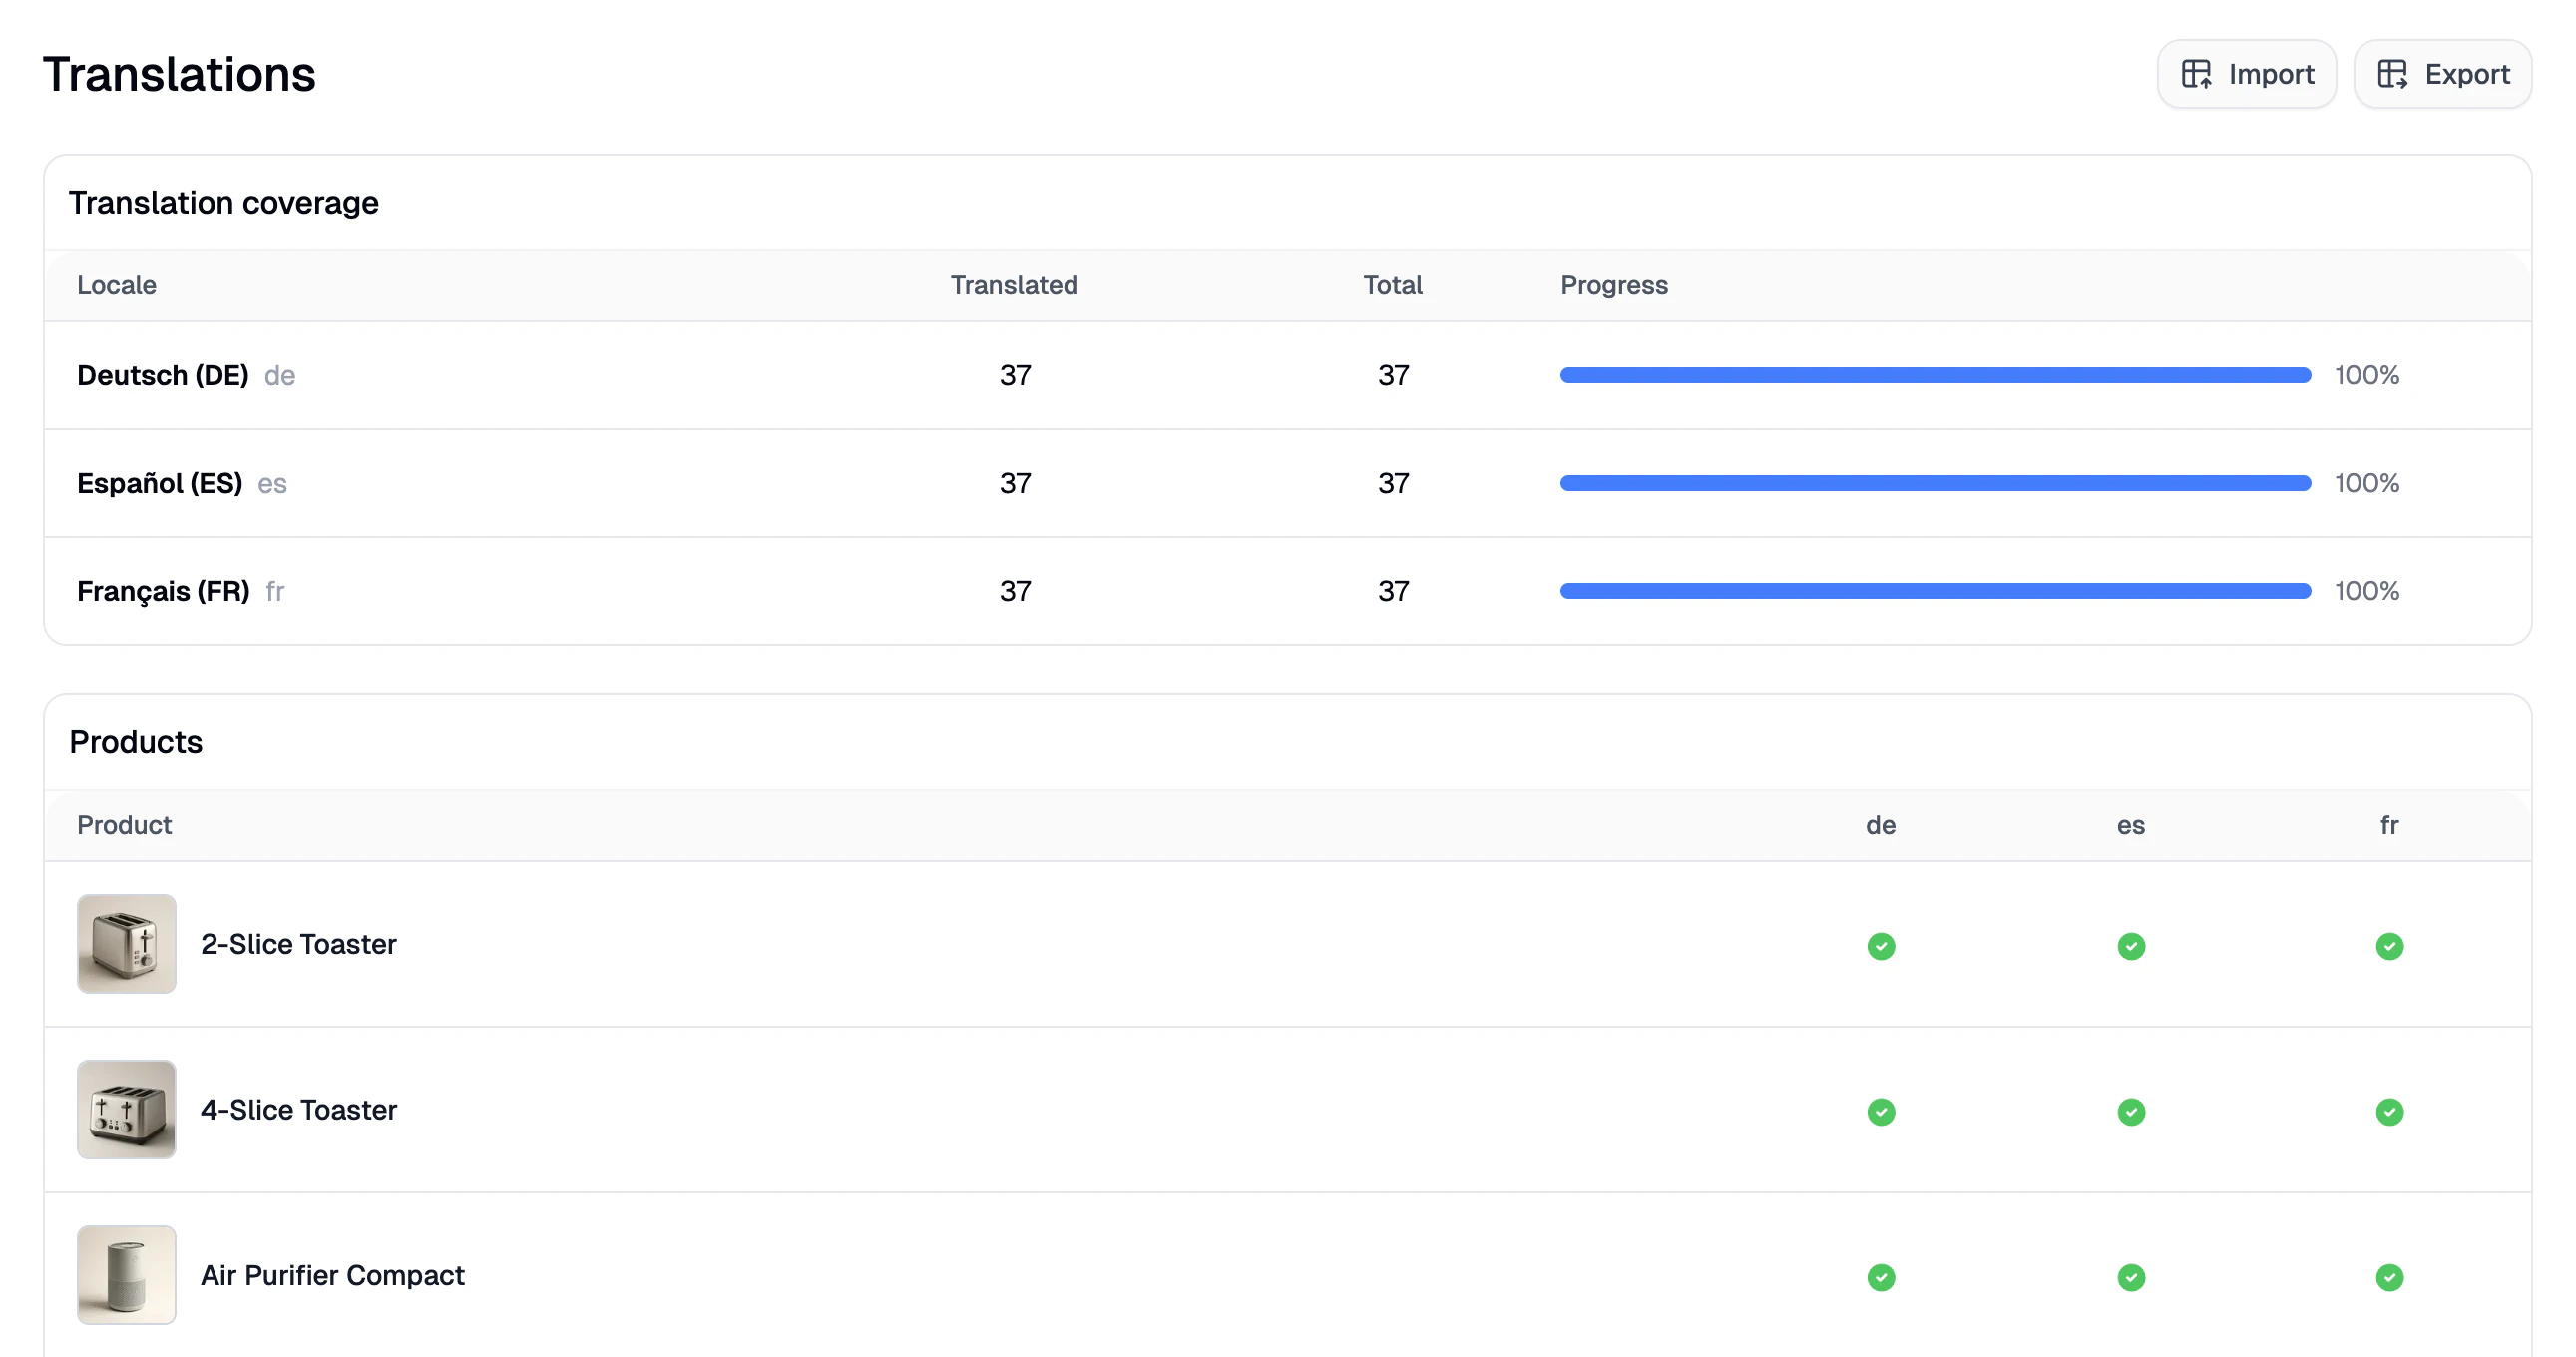 The coverage table at the top shows you how many products have been translated for each locale, so you can track your progress at a glance.
### Export your catalog for translation
Click **Export** in the top-right corner, then confirm by clicking **Export** in the modal. A download link will be sent to your admin email address. The exported file contains your product content in your default language, with empty columns for each additional locale — ready to be filled in.
### Fill in the translations
Open the exported CSV file and fill in the translated content for each locale column. This includes product names, descriptions, and any other translatable fields. Save the file when done.
### Import the translated file
Click **Import** in the top-right corner to open the import side panel.
The coverage table at the top shows you how many products have been translated for each locale, so you can track your progress at a glance.
### Export your catalog for translation
Click **Export** in the top-right corner, then confirm by clicking **Export** in the modal. A download link will be sent to your admin email address. The exported file contains your product content in your default language, with empty columns for each additional locale — ready to be filled in.
### Fill in the translations
Open the exported CSV file and fill in the translated content for each locale column. This includes product names, descriptions, and any other translatable fields. Save the file when done.
### Import the translated file
Click **Import** in the top-right corner to open the import side panel.
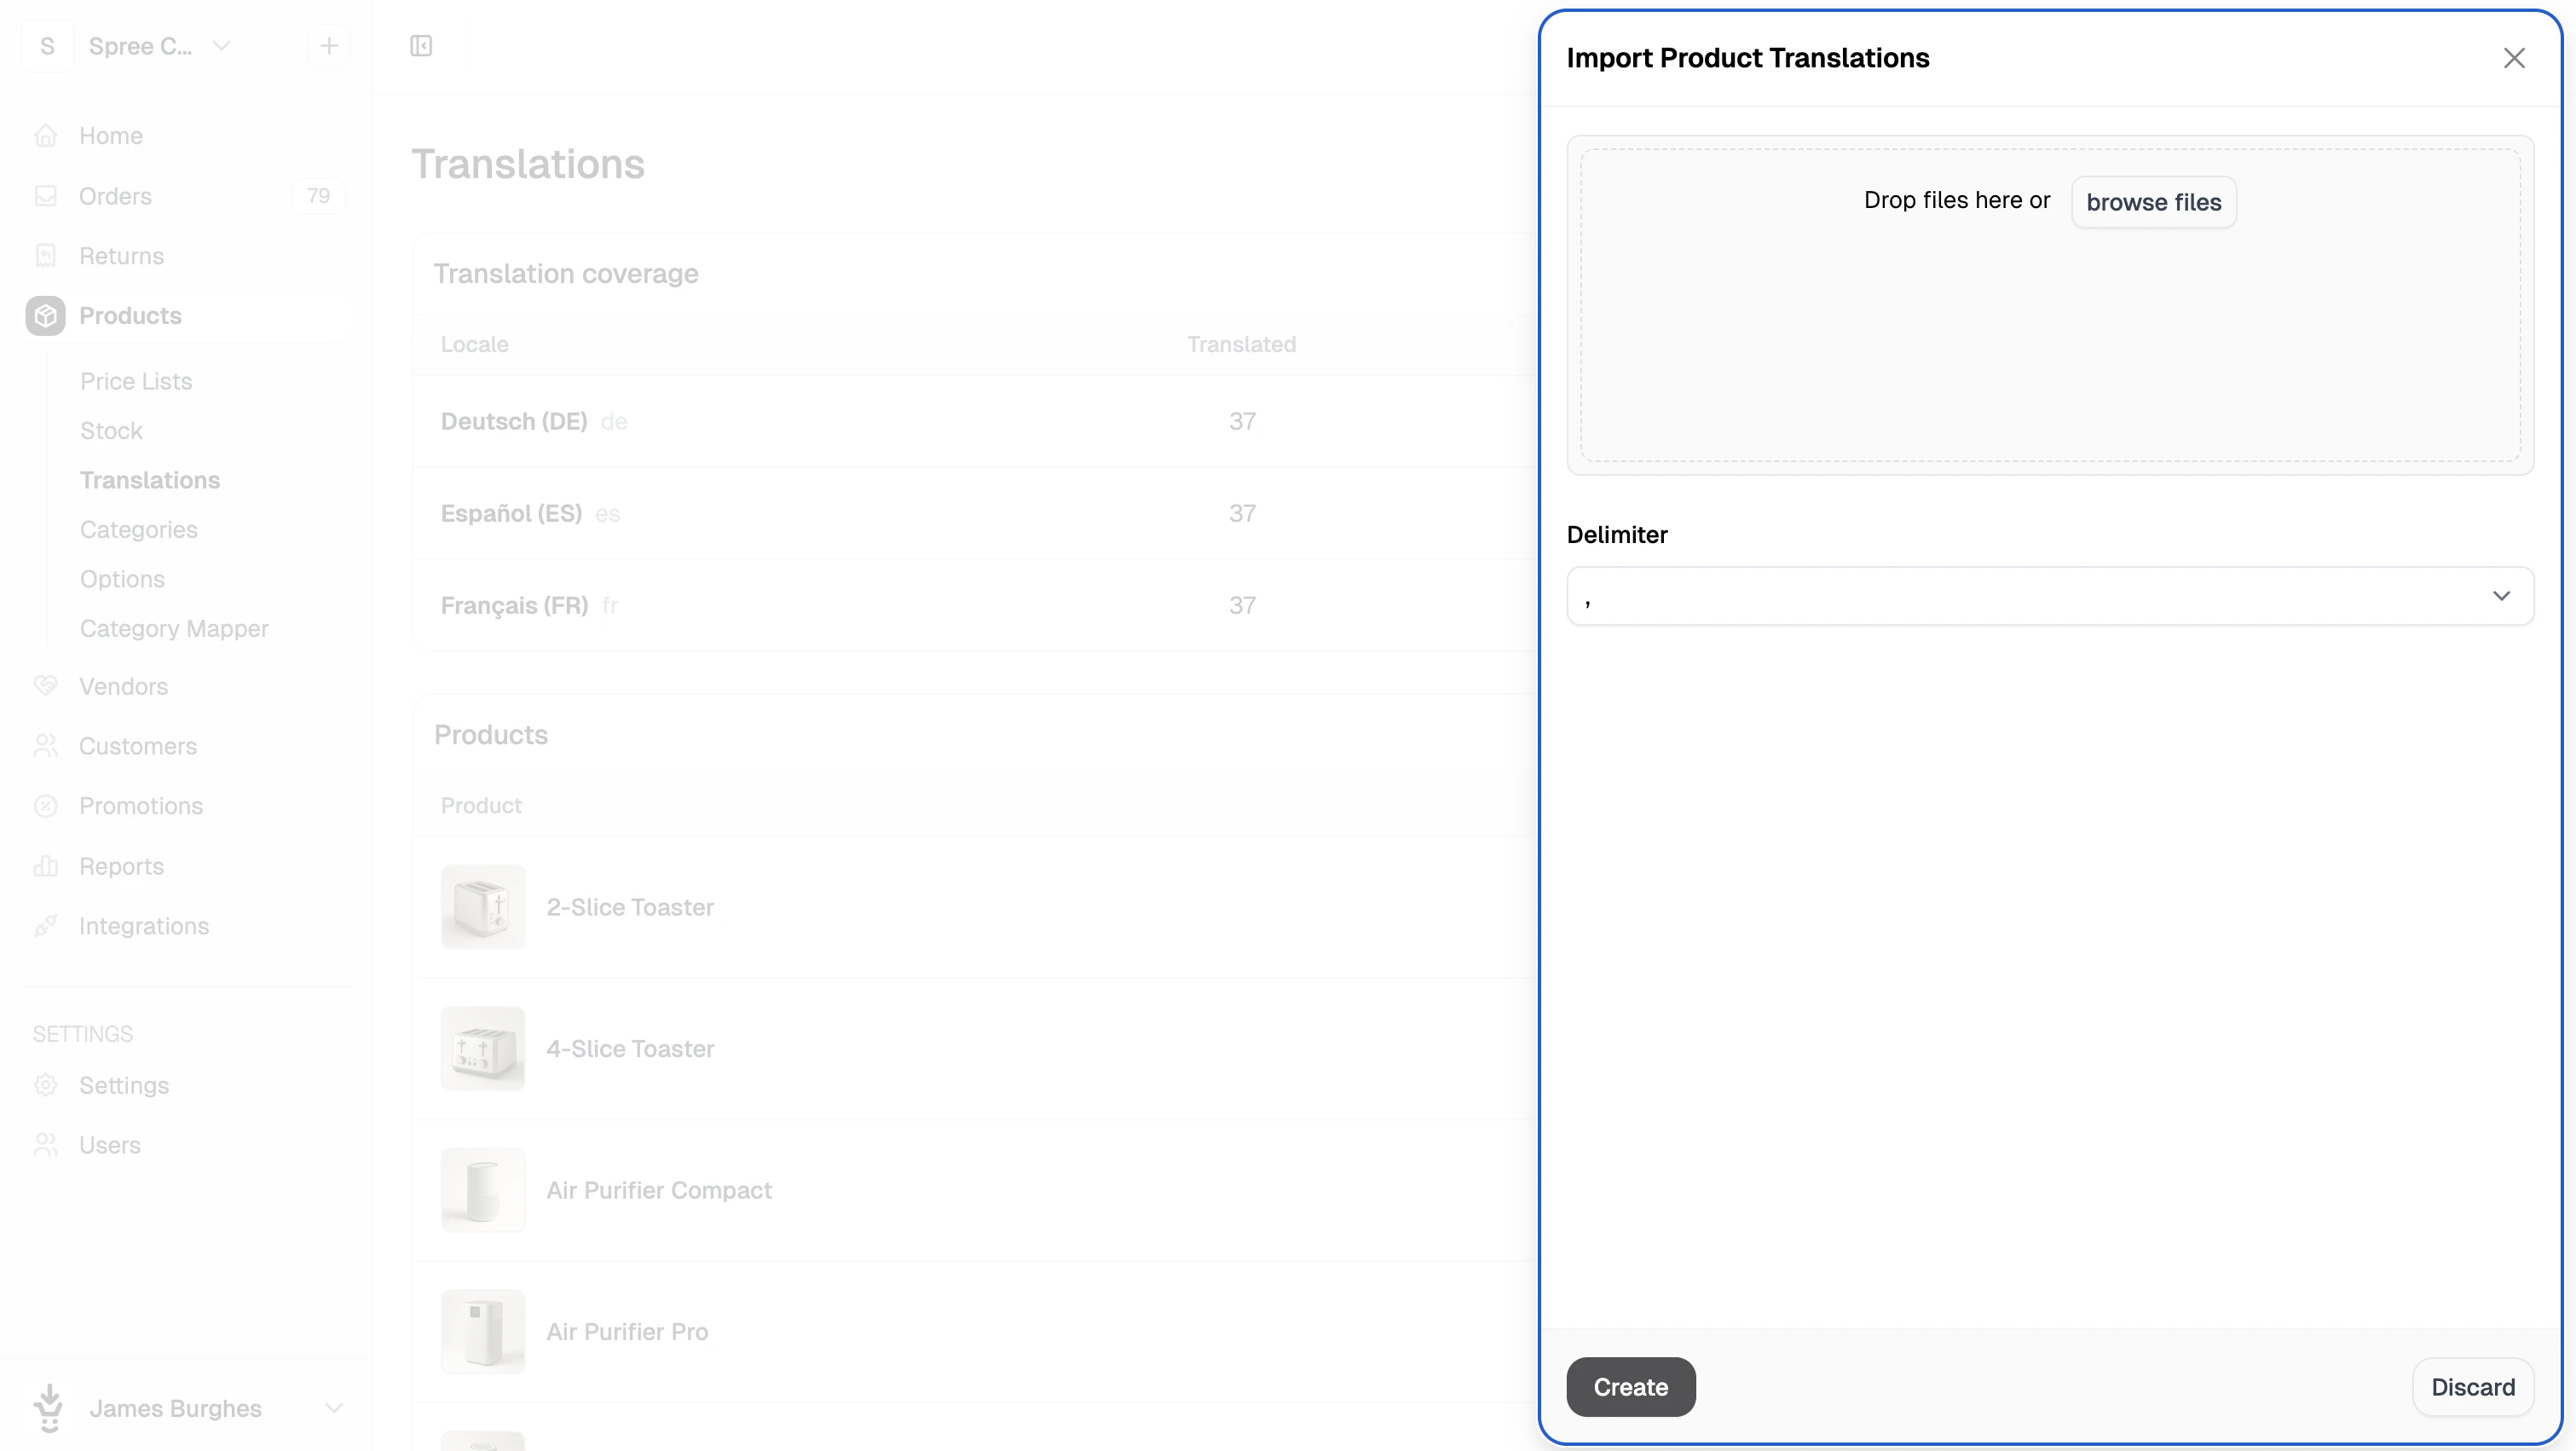 1. Drag and drop your translated CSV file into the upload area, or click **browse files** to select it.
2. Select the delimiter used in your file (comma, pipe, semicolon, or tab).
3. Click **Create** to proceed to the field mapping step.
4. Review the field mapping and adjust any columns that weren't automatically matched, then click **Continue** to submit.
Once submitted, you'll be taken to a progress screen where you can monitor the import. Any rows with errors will be flagged with a message so you can fix and re-import them.
## 3. Manually Translate Individual Products
For one-off adjustments, the quickest way is to update translations directly from **Products → Translations**. Find the product in the list and click its name to open the translation drawer.
1. Drag and drop your translated CSV file into the upload area, or click **browse files** to select it.
2. Select the delimiter used in your file (comma, pipe, semicolon, or tab).
3. Click **Create** to proceed to the field mapping step.
4. Review the field mapping and adjust any columns that weren't automatically matched, then click **Continue** to submit.
Once submitted, you'll be taken to a progress screen where you can monitor the import. Any rows with errors will be flagged with a message so you can fix and re-import them.
## 3. Manually Translate Individual Products
For one-off adjustments, the quickest way is to update translations directly from **Products → Translations**. Find the product in the list and click its name to open the translation drawer.
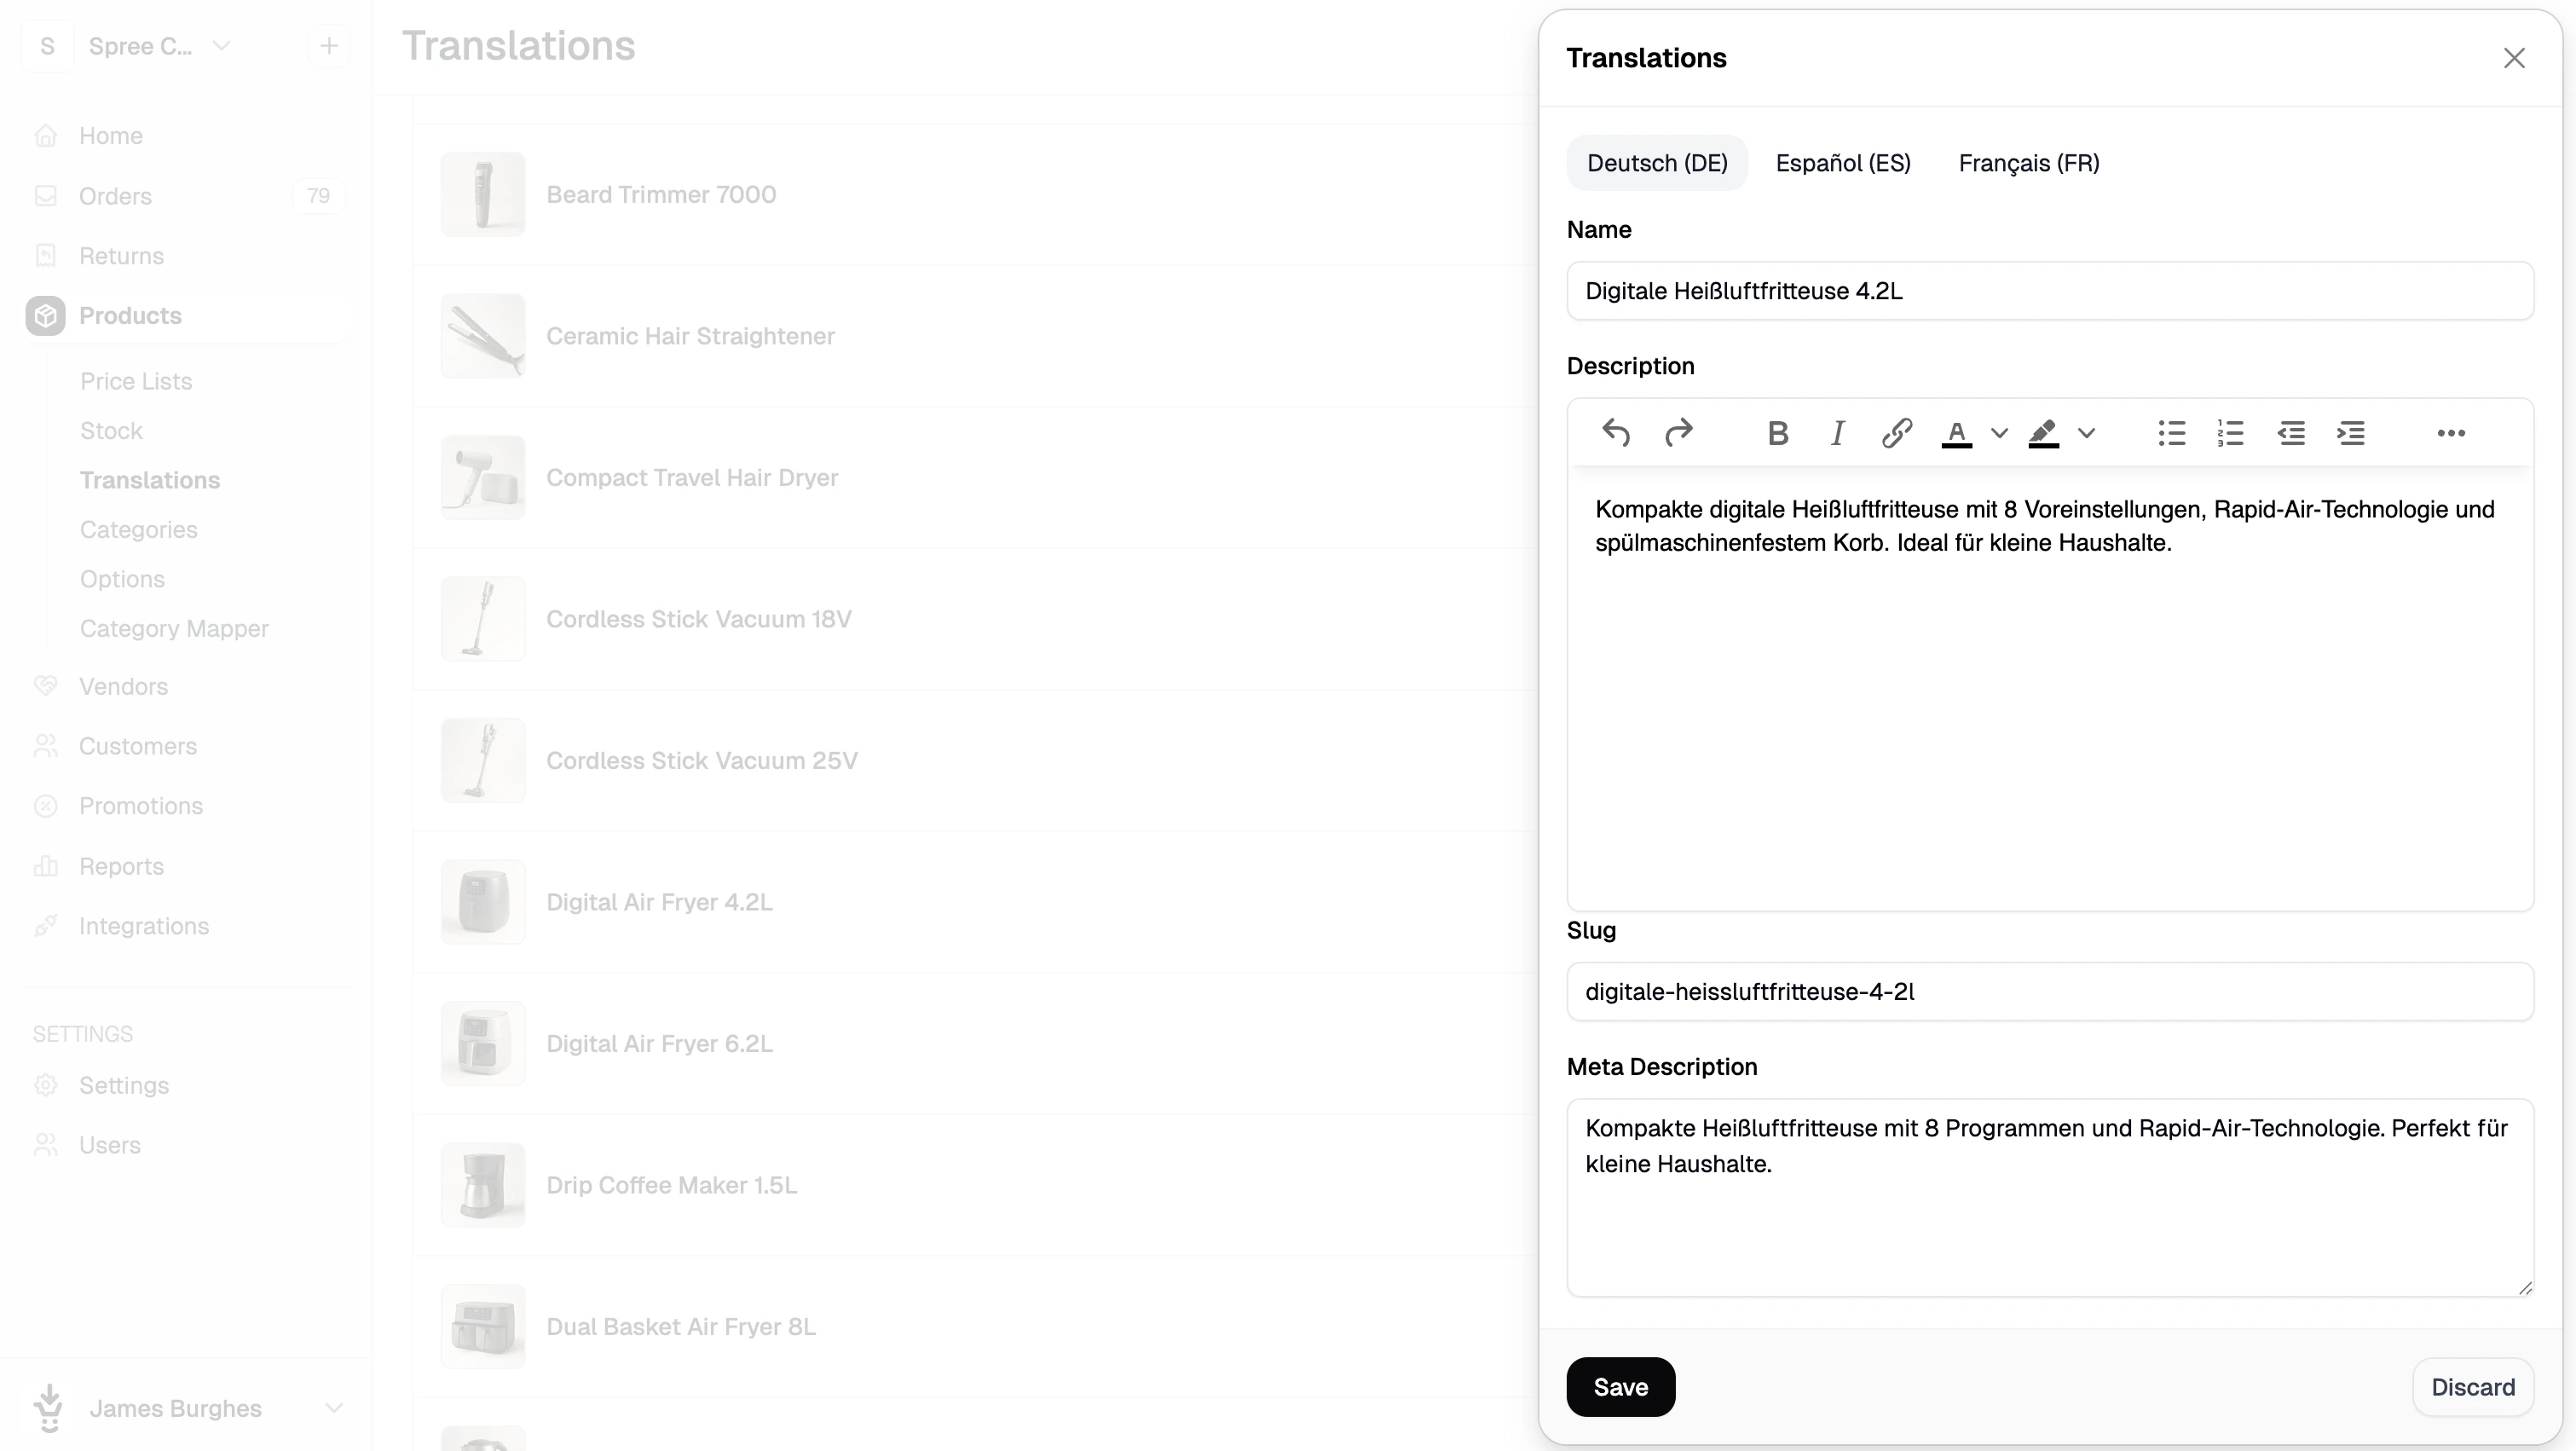 Fill in or update the translated fields for each locale — name, description, and any other translatable content — then save when done.
Translations can also be edited from within the product editor itself. Open the product, select the **Translations** from the three-dot menu in the top right corner, and update the fields there. Both methods produce the same result.
## 4. Translate Categories
Navigate to **Products → Categories** and click on the category you want to translate to open the category configurator.
Fill in or update the translated fields for each locale — name, description, and any other translatable content — then save when done.
Translations can also be edited from within the product editor itself. Open the product, select the **Translations** from the three-dot menu in the top right corner, and update the fields there. Both methods produce the same result.
## 4. Translate Categories
Navigate to **Products → Categories** and click on the category you want to translate to open the category configurator.
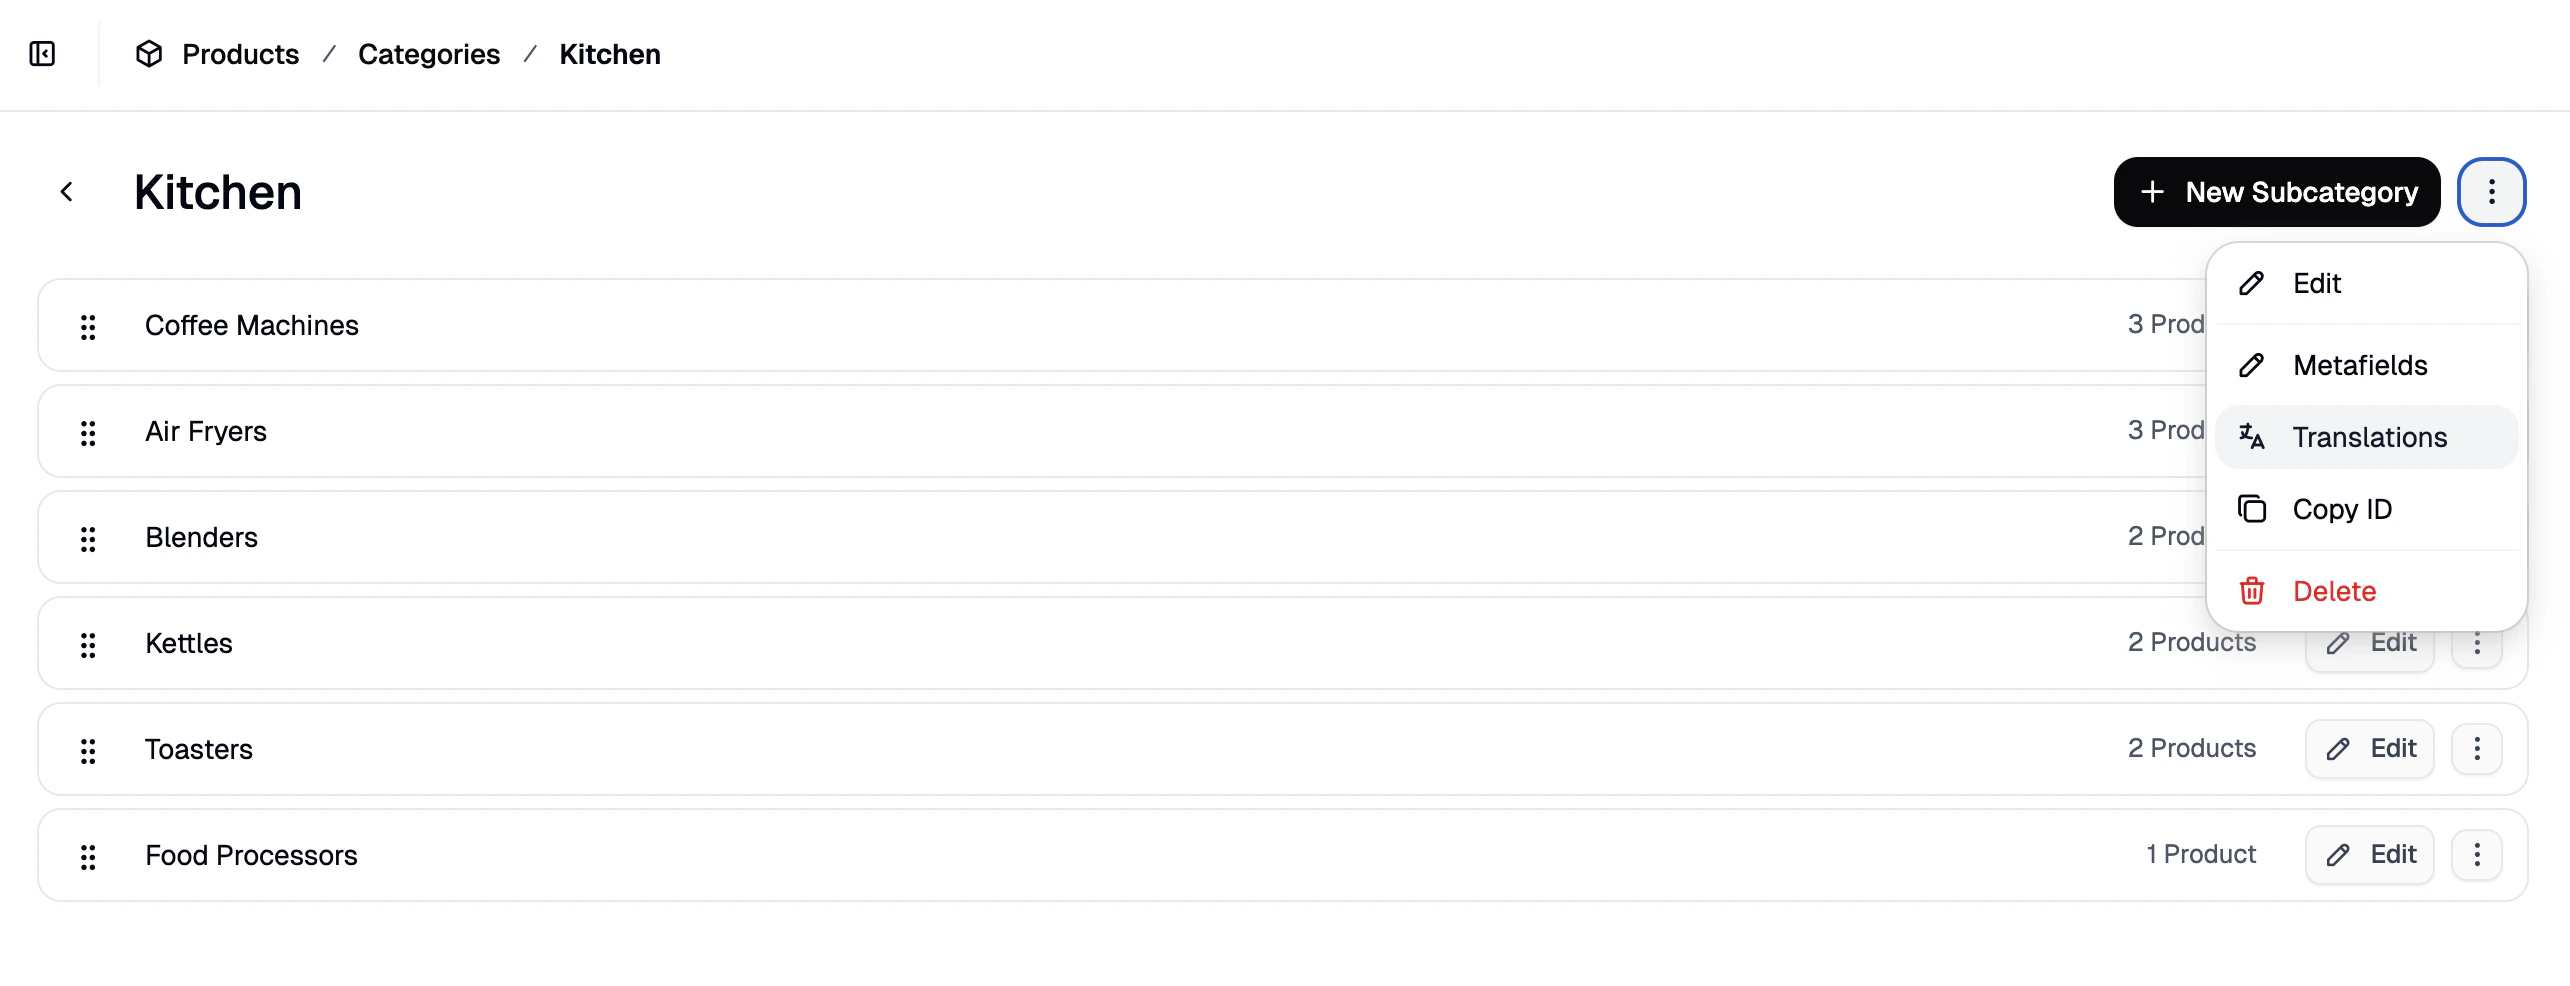 Click the **three-dot menu** in the top-right corner of the configurator and select **Translations**. This opens the translations side panel.
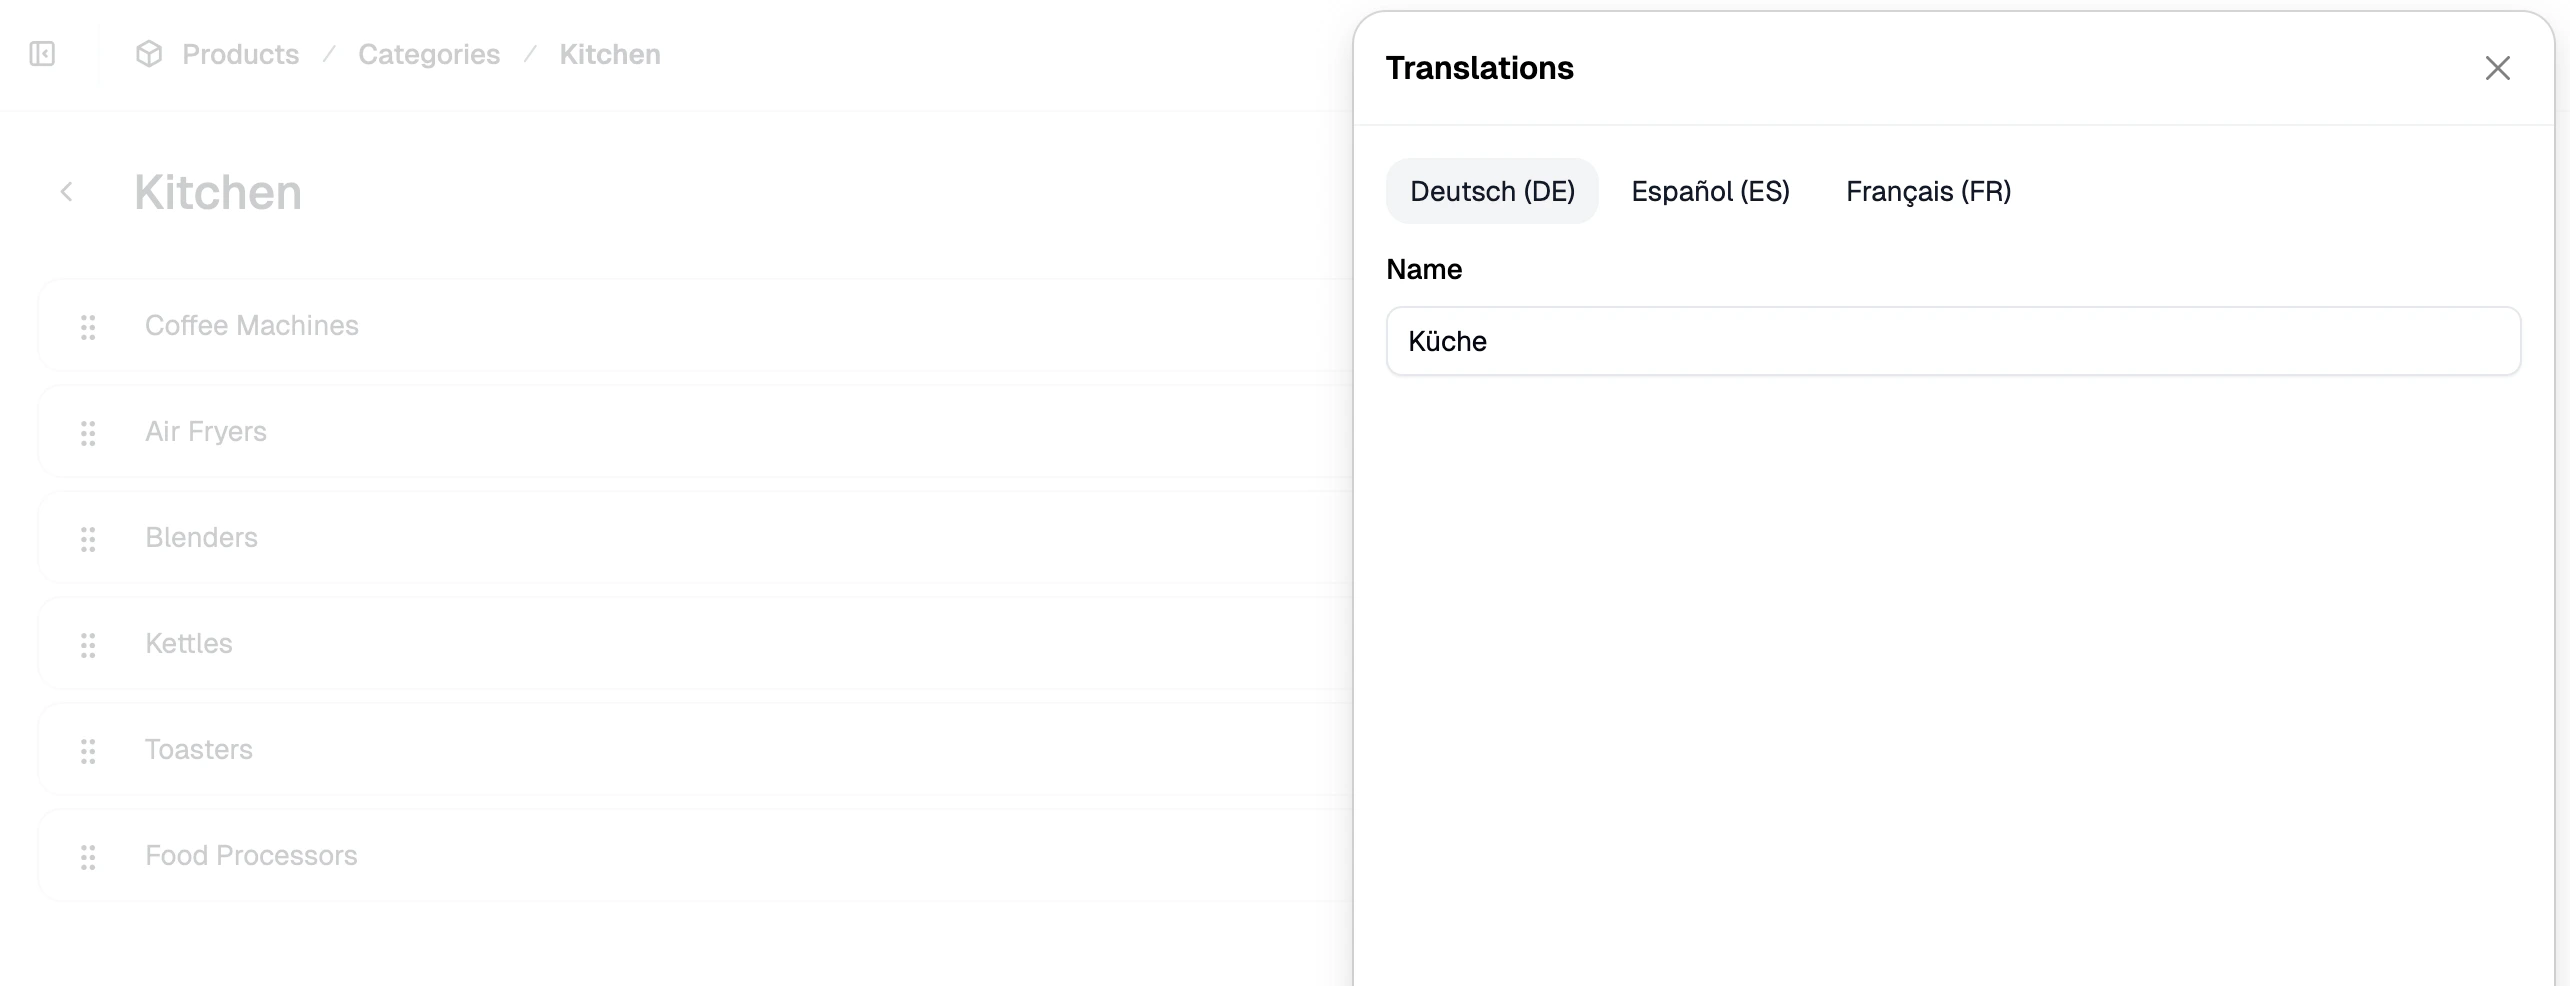 Switch between locales using the locale selector and enter the translated category name for each. Close the panel when done.
For subcategories, the process is the same — click the subcategory to open its editor, click the three-dot menu, and add translations in the side panel.
## 5. Translate Store Policies
Navigate to **Settings → Policies** and click on the policy you want to translate to open the editor.
Switch between locales using the locale selector and enter the translated category name for each. Close the panel when done.
For subcategories, the process is the same — click the subcategory to open its editor, click the three-dot menu, and add translations in the side panel.
## 5. Translate Store Policies
Navigate to **Settings → Policies** and click on the policy you want to translate to open the editor.
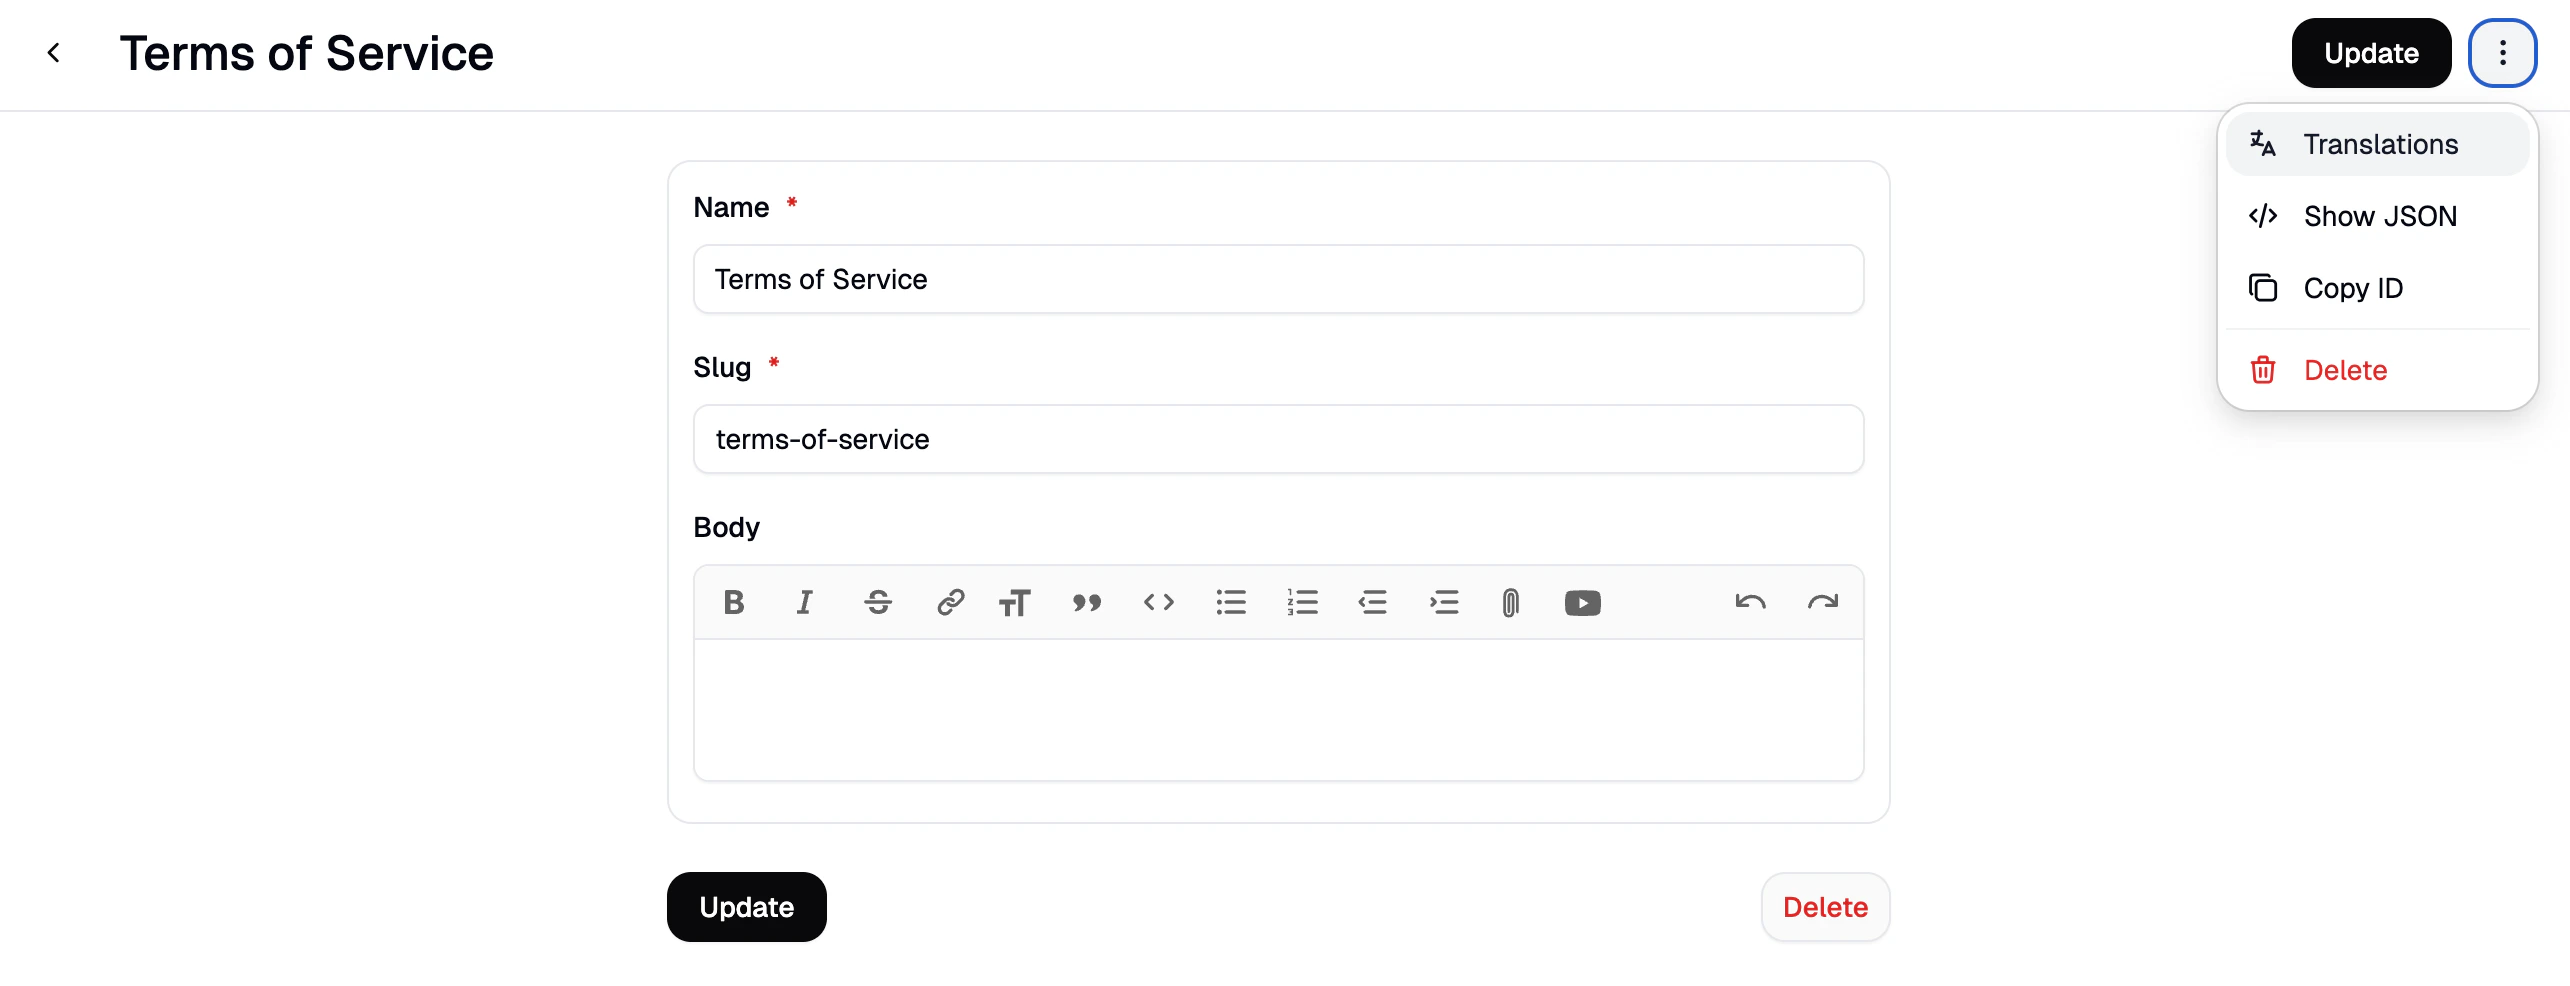 Click the **three-dot menu** in the top-right corner and select **Translations** to open the translations side panel. Switch between locales and enter the translated name and content for each, then close the panel when done.
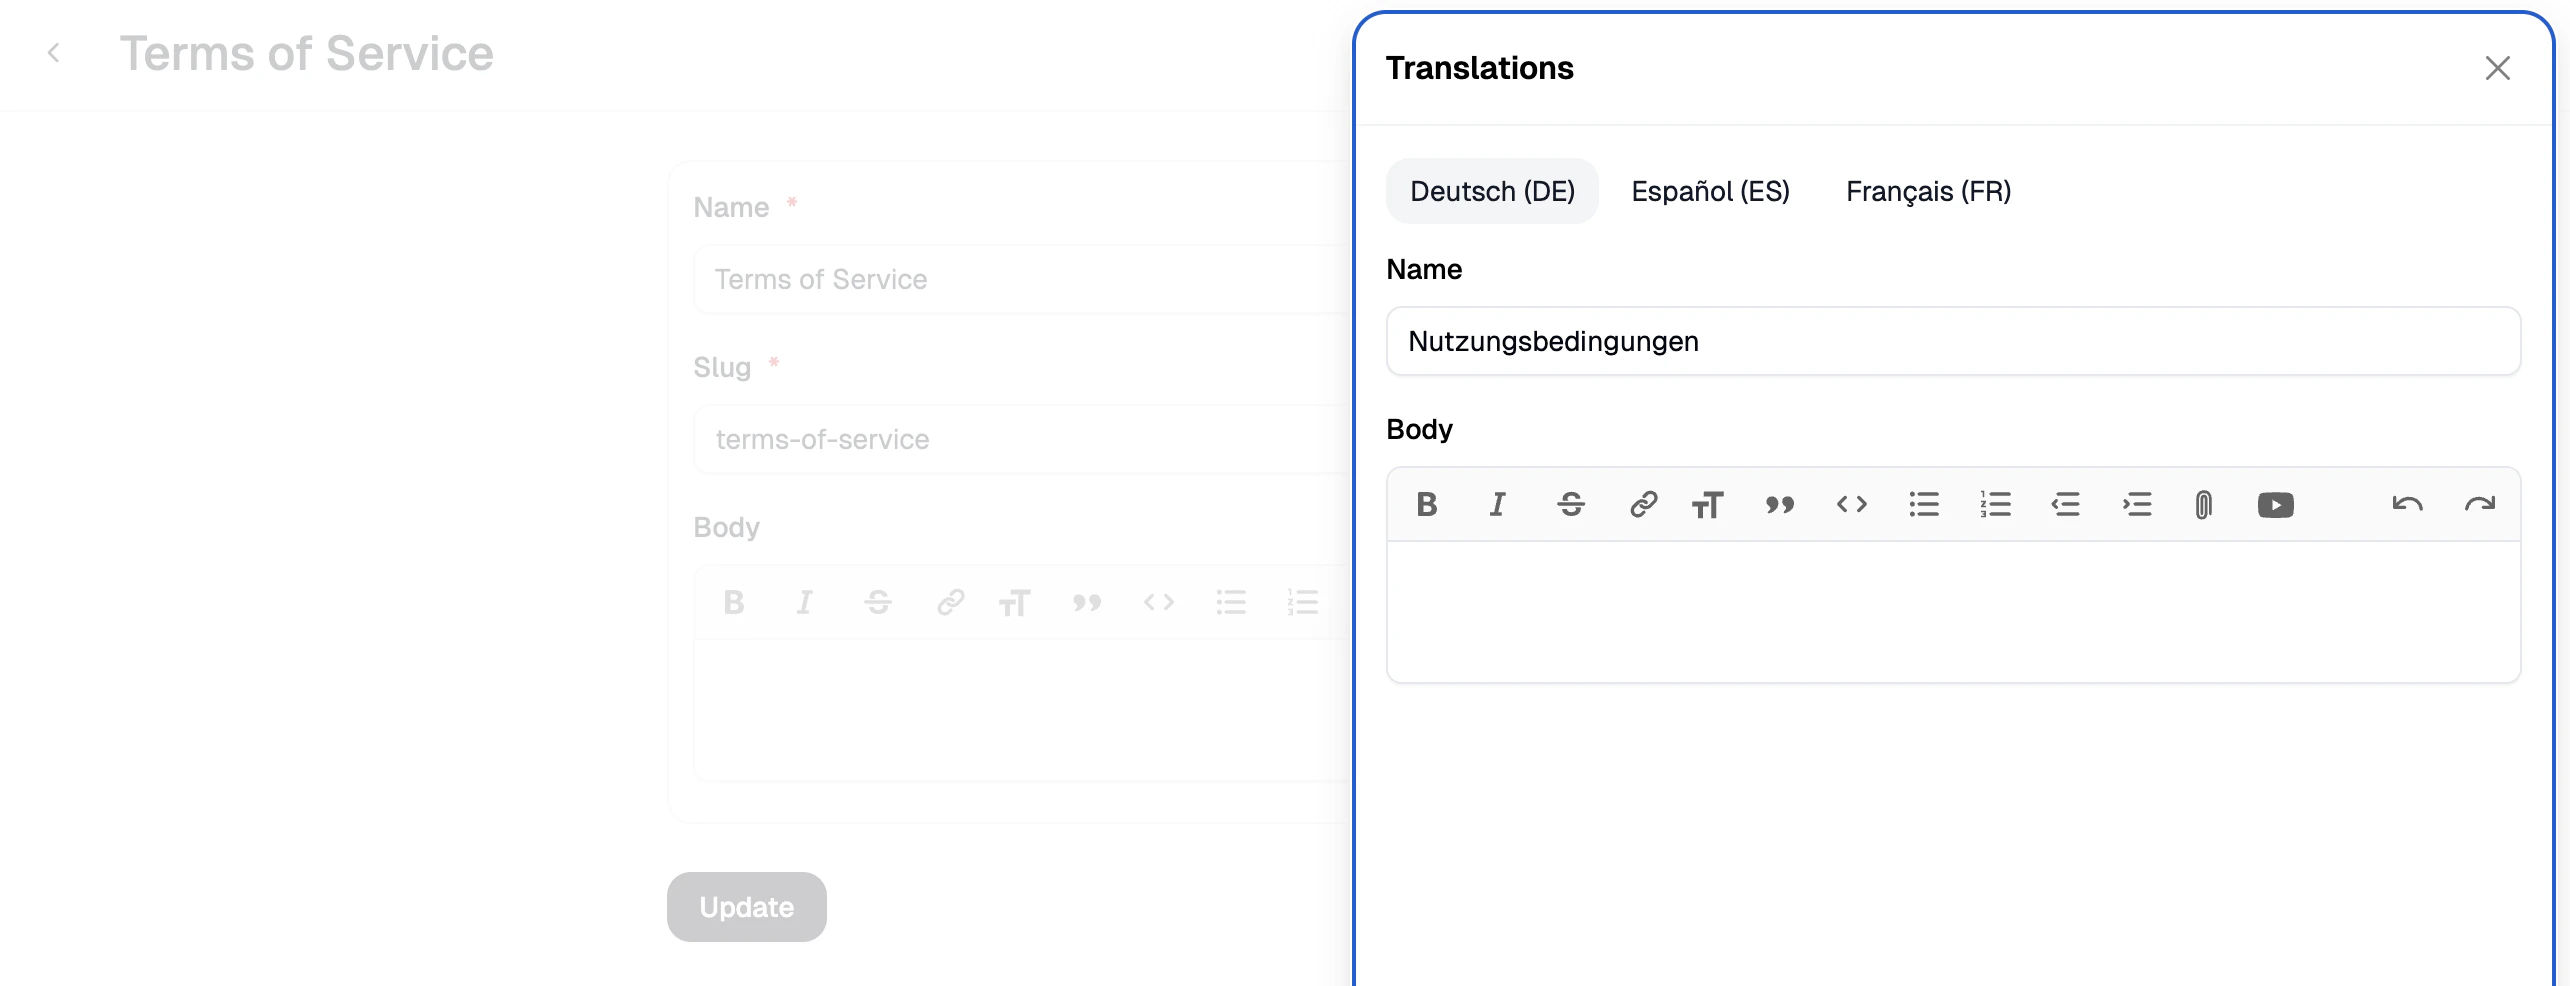 Repeat this process for each policy you want to make available in additional languages.
## Next Steps
* [Settings → Markets](https://spreecommerce.org/docs/user/settings/markets) — full reference for configuring markets and locales
* [Products → Translations](https://spreecommerce.org/docs/user/manage-products/translations) — full reference for the translations overview and bulk importer
* [Set Up Multi-Region Pricing](https://spreecommerce.org/docs/user/how-to/multi-region-pricing) — configure market-specific pricing alongside your language setup
Repeat this process for each policy you want to make available in additional languages.
## Next Steps
* [Settings → Markets](https://spreecommerce.org/docs/user/settings/markets) — full reference for configuring markets and locales
* [Products → Translations](https://spreecommerce.org/docs/user/manage-products/translations) — full reference for the translations overview and bulk importer
* [Set Up Multi-Region Pricing](https://spreecommerce.org/docs/user/how-to/multi-region-pricing) — configure market-specific pricing alongside your language setup