> ## Documentation Index
> Fetch the complete documentation index at: https://spreecommerce.org/docs/llms.txt
> Use this file to discover all available pages before exploring further.
# Connect PayPal payments to Spree Commerce
> Enable Spree's native PayPal integration to accept PayPal, Pay Later (BNPL), Venmo, and guest checkout payments without forcing shoppers to create an account.
PayPal is a global online payment system that allows your customers to pay using their PayPal balance, linked credit or debit cards, or bank accounts. Spree's native PayPal integration also supports PayPal Pay Later (BNPL), Venmo (US only), and guest checkout — giving shoppers flexibility at the payment step without forcing them to create a PayPal account.
## Installation
Before you can enable PayPal, it must be installed. To do so, you need to run the following command:
```bash Spree CLI (Docker) theme={"theme":"night-owl"}
spree bundle add spree_paypal_checkout && spree generate spree_paypal_checkout:install
```
```bash Without Spree CLI theme={"theme":"night-owl"}
bundle add spree_paypal_checkout && bin/rails g spree_paypal_checkout:install
```
After that, you need to make sure to restart the server.
## Connect PayPal
Sign in to your Spree admin dashboard and navigate to **Settings → Payments**.
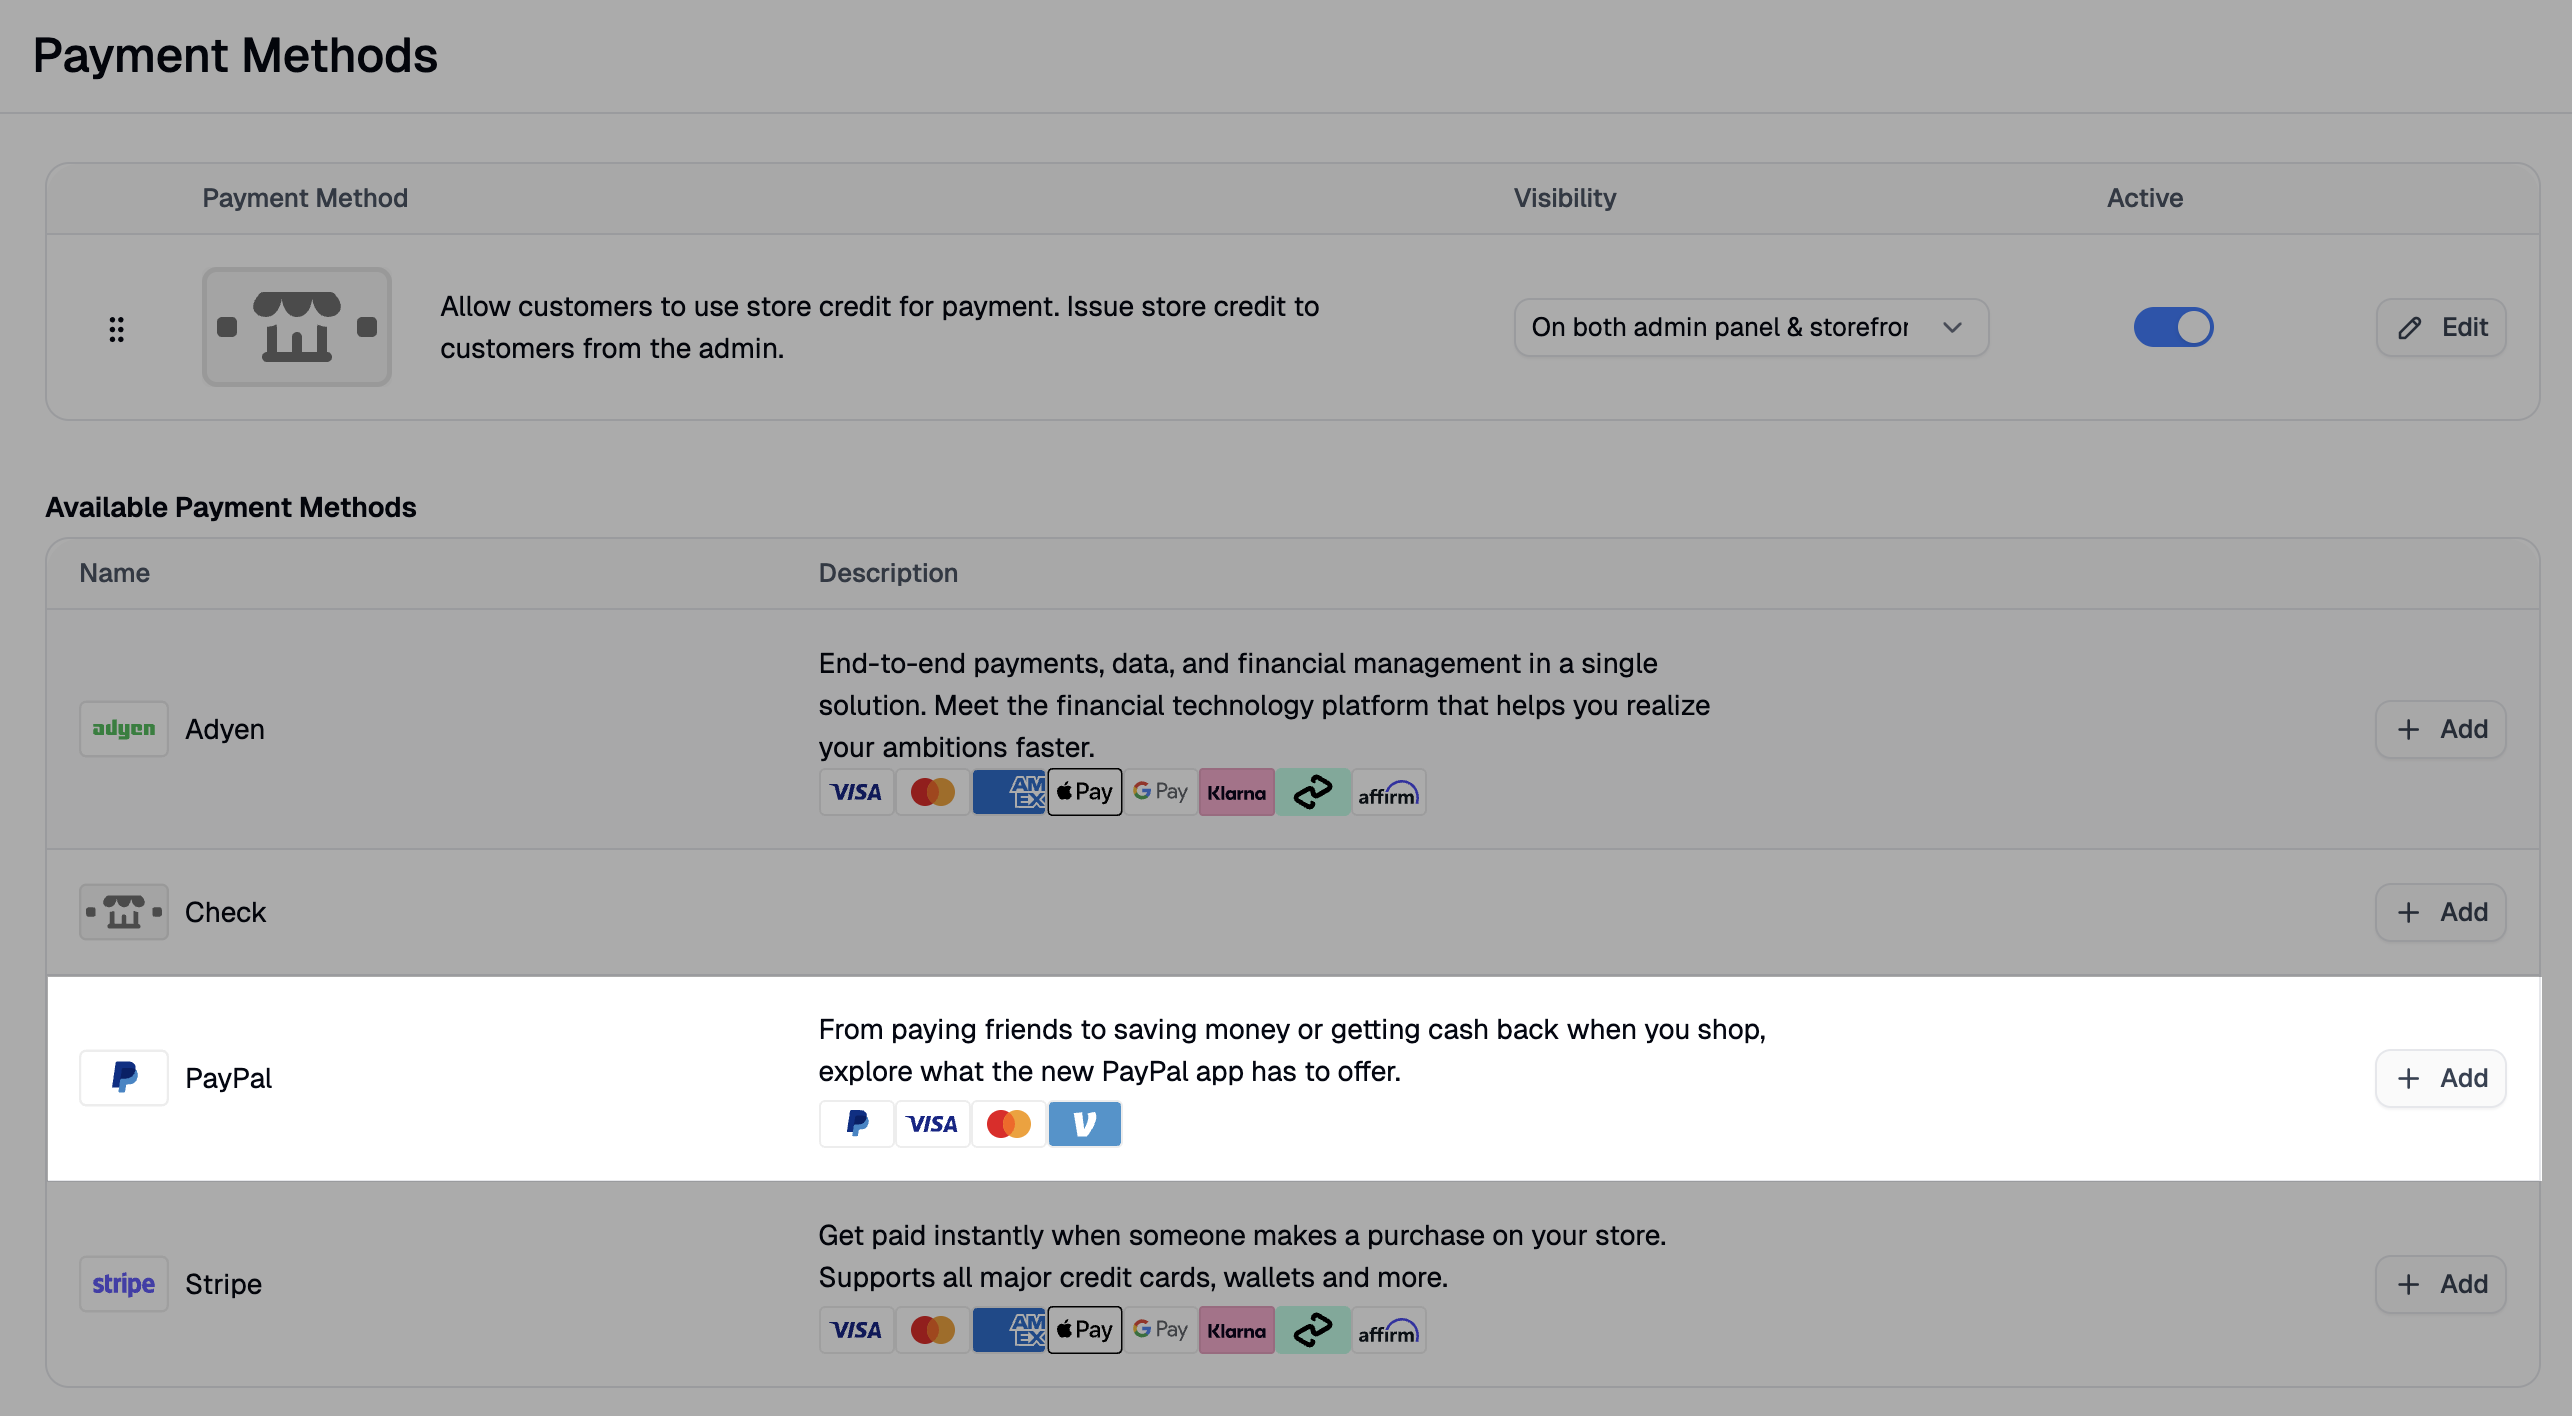 Find PayPal under Available Payment Methods and click **Add**.
This will redirect you to the PayPal setup form.
Find PayPal under Available Payment Methods and click **Add**.
This will redirect you to the PayPal setup form.
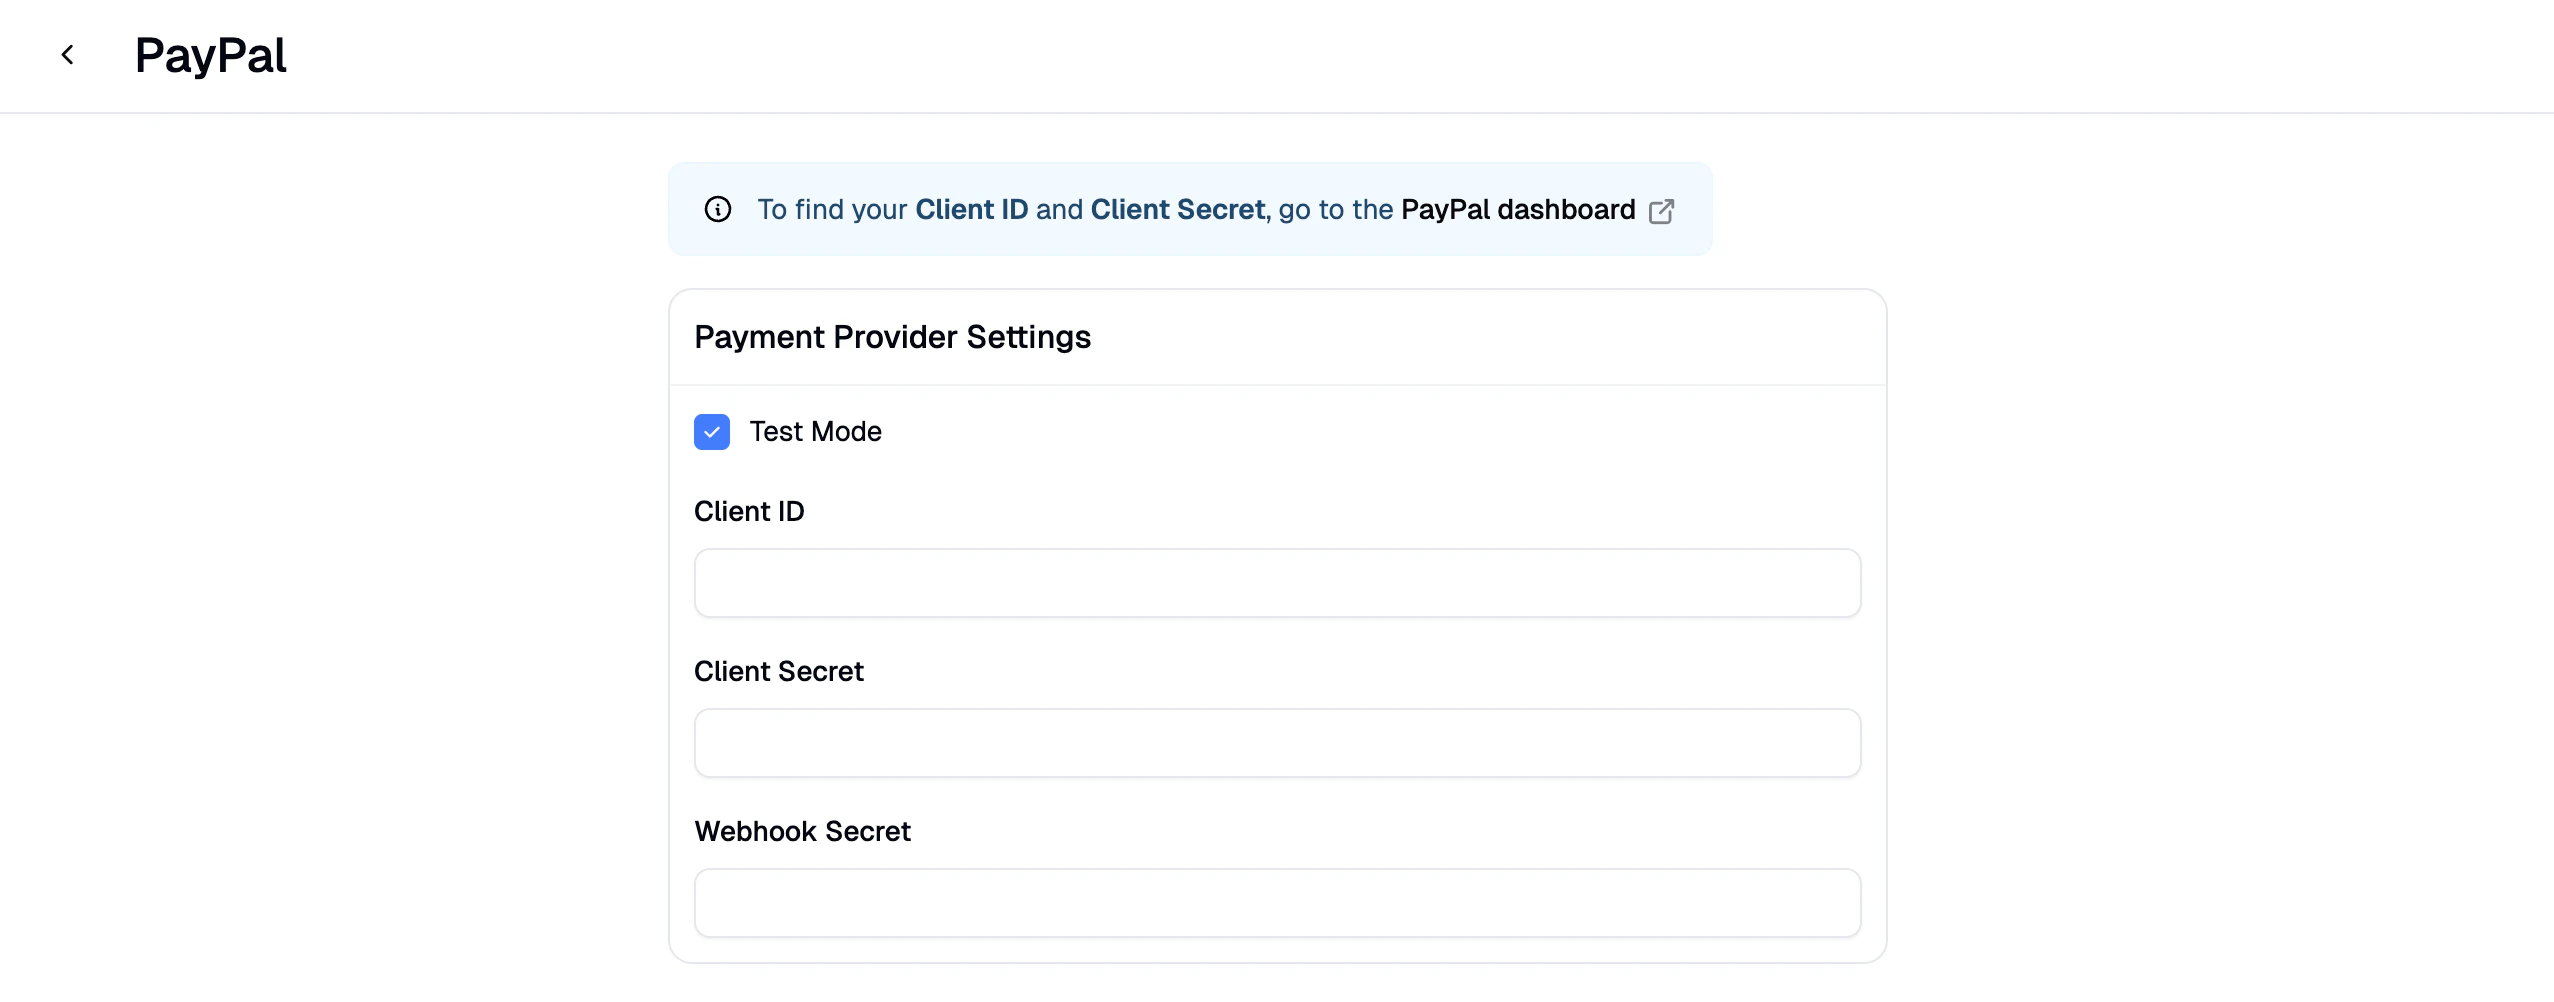 To retrieve your credentials:
1. Log in to your [PayPal Developer Dashboard](https://developer.paypal.com/dashboard/).
2. Navigate to **Apps & Credentials** and make sure you're on the **Live** tab.
3. Click into your **Default Application** (or create a new app if none exists).
4. Copy the **Client ID** and **Secret** and paste them into the matching fields in Spree.
5. *(Optional but recommended)* Create a webhook subscription to get a **Webhook ID** — see [Webhook ID](#webhook-id) below.
6. Click **Create** to enable PayPal as a payment method on your store.
To retrieve your credentials:
1. Log in to your [PayPal Developer Dashboard](https://developer.paypal.com/dashboard/).
2. Navigate to **Apps & Credentials** and make sure you're on the **Live** tab.
3. Click into your **Default Application** (or create a new app if none exists).
4. Copy the **Client ID** and **Secret** and paste them into the matching fields in Spree.
5. *(Optional but recommended)* Create a webhook subscription to get a **Webhook ID** — see [Webhook ID](#webhook-id) below.
6. Click **Create** to enable PayPal as a payment method on your store.
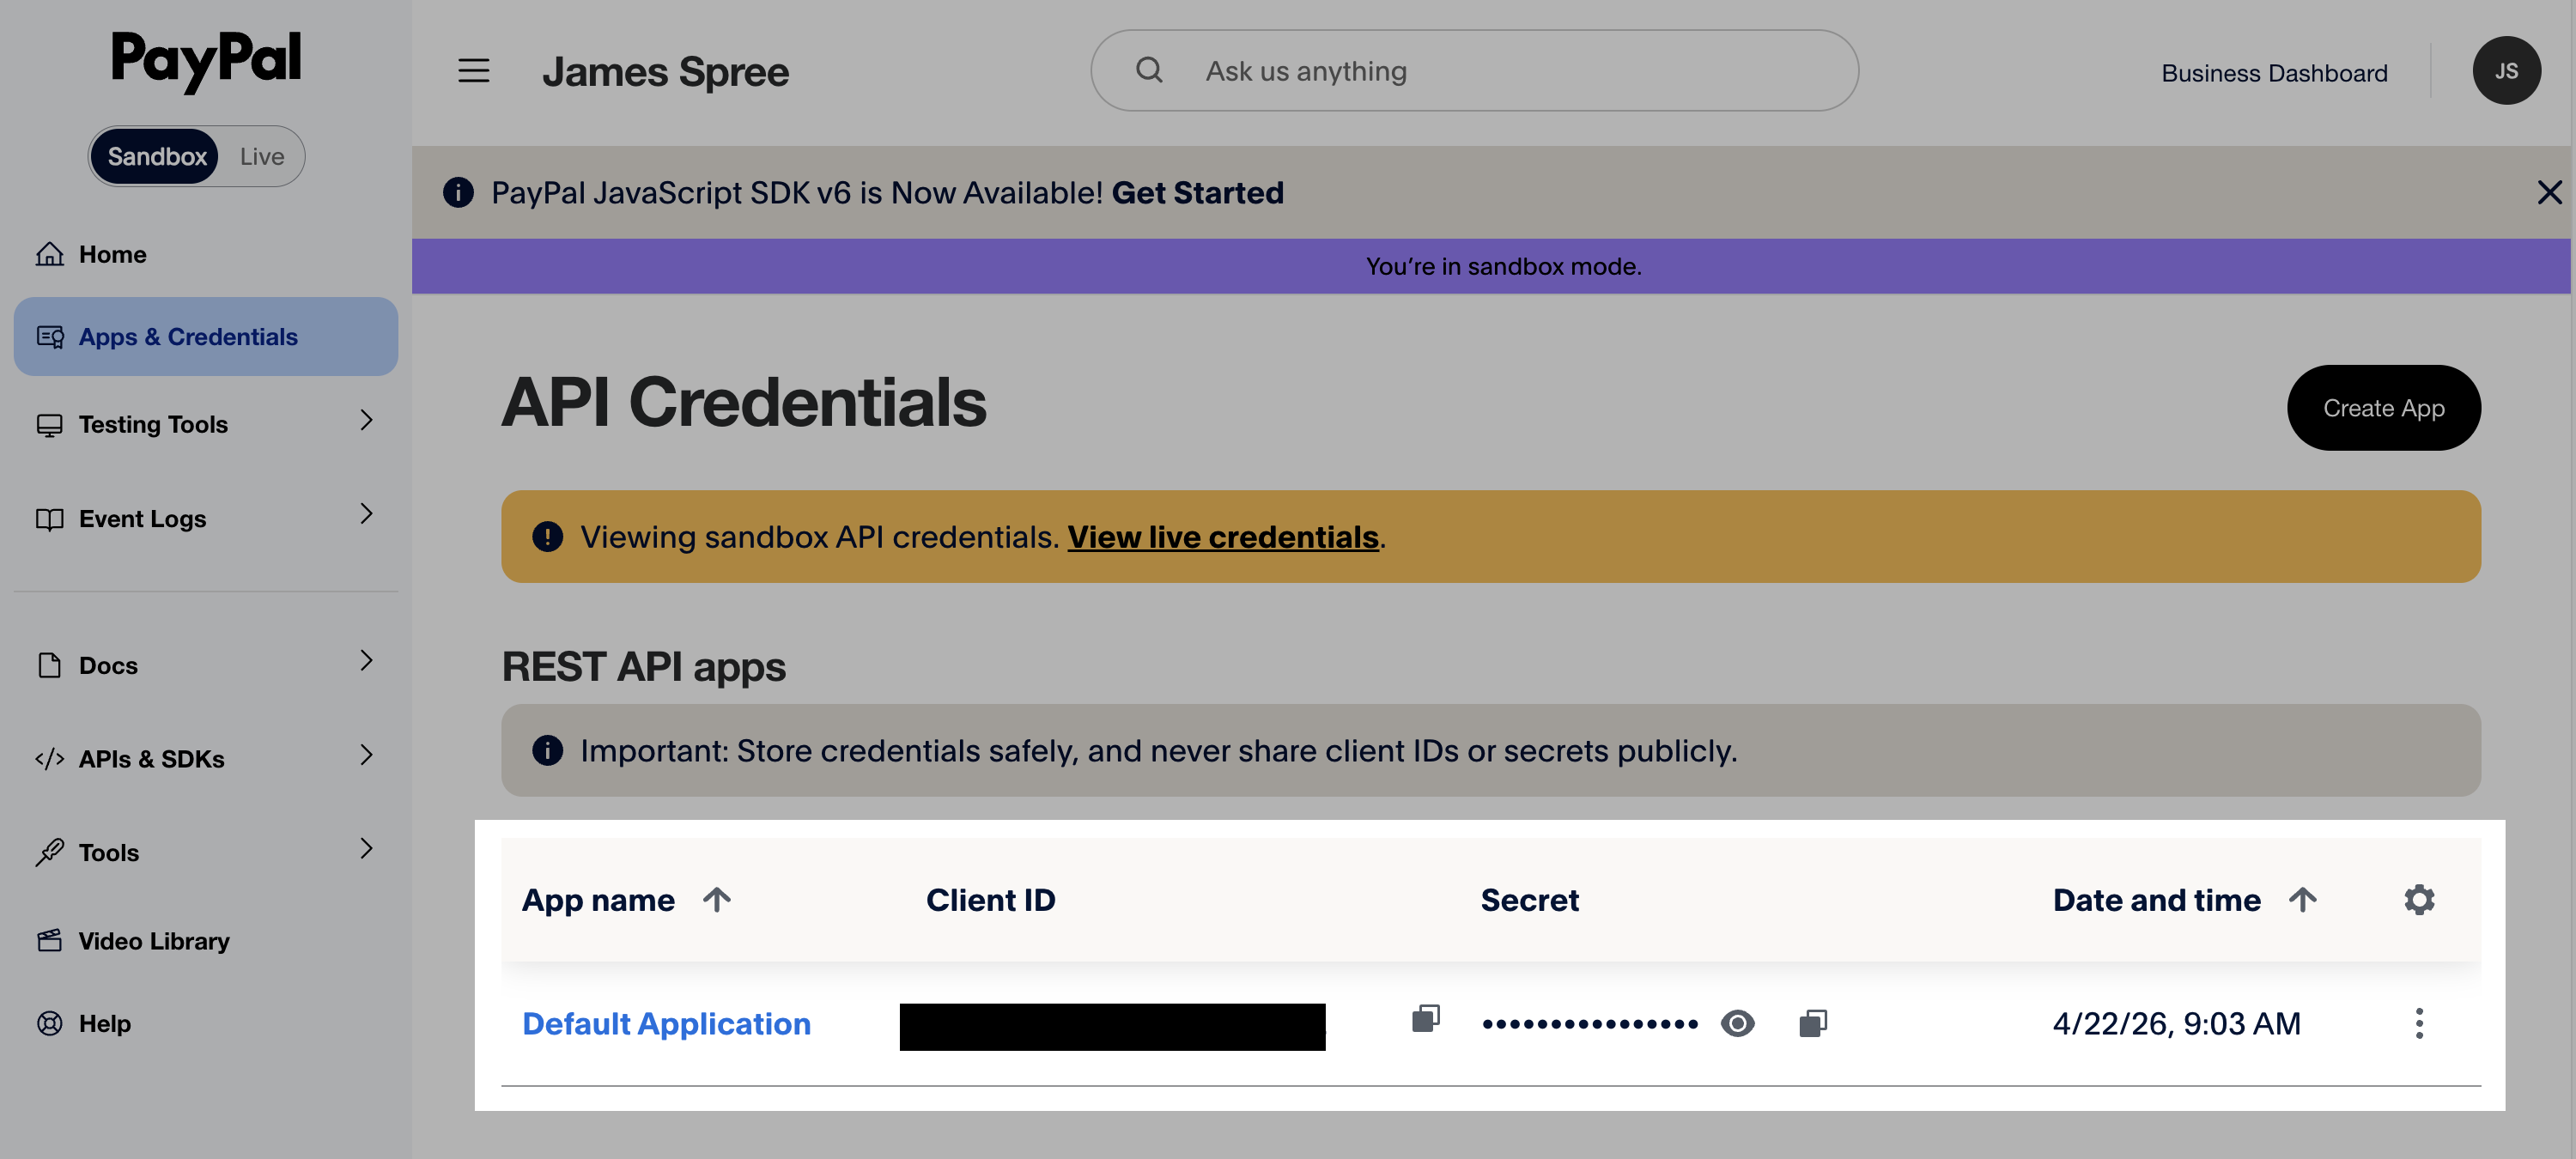 PayPal has three separate systems that are easy to mix up: **paypal.com** (your live merchant account), **sandbox.paypal.com** (where test users log in to simulate payments or review transactions), and **developer.paypal.com** (the dashboard for API credentials). Developer dashboard access requires a live paypal.com Business account.
### Webhook ID
The Webhook ID lets Spree verify that incoming notifications from PayPal (e.g. payment completed, refund issued) are genuinely from PayPal. This is what allows Spree to reliably finalize orders — including in cases where a shopper closes their browser mid-checkout.
To generate a Webhook ID:
1. From the **Apps & Credentials** page, click into your application.
2. Scroll down to the **Webhooks** section (Live or Sandbox depending on the environment).
3. Click **Add Webhook**.
4. Enter your Spree webhook URL: `https://your-store-url.com/api/v3/webhooks/payments/[payment_method_id]`
* The `payment_method_id` is the prefixed ID visible in the URL when editing your PayPal payment method in Spree (e.g. `/payment_methods/pm_1example23/edit`).
5. Select the event types to subscribe to. At minimum:
* Checkout order approved
* Checkout order completed
* Payment capture completed
* Payment capture refunded
* Payment capture denied
6. Click **Save**. PayPal then displays the **Webhook ID**.
7. Copy the Webhook ID and paste it into the **Webhook ID** field in Spree.
Your Spree store must be publicly reachable from the internet for PayPal to deliver webhooks. Webhooks will silently fail against a localhost or VPN-only URL unless you use a tunnel (e.g. ngrok).
## Additional Settings
PayPal has three separate systems that are easy to mix up: **paypal.com** (your live merchant account), **sandbox.paypal.com** (where test users log in to simulate payments or review transactions), and **developer.paypal.com** (the dashboard for API credentials). Developer dashboard access requires a live paypal.com Business account.
### Webhook ID
The Webhook ID lets Spree verify that incoming notifications from PayPal (e.g. payment completed, refund issued) are genuinely from PayPal. This is what allows Spree to reliably finalize orders — including in cases where a shopper closes their browser mid-checkout.
To generate a Webhook ID:
1. From the **Apps & Credentials** page, click into your application.
2. Scroll down to the **Webhooks** section (Live or Sandbox depending on the environment).
3. Click **Add Webhook**.
4. Enter your Spree webhook URL: `https://your-store-url.com/api/v3/webhooks/payments/[payment_method_id]`
* The `payment_method_id` is the prefixed ID visible in the URL when editing your PayPal payment method in Spree (e.g. `/payment_methods/pm_1example23/edit`).
5. Select the event types to subscribe to. At minimum:
* Checkout order approved
* Checkout order completed
* Payment capture completed
* Payment capture refunded
* Payment capture denied
6. Click **Save**. PayPal then displays the **Webhook ID**.
7. Copy the Webhook ID and paste it into the **Webhook ID** field in Spree.
Your Spree store must be publicly reachable from the internet for PayPal to deliver webhooks. Webhooks will silently fail against a localhost or VPN-only URL unless you use a tunnel (e.g. ngrok).
## Additional Settings
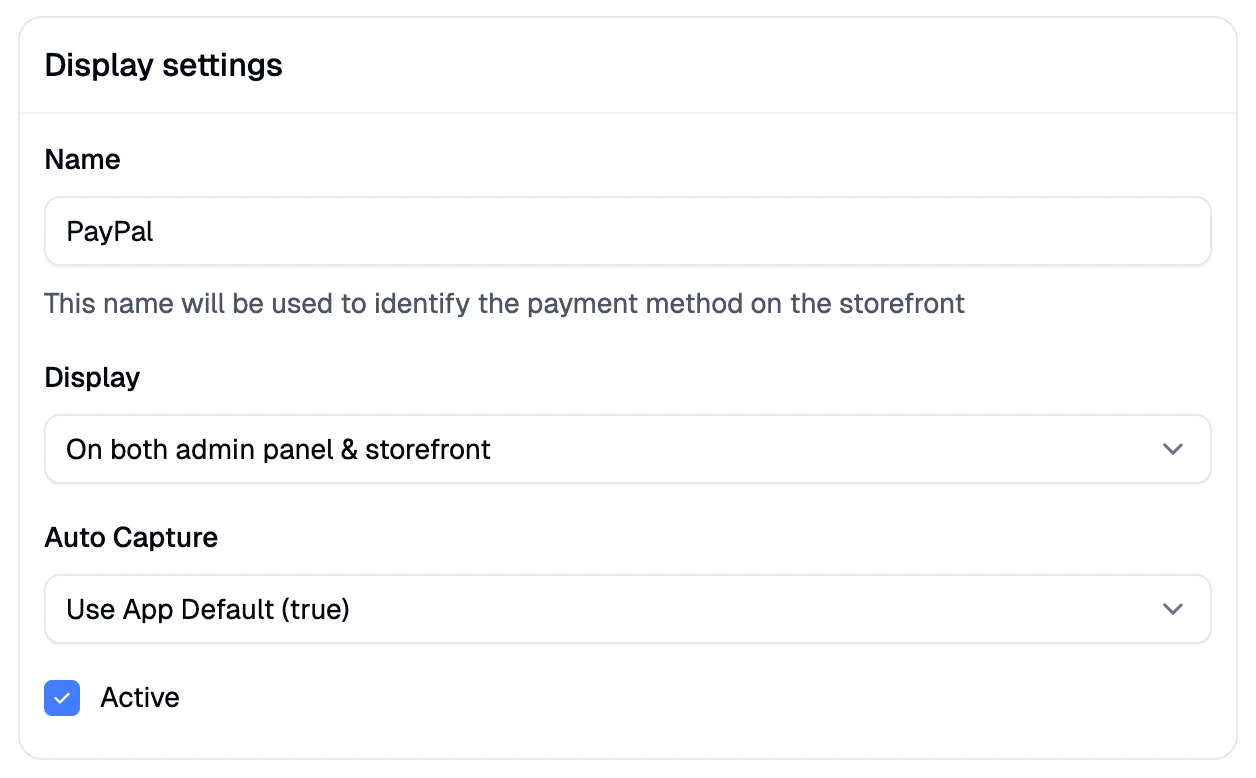 You can optionally configure the following settings for your PayPal payment method:
* **Name**: Customize the display name shown for this payment method on the storefront.
* **Display**: Choose where PayPal should be available:
* Storefront only
* Admin panel only
* Both (recommended)
* **Auto Capture**: Decide whether payments should be automatically captured at the time of authorization (recommended), or manually captured later.
* **Active Status**: Enable or disable the payment method. Inactive methods are hidden from checkout but not removed.
## Storefront Configuration
For the PayPal SDK to initialize on the Next.js storefront, set the following environment variable in your storefront's hosting platform or `.env` file:
* **`NEXT_PUBLIC_PAYPAL_CLIENT_ID`** — Your PayPal **Client ID** (live or sandbox, depending on the environment). This is the same value you pasted into the Spree admin.
The `NEXT_PUBLIC_` prefix makes the variable available to client-side code so the PayPal JS SDK can initialize in the browser. The Client ID is safe to expose publicly.
If this env var isn't set, the PayPal payment option won't render on the storefront even if PayPal is configured in the Spree admin.
## Test Mode
If you'd like to test your checkout flow without processing real payments, PayPal's sandbox is a safe and effective way to simulate transactions. To enable it:
1. Tick the **Test Mode** checkbox in the PayPal payment method settings in Spree.
2. Paste your **sandbox** Client ID, Client Secret, and Webhook ID into the fields (these are separate from your live credentials). See [Testing PayPal payments](#testing-paypal-payments) below for a full walkthrough of the sandbox setup, which can be unintuitive the first time through.
## Testing PayPal payments
PayPal's sandbox environment can be confusing because it spans three separate sites and requires both a live account (to access the developer dashboard) and test accounts (to simulate shoppers). This section walks through the full setup.
### 1. Create a live PayPal Business account
Sign up for a **PayPal Business** account at [paypal.com](https://paypal.com). This is your real account — you won't process any real transactions through it, but it's required in order to access the developer dashboard.
You can skip the bank account linking step during signup — it isn't required for sandbox testing.
### 2. Access the PayPal Developer Dashboard
Navigate to [developer.paypal.com](https://developer.paypal.com/dashboard/) and log in using your live PayPal Business account credentials.
If you hit a login loop or "incorrect credentials" error, log into [paypal.com](https://paypal.com) first, verify your email address, then navigate to the developer dashboard in the same browser session.
### 3. Get sandbox API credentials
In the developer dashboard, go to **Apps & Credentials** and make sure you're on the **Sandbox** tab (not Live).
Click into the **Default Application** — PayPal auto-creates this when your developer account is provisioned.
Copy the **Client ID** and **Secret** and paste them into the PayPal payment method settings in Spree, making sure **Test Mode** is ticked.
### 4. Create a sandbox webhook (optional)
In the same Default Application, scroll to the **Sandbox webhooks** section and follow the steps outlined in [Webhook ID](#webhook-id) above to generate a Webhook ID. Paste it into the **Webhook ID** field in Spree.
### 5. Use sandbox test accounts to check out
To simulate a shopper paying with PayPal, add items to your cart and proceed through checkout on your Spree store. When redirected to **sandbox.paypal.com**, log in using the test **Personal** account credentials found in the developer dashboard under **Testing Tools → Sandbox Accounts**.
These test accounts are pre-funded with fake money, so you can complete checkout without any real funds being involved.
### 6. View sandbox transactions from the merchant side
To see transactions as the merchant, log in to [sandbox.paypal.com](https://sandbox.paypal.com) using the **Business** test account credentials (also found under **Testing Tools → Sandbox Accounts**). You'll see incoming payments, refunds, and any webhooks that have fired.
### Common Issues
* **Wrong currency**: make sure the sandbox buyer account's currency matches what your Spree store is charging in, or checkout may fail or behave unexpectedly.
* **Account flagged by PayPal's anti-fraud system**: new accounts sometimes trigger captcha blocks or temporary login restrictions. Wait 30–60 minutes and try from a different network (e.g. a phone hotspot) if you're persistently blocked.
* **Webhooks not delivering**: double-check that your Spree URL is publicly reachable. PayPal will silently fail to deliver to localhost or VPN-only addresses.
## Features
Spree's native PayPal integration supports:
* PayPal Checkout — branded PayPal buttons at checkout
* PayPal Pay Later (Buy Now, Pay Later) where available
* Venmo (US merchants only)
* Guest checkout — customers can pay with a credit or debit card without creating a PayPal account
* Webhook-driven order completion — orders are finalized reliably even if shoppers close their browser mid-checkout
* Sandbox environment for testing prior to going live
You can optionally configure the following settings for your PayPal payment method:
* **Name**: Customize the display name shown for this payment method on the storefront.
* **Display**: Choose where PayPal should be available:
* Storefront only
* Admin panel only
* Both (recommended)
* **Auto Capture**: Decide whether payments should be automatically captured at the time of authorization (recommended), or manually captured later.
* **Active Status**: Enable or disable the payment method. Inactive methods are hidden from checkout but not removed.
## Storefront Configuration
For the PayPal SDK to initialize on the Next.js storefront, set the following environment variable in your storefront's hosting platform or `.env` file:
* **`NEXT_PUBLIC_PAYPAL_CLIENT_ID`** — Your PayPal **Client ID** (live or sandbox, depending on the environment). This is the same value you pasted into the Spree admin.
The `NEXT_PUBLIC_` prefix makes the variable available to client-side code so the PayPal JS SDK can initialize in the browser. The Client ID is safe to expose publicly.
If this env var isn't set, the PayPal payment option won't render on the storefront even if PayPal is configured in the Spree admin.
## Test Mode
If you'd like to test your checkout flow without processing real payments, PayPal's sandbox is a safe and effective way to simulate transactions. To enable it:
1. Tick the **Test Mode** checkbox in the PayPal payment method settings in Spree.
2. Paste your **sandbox** Client ID, Client Secret, and Webhook ID into the fields (these are separate from your live credentials). See [Testing PayPal payments](#testing-paypal-payments) below for a full walkthrough of the sandbox setup, which can be unintuitive the first time through.
## Testing PayPal payments
PayPal's sandbox environment can be confusing because it spans three separate sites and requires both a live account (to access the developer dashboard) and test accounts (to simulate shoppers). This section walks through the full setup.
### 1. Create a live PayPal Business account
Sign up for a **PayPal Business** account at [paypal.com](https://paypal.com). This is your real account — you won't process any real transactions through it, but it's required in order to access the developer dashboard.
You can skip the bank account linking step during signup — it isn't required for sandbox testing.
### 2. Access the PayPal Developer Dashboard
Navigate to [developer.paypal.com](https://developer.paypal.com/dashboard/) and log in using your live PayPal Business account credentials.
If you hit a login loop or "incorrect credentials" error, log into [paypal.com](https://paypal.com) first, verify your email address, then navigate to the developer dashboard in the same browser session.
### 3. Get sandbox API credentials
In the developer dashboard, go to **Apps & Credentials** and make sure you're on the **Sandbox** tab (not Live).
Click into the **Default Application** — PayPal auto-creates this when your developer account is provisioned.
Copy the **Client ID** and **Secret** and paste them into the PayPal payment method settings in Spree, making sure **Test Mode** is ticked.
### 4. Create a sandbox webhook (optional)
In the same Default Application, scroll to the **Sandbox webhooks** section and follow the steps outlined in [Webhook ID](#webhook-id) above to generate a Webhook ID. Paste it into the **Webhook ID** field in Spree.
### 5. Use sandbox test accounts to check out
To simulate a shopper paying with PayPal, add items to your cart and proceed through checkout on your Spree store. When redirected to **sandbox.paypal.com**, log in using the test **Personal** account credentials found in the developer dashboard under **Testing Tools → Sandbox Accounts**.
These test accounts are pre-funded with fake money, so you can complete checkout without any real funds being involved.
### 6. View sandbox transactions from the merchant side
To see transactions as the merchant, log in to [sandbox.paypal.com](https://sandbox.paypal.com) using the **Business** test account credentials (also found under **Testing Tools → Sandbox Accounts**). You'll see incoming payments, refunds, and any webhooks that have fired.
### Common Issues
* **Wrong currency**: make sure the sandbox buyer account's currency matches what your Spree store is charging in, or checkout may fail or behave unexpectedly.
* **Account flagged by PayPal's anti-fraud system**: new accounts sometimes trigger captcha blocks or temporary login restrictions. Wait 30–60 minutes and try from a different network (e.g. a phone hotspot) if you're persistently blocked.
* **Webhooks not delivering**: double-check that your Spree URL is publicly reachable. PayPal will silently fail to deliver to localhost or VPN-only addresses.
## Features
Spree's native PayPal integration supports:
* PayPal Checkout — branded PayPal buttons at checkout
* PayPal Pay Later (Buy Now, Pay Later) where available
* Venmo (US merchants only)
* Guest checkout — customers can pay with a credit or debit card without creating a PayPal account
* Webhook-driven order completion — orders are finalized reliably even if shoppers close their browser mid-checkout
* Sandbox environment for testing prior to going live